 Did we miss anything in this section? Is there something we didn't discover?
Let us know!
Area Note
Did we miss anything in this section? Is there something we didn't discover?
Let us know!
Area Note
When you leave this area for the first time, you'll once again witness a cutscene where an elf will seem to be following you and watching you. If your destination is forwards rather than backwards, then bandits will accost you and demand payment. If you talk your way past them, then you'll earn 150 xp. If you fight them, then you'll earn roughly the same amount of xp. In a chest near the bandits, you'll find
Greater Gloves of Concentration.
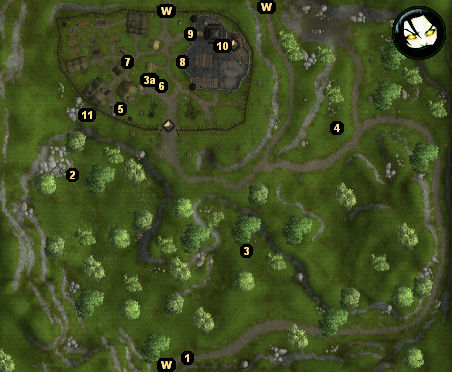
Walkthrough
1 - Starting Point
2 - Dire Wolf / Corpse
At this spot you'll encounter a dire wolf standing over a corpse. The corpse probably won't have much on it.
3 - Galen
You'll run into Galen (#3) and his bodyguards again -- only this time, the guards will be trying to rob him! You can either step in and save Galen, or else you can kill everybody. If you rescue Galen, then you'll earn 50 xp, and Galen will reward you with at most 150 gp. If you kill everybody, then you'll find about 1600 gp plus the rapier
Namarra (Neversleep) +1 on Galen's corpse.
After this encounter, if Galen is still alive, then he'll run up to Fort Locke and become a shopkeeper (#3a). At this new spot he'll sell items like
Boots of Hardiness +1,
Bracers of Archery, and a
Lesser Magic Bag, but you won't find anything too exciting on him. Also, Galen will talk about leaving the fort, but he never will, and so this is the last place you'll see him. In other words, it doesn't really matter if you kill him or not.
4 - Neeshka / Soldiers
When you approach this area, you'll witness a quartet of Fort Locke soldiers preparing to kill a tiefling so that they can claim a bandit bounty on her. When they see you and Khelgar, the soldiers will decide that three bounties are better than one, and they'll attack.
After the battle, the tiefling will introduce herself as Neeshka, and she'll join your party. Neeshka is a rogue, and you can find some equipment for her in the nearby chest.
5 - Jacoby
Jacoby is Fort Locke's weaponsmith. He'll sell you a variety of regular and +1 weapons, plus a few named weapons like
Sword Saint Legacy +1 and
Writ of the Vizier.
6 - Marshal Cormick
Even though Marshal Cormick is a part of the Neverwinter City Watch, he'll be able to give you a lot of background information about Fort Locke, including that the commander of the fort has gone missing, and that the roads surrounding the fort are much more dangerous as a result.
7 - Liza
Liza is the leader of the refugees. When you talk to her, she'll tell you that several people, including her husband, have been kidnapped by the bandits, and she'll ask you to rescue them.
You'll find the bandits at the
Bandit Camp, which Neeshka will mark on the world map after you've talked to Liza or Tor Millows (#9). If you manage to rescue all of the refugees there, then you'll receive 250 xp and 250 gp. If some of the refugees die during the escape, then you'll only receive 250 gp.
8 - Lieutenant Vallis Anton / Commander Tann
When you first arrive at Fort Locke, you'll find Lieutenant Vallis Anton here. He'll tell you that many of the fort's patrols have disappeared, and that Commander Tann is missing as well. You'll have to convince Vallis to let you search for Tann, but since Vallis needs proof of Tann's death before he can officially take over the fort, he'll eventually give you permission, and he'll mark the
Graveyard on the world map.
After rescuing Tann, when you return to the fort, Vallis will attempt to relieve Tann of his command. The easiest way to handle the situation is to attack Vallis. Vallis is a tough fighter, but the two soldiers with him are not, and so it shouldn't take very long to strike them down. For defeating the trio, you'll earn about 350 xp, and Vallis will drop a
Chainmail +1 when he dies.
You can also talk your way through the encounter. For this case, you'll need about 15 ranks in diplomacy or intimidate, or you'll need to have Khelgar in your party when you attempt the intimidate option (this will cause him to step in and intimidate the soldiers for you). Then the soldiers with Vallis will switch their allegiance to Tann, they'll arrest Vallis and lead him away, and you'll earn 250 xp. Later, you'll find Vallis hanging from the gallows in Fort Locke.
After the encounter, Commander Tann will run back to the fort to take charge, and you'll find him where Vallis had been standing. If you talk to Marshal Cormick in the fort (#6), he'll reward you with 200 gp for getting the patrols going again, and he'll promise you a better reward when you eventually reach Neverwinter.
9 - Tor Millows
Tor Millows is a priest of Ilmater and also a shopkeeper. He'll tell you that bandits stole a holy symbol from him when he was making his way to Fort Locke from
Highcliff, and he'll ask you to get the item back for him.
You'll find
Tor's Holy Symbol at the
Bandit Camp, which Neeshka will mark on the world map after you've talked to Tor or the refugee leader Liza (#7). When you bring the holy symbol back to Tor, you'll receive 200 xp.
10 - Craftmaster
The craftmaster will give you a short tutorial about how crafting works in the game, and you'll find some crafting supplies, recipes, and molds in the crates next to him.
11 - Corpse
You probably won't find anything interesting on the corpse. It's just an oddity that you'll find a corpse here at all.
Exits:
- World exit.


