 Did we miss anything in this section? Is there something we didn't discover?
Let us know!
Walkthrough
1 - Starting Point
2 - Deserted Camp
Did we miss anything in this section? Is there something we didn't discover?
Let us know!
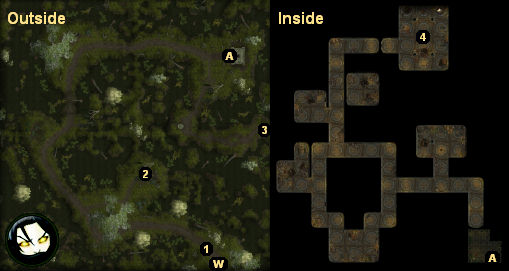
Walkthrough
1 - Starting Point
2 - Deserted Camp
You'll find a chest that you can loot here. Inside, you'll find some
Gloves of Concentration and a pair of
torches. If you didn't find the
torches in
West Harbor, then these might prove useful as you make your way through the swamp in the dark.
3 - Locked Crypt
You won't be able to enter this crypt until much later in the game.
4 - Shaman's Room
When you enter the room, the shaman will say, "A warm-blood -- here!? Your very presence offends the stone god!" Despite that inauspicious start, it's possible to talk to the shaman and avoid a battle. One such dialogue path goes like:
- "When this land was once ours..."
- "It's needed to save my tribe..."
- "Let me save my tribe..."
You can also lie to the shaman, but doing that will make you more chaotic.
If you handle the lizardlings diplomatically, then they'll turn neutral and leave the room, and you'll gain 100 xp. If you fight them, then you'll probably gain more xp than that, and you'll also find a
Dagger +1 on the corpse of the shaman.
After the confrontation, if you loot the chest in the northeastern corner of the room, you'll find a
Golden Chalice of Lathander and a
Silver Shard: Health Bonus inside. Picking up the shard will start a conversation with Bevil. If you've already looted everything you wanted from the ruins, then go ahead and agree to leave, and you'll be teleported back to
West Harbor. If you still need to pick up some things, then break off the conversation and talk to Bevil again when you're ready to go.
"We were risking life and limb -- for
that? None of this makes any sense."
Exits:
- Entrance to the ruins. When you first enter the ruins, you'll witness a cutscene where an elf will seem to be spying on you. You'll learn more about the elf later.
- World exit.


