 Did we miss anything on this map? Is there something we didn't discover? Let us know!
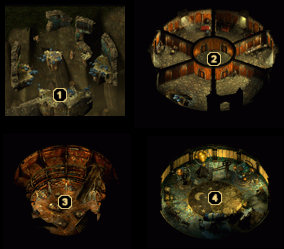
1 - First Floor
Did we miss anything on this map? Is there something we didn't discover? Let us know!
1 - First Floor
When you first arrive at the base of Labelas Tower, you'll witness Larrel laughing about his success in destroying the first floor to keep anyone from ascending it. Parts of the floor are still suspended in the air by magic, but you won't be able to reach the rest of the tower from here. Instead, you'll have to use the bridge that connects
Sheverash Tower with
Labelas Tower.
2 - Second Floor
Having used the bridge from the third floor of
Sheverash Tower, your party will arrive on the floor just above Larrel's former destruction. The entry room is empty, but the center room contains two Shadowed Elven Swordsmen, a Shadowed Elven Cleric, and a Shadowed Elven Wizard to contend with. When all four lie dead, explore the rooms in a clockwise fashion starting with the room you just exited.
The second room would have been the entry room if Larrel hadn't destroyed the first floor, but it now just contains a gaping hole and is otherwise empty. The third room is also empty, save for a table at the back that contains scrolls of Greater Malison and Improved Invisibility, as well as a
Potion of Genius. The fourth room is inhabited by a single Shadowed Elven Wizard and contains a table where you'll uncover some gold, a
Potion of Clarity, the Diary of Evayne, and a random magic item (such as a
Dagger +2 or the
Robe of the Hand). The fifth room is empty (aside from a Shadowed Elven Cleric and Shadowed Elven Wizard) and the sixth room has a long table with a scroll of Protection From Normal Missiles, a
Potion of Invisibility, and a
Potion of Heroism lying on top of it.
When you're satisfied that you've experienced everything this floor has to offer, return to the entry room and use the staircase to reach the tower's third floor.
3 - Third Floor
This is the Severed Hand library, where you'll have the pleasure of meeting the spirit of Custhantos, the library's caretaker. Custhantos has thirteen books that he recommends to your party, though the only one that you should really take an interest in is "Mythal Theory." This particular book can be handed over to Orrick the Grey in
Kuldahar for some experience and an item reward.
Once the book is in your possession, there's nothing more you need to do here. Proceed to the Severed Hand's final location - the fourth floor of Labelas Tower.
4 - Fourth Floor
At long last, you've finally found the "true" form of Larrel. Unfortunately, the cursed Baelnorn can only mumble "... free... my... people... ...Astrolabe... whirls... twirls..." regardless of what you say to him. Whatever you do,
do not kill him. Instead, end your conversation and instead speak with Gelarith over by the astrolabe.
Gelarith is attempting to fix the broken astrolabe and is in need of the four pieces of broken machinery that you've been collecting throughout the Severed Hand. If you don't have them all here's a quick list of where to find them in the walkthrough -
Severed Hand 1 (area #9),
Solonar Tower (area #3),
Corellon Tower (area #2), and
Sheverash Tower (area #1). Each time you hand over one of the pieces to Gelarith, your party will either receive 24,000 or 35,000 experience points. When all four pieces have been turned in, the astrolabe comes to life and Larrel is able to carry on a normal conversation once again.
Larrel knows much about the Heartstone Gem and is happy to use it in order to help you determine who or what is behind the evil troubling the North. When you turn over the Heartstone Gem, you'll receive 54,000 experience points and a cinematic will launch showing Larrel using the scrying device to see the statue of a dwarf and elf sitting side by side on a dual throne. When the cinematic ends, Larrel tells you that the statue represents Dorn's Deep, the home of the dwarves (or as Larrel puts it, the "den of the betrayers"). He has the power to teleport you directly to
Upper Dorn's Deep if you wish, though you might want to have him teleport you to
Kuldahar instead to rest up, get resupplied, and bring the "Mythal Theory" book to Orrick.
Later in the game, after you've fully explored the
Hall of Heroes, you can return to Larrel and show him Evayne's Journal. When he realizes that his daughter was not killed by the dwarves but instead died fighting at their side, he comes to the realization that his anger has been misdirected all these years. This will earn you 56,000 experience points.


