 Did we miss anything on this map? Is there something we didn't discover? Let us know!
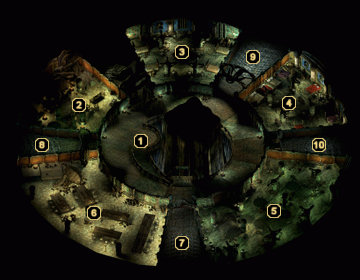
1 - Arrival
Did we miss anything on this map? Is there something we didn't discover? Let us know!
1 - Arrival
This is where you'll first arrive on the fourth floor of the tower. You won't be fighting anything on this entire floor, so don't worry about making any combat preparations.
2 - Lehland
Lehland is one of many long-dead elves on this floor, though he doesn't seem to realize it. He still thinks that all of the elves here are alive and well and scoffs at you when you refer to the place as the "Severed Hand" as its rightful name is "Hand of the Seldarine."
Lehland will provide you with quite a bit of information about the main tower and the five towers that protrode off of it (Corellon Tower, Sheverash Tower, Sehanine Tower, Labelas Tower, and Solonor Tower). When you're done listening to him, you have the option to buy and sell goods with him. He has a nice stock of magical missiles (
Acid Arrows,
Bullets of Fire +2, and
Blinding Darts +2, to name a few) available, as well as some
Elven Healing Wine and other rarities. I'm not sure where he gets the gold to buy your excess equipment, but it's a convenient service nonetheless.
3 - Loot!
Check the table in this room to loot a scroll of Emotion: Hope, some
Berduskan Black Brew, a
Potion of Strength, and a
Potion of Clarity.
4 - Sehriya
A little girl named Sehriya stands near the beds in this room. She'll ask if you've seen her mother, who apparently ran some sort of an inn here at the Hand years ago. Of course, her mother is dead, but the little girl refuses to believe it. She'll let you rest here if you want, so take advantage of the offer if your party has hit points or memorized spells to recover.
Before leaving, check the table near the door to find some gold, a scroll of Cone of Cold, a
Potion of Cold Resistance, and a
Potion of Healing.
5 - Elven Apparitions
A large number of ghostly elves can be seen sitting at the tables in this room, but as soon as you try to speak to one of them they all disappear. Odd.
6 - Telanis Songbender
Telanis is the Hand's former minstrel. If you speak with him, you can ask him to tell you a tale about Larrel or a tale about the dwarves and elves. When you've heard enough out of him, search the urns along the north wall to find a
Potion of Clarity and a
Potion of Healing.
7 - Exit
This stairway leads to the first floor of
Solonar Tower.
8 - Exit
This stairway leads to the first floor of
Labelas Tower.
9 - Exit
This stairway leads to the first floor of
Corellon Tower.
10 - Exit
This stairway leads to the first floor of
Sheverash Tower.


