 Did we miss anything on this map? Is there something we didn't discover? Let us know!
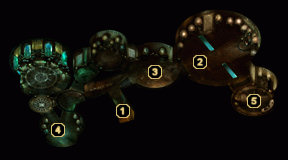
1 - Arrival
Did we miss anything on this map? Is there something we didn't discover? Let us know!
1 - Arrival
You're obviously unwanted here in Malavon's subterranean laboratory, as two Umber Hulks will immediately try to stop you from entering.
2 - Malavon Battle
First of all, let me just say that Malavon is tough. Very tough. Do not participate in any of these battles without buffing your characters with Haste and other beneficial spells.
When you first encounter Malavon in this chamber, he'll threaten to kill all of his Svirfneblin slaves. Unfortunately, there's no way you can avoid getting them all killed, so don't bother with trying to convince him otherwise. And, whatever you do, don't drop your weapons.
When the battle begins, Malavon will conjure up two Cloudkills to kill all of the slaves and to make things more difficult for your party. Four Umber Hulks will rush in from behind him and the two Iron Golems flanking him will lumber in for the kill. I recommend taking Malavon down first and then focusing on the Umber Hulks so you don't have to worry about their Confusion ability anymore. The Iron Golems are extremely powerful and are only susceptible to high-end weapons, so watch the combat dialogue to make sure nobody is swinging with an ineffective weapon. If you're not already using it, you might want to crack out
Conlan's Hammer (assuming you picked it up back in
Kuldahar).
After you've finished Malavon off once and for all (see the other battles below), return to this area to loot a
Robe of the Evil Archmagi from the simulacrum's remains and to search the throne for a random magic item (such as a
Potion of Dissipation or
Ring of Reckless Action).
3 - Malavon Returns
Once Malavon and his entourage have been slain at area #2, the "real" Malavon will appear here and congratulate you on defeating his simulacrum. He usually drops a Malavon's Corrosive Fog on top of you and follows it up with a Web, but it really depends on how quickly you're able to close in on him. When you get within melee range, he casts Dimension Door and reappears at area #4.
4 - Malavon Finale
This is the first of several areas that Malavon will Dimension Door to for the remainder of the battle, during which he'll be casting Cloudkill, Web, Finger of Death, and various summoning spells to wear you down. Continue to chase him around the laboratory and you'll eventually inflict enough damage to put a stop to his madness.
When his rotting carcass finally hits the floor, you'll be able to loot it for his badge, a scroll of Malavon's Rage, a
Robe of the Watcher, and a dagger called
Fire Kiss. Picking up the badge immediately awards you party with 337,500 experience points.
5 - Study
Malavon's study is full of goodies. The five containers within can be ransacked for sixteen potions (including the
Oil of Null Effect that can be used on Ginafae in
Old Dorn's Palace 1), a cursed necklace called the
Amulet of Dark Flesh, and scrolls of Flesh to Stone, Tenser's Transformation, Monster Summoning VII, Finger of Death, Mass Invisibility, Death Fog, Death Spell, Disintegrate, Shades, Power Word: Kill, and Incendiary Cloud. You'll also discover some seeds, which can be brought to Valestis on
the fourth floor of Corellon Tower in the Severed Hand for an experience point reward.


