 Did we miss anything on this map? Is there something we didn't discover? Let us know!
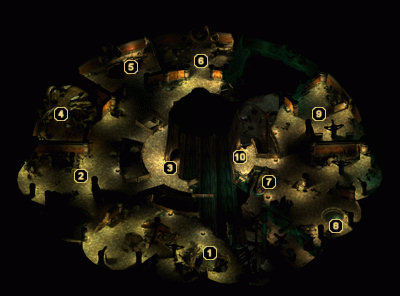
1 - First Arrival
Did we miss anything on this map? Is there something we didn't discover? Let us know!
1 - First Arrival
After ascending the southern steps on the first floor, you'll arrive at this location. Once you've slain the Shadowed Orcs and Goblins inhabiting the room, you can grab the two potions and scroll of Emotion: Courage from the table along the west wall.
2 - Shadowed Goblin Trainer
A Shadowed Goblin Trainer and a large group of Shadowed Worgs await your party in this section of the tower. When the trainer finally falls, he'll drop a
Jester's Bag of Holding.
3 - Exit
These stairs will bring you to
Severed Hand 3.
4 - Exit
This ramp will also bring you to
Severed Hand 3. You'll want to ascend this ramp before using the stairs at area #3, as you can clear out a bunch of annoying archers that will be much more of a nuisance if you ascend the stairs first.
5 - Exit
The ramp here will bring you down to
Severed Hand 1.
6 - Ambush
A small army of Shadowed Orcs and Goblins materializes when your party enters this room. Make a point of wiping out the two shaman first, then move on to the archers before cleaning up the rest. Afterwards, search the table to find some gold, two potions, and a scroll of Animate Dead, then check the overturned chairs to find a random magic weapon (such as a
Morning Star of Lesser Phasing).
7 - Second Arrival
When you activate the lift on
the third floor of the tower, you'll wind up here. Several Armored Skeletons and Shattered Souls will immediately attack your party, so be prepared.
8 - Loot!
Sift through this debris to uncover a random magic item (such as
Some God's Lesser Promise).
9 - Optional Battle
A number of Armored Skeletons and Shattered Souls await your party in this room, though you don't technically have to fight them since there's nothing to be gained from the room after the battle is over. Avoid the room entirely unless you're looking for experience.
10 - Exit
These stairs lead down to the previously inaccessible eastern half of
Severed Hand 1.


