 Did we miss anything on this map? Is there something we didn't discover? Let us know!
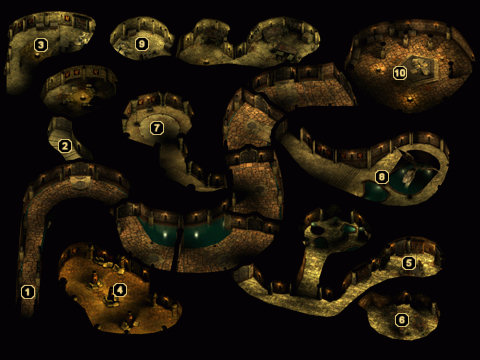
1 - Arrival
Did we miss anything on this map? Is there something we didn't discover? Let us know!
1 - Arrival
An "odd little girl" will greet you at the entrance to this level, spouting about "sidereal translations" or some such nonsense. Regardless of how you respond, she'll simply Dimension Door away. You'll be seeing a lot more of her on this level, and each time she'll have another cryptic message for you. In fact, you'll see her twice more in this very hallway and she'll conjure up some Yuan-ti guards to try and slow your progress.
2 - Trap
A nasty cloud trap will trigger as you pass between these two sets of doors, so tread carefully.
3 - Loot!
After hacking your way through two rooms full of Yuan-ti, you'll stumble upon three large chests and a bookshelf. All three chests are locked and two of them are trapped, so having a thief will save you some frustration. Between all four containers, you'll plunder some gold, four potions, several gems, and a scroll of Non-Detection. There's also the possibility of a random magic item (such as
Sloth or
The Sword of Days), but it doesn't always appear.
4 - High Archer
This room is packed with Yuan-ti, including one called the High Archer. Use whatever tactics you can to draw out a few at a time or you'll find yourself overwhelmed. When all of the snake-like creatures are defeated, check the High Archer's corpse to find some gold, the
Messenger of Sseth bow, and some
Arrows +2.
You can also search the three piles of pillows to uncover some more magical arrows, a nice pile of gold, and eight
Potions of Extra Healing.
5 - Torture Chamber
Battle your way through more Yuan-ti and some Histachii to reach this room, then search the bookshelves to find a scrolls of Dimension Door and Ghost Armor, as well as a
Potion of Genius. A hidden switch to the right of the northernmost bookshelf will reveal a secret passageway to area #6.
6 - The High Torturer
Once you've pressed the hidden switch in room #5, a passageway will open up allowing you to enter this room. The High Torturer will ask if you've come as a student or a patient, though either response won't get you very far. A battle will take place and you'll be forced to spill the torturer's snake blood. After the torturer and his two Yuan-ti Champion allies are bested, search the table to discover some gold, two scrolls, two potions, and a
Throwing Axe +2. The High Torturer also drops a
Ring of Pain Amplification, but there's no sense in even picking up such a cursed item.
7 - Yuan-ti Battle
Wipe out the Yuan-ti Priests and Elites that inhabit this room, then search the stone chair along the far wall to uncover a nonmagical necklace and some
Studded Leather Armor +2.
8 - The High Baptist
This isn't an extraordinarily hard fight, though you will have to deal with a large group of Histaachi in addition to the High Baptist. Unfortunately, there's no loot to be found once the battle is over.
9 - Loot!
Having killed several Yuan-ti to make it to this room, you'll be happy to find two chests and a table ready to be looted. Ransack all three containers for some gold, six potions, the
Baleful Mail, and a random magic item (such as
The Red Knight's Shield).
10 - Yxunomei
At last, you've reached your final destination here in Dragon's Eye. The "odd little girl" materializes once again, though this time she provides you with a conversation you can finally understand. After refusing to hand over the Heartstone Gem, the little girl transforms into the Yuan-ti's deity, Yxunomei. You'll also have to deal with four Yuan-ti Elites and two Yuan-ti Priests, so don't be surprised if you suffer a casualty or two during this battle.
When Yxunomei lies dead, you'll receive a hefty 46,000 experience points and are free to loot the Heartstone Gem from her corpse. There are also seven locked chests in this room. Make your way around the room unloading each of them and you'll find yourself walking away with a few thousand gold, several gems and potions, the
Dead Man's Face helmet, some
Translocation Arrows, and two random missiles (such as
Bolts +1 or
Bolts +2).


