 Did we miss anything on this map? Is there something we didn't discover? Let us know!
1 - Arrival
Did we miss anything on this map? Is there something we didn't discover? Let us know!
1 - Arrival
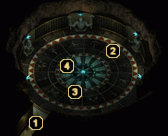
Entering from the dwarven meeting hall in
Upper Dorn's Deep 1, you'll discover that the whole room is a replica of the hall's circular table. Well, almost. If you look at the table in the meeting hall closely, you'll notice that the same symbol is etched on each of its rings, while the replica in the puzzle room has a variety of different symbols.
The key to this puzzle is to step on the symbol that matches the one on the meeting hall's table. If you step on the wrong symbol, your party will be blasted by a lightning bolt. So, for example, the table's outer ring depicts a hammer and anvil, so that's the pressure plate you need to step on first in this puzzle. Continue using the same method until you reach the innermost ring.
2 - First Plate
The pressure plate with the symbol of a hammer and anvil etched on it should be your first step.
3 - Second Plate
The pressure plate with the symbol of two crossed axes etched on it should be your second step.
4 - Third Plate
The pressure plate with the symbol of two interlocking rings etched on it should be your third and final step.
When all three plates have been activated, you'll have to exit back to the meeting hall in
Upper Dorn's Deep 2 and activate the hammer of the statue to the right of the secret door. This will earn you 56,000 experience points and will lower a spiraling staircase in the center of the puzzle room. Descend the stairs to reach
The Great Forge.


