 Did we miss anything on this map? Is there something we didn't discover? Let us know!
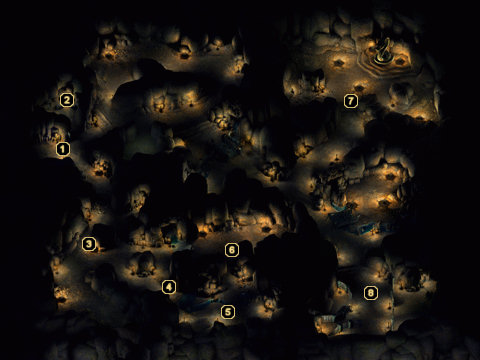
1 - Arrival
Did we miss anything on this map? Is there something we didn't discover? Let us know!
1 - Arrival
Your arrival in Dragon's Eye is greeted by a handful of Lizard Men and a Lizard Man Shaman. Give them what they deserve, then loot their corpses for a small amount of gold and a
Flaming Oil or two.
You're going to be fighting a
lot of Lizard Men in Dragon's Eye, and they'll be dropping
Flaming Oil on a regular basis. This is no accident, as you'll most likely need them to finish off Trolls you'll be encountering deeper in the caverns. Grab them and store them away whenever the opportunity presents itself.
2 - Loot!
These chests contain some gold, gems, a scroll of Protection From Normal Missiles, an
Oil of Speed, fifteen
Antidotes, and some low-level missiles.
3 - Bombardier Beetles
Bombardier Beetles guard this area. They have a wicked area of effect poison attack capable of damaging all nearby characters and afflicting them with Hold Person. Be very careful when fighting these and don't mob them or your whole party will fall fast.
4 - Wraith Spiders
A few Wraith Spiders attack your party in this stretch of hallway. They're capable of diseasing your party members, so be careful.
5 - Sword Spider
The Sword Spider in this area of the cavern is quite deadly. Focus your attention on it quickly as its nasty bite can take out a party member quickly. The Sword Spider apparently killed the elf Erevain, though, as his body still lies on the floor here. Loot it to obtain his journal,
Erevain's Broad Sword, an assortment of
Arrows of Fire and
Acid Arrows, some gold, and a couple of other nonmagical items.
6 - Phase Spiders
A couple of Phase Spiders await your party here. They have a very lethal poison, so keep the
Antidotes you looted at area #2 handy.
7 - Lizard King Lispen
The Lizard Man King and a selection of guards are camped out in this corner. The king will indulge you in a little dialogue, after which a fairly difficult battle will take place. If you have some sort of crowd control at your disposal - web, sleep, etc. - use it. If not, rush the casters and try to get rid of them before focusing any attention on the king.
When the dust settles, you'll be able to loot
Spinesheath from one of the Lizard Man Shaman corpses. Searching the snake statue will also turn up some potions, gems, scrolls, and a random magic item (such as
Boots of the Fox or a
Shield Ring). With Lispen dead, you can now free the prisoners to the south.
8 - Prisoners
You'll discover numerous villagers and merchants being held captive by the Lizard Men in this area of the cavern. After you have killed the Lizard Man King to the north and all of the Lizard Man guards in the vicinity, the prisoners will acknowledge your deeds and you'll earn 30,000 experience points. Proceed to the doorway along the eastern wall to descend to
Dragon's Eye 2.


