 Did we miss anything on this map? Is there something we didn't discover? Let us know!
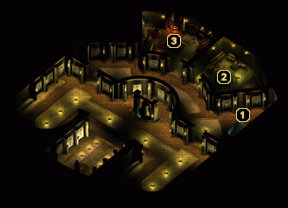
1 - Arrival
Did we miss anything on this map? Is there something we didn't discover? Let us know!
1 - Arrival
You'll arrive from
the first floor of Old Dorn's Palace here. This whole level is crawling with thieves, so move slowly to avoid getting overwhelmed.
2 - Seth
You may have convinced Seth that you are here for a job with the Kraken Society, but his suspicious nature keeps him hidden from your sight as you wander around his room. If you end up attacking Marketh, though, Seth will reveal himself to join the fray.
3 - Marketh
You finally get to put a face to the name. The wife-beating, tongue-gouging, leg-crippling bastard that is Lord Chamberlain Marketh stands by the fireplace in this room. He tells you that he's responsible for making sure that New Dorn's Deep runs efficiently, whatever the cost. After a quick history lesson on how he came to be here, he tries to excuse himself from the room. When you won't let him leave, he offers to give you his badge in exchange for his life.
Now, you can do this one of two ways. You can either kill Marketh and pry the badge from his dead fingers or you can take his badge (and all of his equipment, if your Intelligence is high enough) when he offers it and let him live. The latter method earns you 150,000 experience points for keeping your promise to Ginafae, but it certainly doesn't give you any satisfaction. It also keeps you from acquiring Marketh's equipment, unless you have the Intelligence sufficient enough to ask for it before he leaves.
Personally, I think the experience is worth giving up to make him pay for the pain and suffering he's inflicted over his lifetime. Sure, Ginafae will be saddened by his death, but she'll be better off without him. If a battle does break out, Marketh will call for his guards. Any thieves in the immediate area will come to his aid and Seth will come out of hiding next door to take Marketh's side. You'll also find that a powerful Kraken Society Mage has suddenly materialized by the entry stairs, which will make the fight considerably tougher.
The good news is that once the battle is won, there is plenty of loot to be had. Search Marketh's corpse to turn up some gold, his badge, a cursed
Ring of the Gorgon,
Valiant, and the
Black Dragon Scale armor. Seth's remains provide you with some gold, a
Small Shield +1, some
Studded Leather Armor +2, the
Gauntlets of Elven Might, and
The Salamander's Tongue. Finally, check the Kraken Society Mage's body to uncover some gold, a
Static Dagger +1,
Bracers of Defense AC 6, and a
Robe of Enfusing.
Additionally, there are six containers in Marketh's room that can be plundered regardless of whether or not you let him live. Make your way around the room to pick up seven potions and a random magic item (such as a
Short Sword of Health +4 or a
Mage Dagger +4).


