 Did we miss anything on this map? Is there something we didn't discover? Let us know!
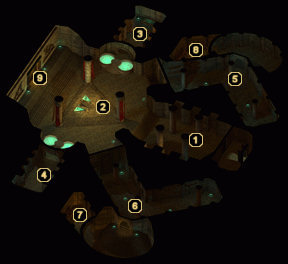
1 - Undead Greeting Party
Did we miss anything on this map? Is there something we didn't discover? Let us know!
1 - Undead Greeting Party
You'll be greeted to the second level of this temple by a small army of Tattered Skeletons, Skeletons, and Skeleton Archers. Do not tread too far to the west during the battle, as there is a large number of undead waiting for you at area #2 and you don't want to have to deal with all of them at once. Clear your way through the initial undead resistance and rest up before continuing to the main room.
2 - Tough Battle
A very large battle will erupt when you enter here. A Skeletal Mage, two of his Imbued Wight friends, and an assortment of Skeletons and Tattered Skeletons await you. Proceed with caution and don't move too far to the west. Take the undead a couple at a time in order to keep your party alive. The Skeletal Mage enjoys casting Stinking Clouds, so keep your party spread out to avoid having a large number of your party members hit by one spell.
Once the room is clear, search the Skeletal Mage's corpse to find some
Bracers of Defense AC 8 and a random gem, then move on to the opened sarcophagus to find a couple of scrolls, some potions, a
Wand of Magic Missiles, and a random magic item (such as a
Mage Dagger +1 or
Reinforced Large Shield +1). There's also a lever behind the easternmost pillar that opens the door at area #8, but you'll need the talisman from area #7 before you can activate it. To gain access to either of this room's side chambers, you'll need the Mausoleum Key from the
Vale of Shadows.
3 - Sarcophagus
Another sarcophagus waits to be plundered here. Disarm the trap in front of it, then grab the potion, scroll,
Morning Star +1, and
Wand of Armory within.
4 - Imbued Wight
You'll face another Imbued Wight within this chamber, but I don't recall finding any treasure worth mentioning.
5 - Undead
This northern hallway sports various undead for you to take care of. Once you've taken them out, search the niches in the walls for various goodies. Then, head to area #9 to grab the key off the table in order to reach area #6.
6 - More Undead
In order to reach this area, you'll need the key off the table in area #8. This hallway is much like area #5, with some undead to fight and niches to search. Continue on to area #7 when the room is clear.
7 - Black Wolf Talisman
There's a pretty difficult fight here involving a couple of Ghasts. Once you're finished hacking the undead to bits, snag the
Black Wolf Talisman within the room. Aside from its magical properties, this trinket will allow you to pull the lever in area #2 and head to the third floor of the temple.
8 - Plain Key
Slay the Zombies within the vicinity of this room and then grab the Plain Key off the table. You'll need it to open the door to area #6.
9 - Exit
Once you're able to pull the lever in area #2, the door here will open, granting you access to
Black Wolf Temple 3.


