 Did we miss anything on this map? Is there something we didn't discover? Let us know!
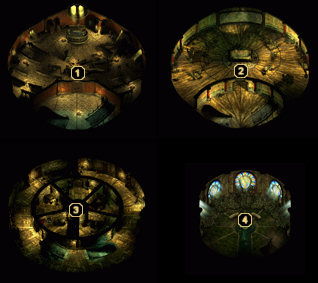
1 - First Floor
Did we miss anything on this map? Is there something we didn't discover? Let us know!
1 - First Floor
When you pass through the main door on this floor, your party will find themselves battling a large number of Shadowed Elven Archers and Swordsmen, as well as one Wizard and an Officer. Wipe the floor with them, then take a closer look at the overturned chairs in the northeast corner to find a random magic bow (including a chance at the
Composite Long Bow of the Hand or a
Long Bow of Marksmanship).
2 - Second Floor
Several Shadowed Elven Archers, Swordsmen, and Officers alongside a Wizard and Cleric will attack your party on this floor. After they're all dead, check the three tables to uncover another Piece of Broken Machinery, some gold, a gem, an
Oil of Fiery Burning, and scrolls of Stoneskin, Ice Lance, Otiulke's Resilient Sphere, and Cloudkill.
3 - Third Floor
Arriving on the south side of this floor, move clockwise and enter the southwest room. Kill the Shadowed Elven Officer inside, then continue clockwise to the second room. In here, you'll find some gold, a potion, and a scroll of Protection From Lightning on the shelf.
Proceed to the third room, where you'll face a few more Shadowed Elven Officers. When they're dealt with, grab the two potions and gem from the shelf and continue on to the fourth room. Here, a single Shadowed Elven Officer guards a chest containing forty
Arrows of the Hand, a
Potion of Storm Giant Strength, and a random weapon (such as a
Long Sword of the Hand +3 or
Life's Gift). The fifth and final room is empty, save for a scroll of Remove Curse on the shelves.
4 - Fourth Floor
This is the Severed Hand's arboretum. Talk with the elf named Valestis to learn that he stands here, day after day, waiting for life to grow here once again. If you inquire about a way to help restore life to the arboretum, Valestis will ask that you bring him some seeds, a sample of pure water, and any small animals seeking a new home. These three things (four, actually) would allow him to restore some beauty to the arboretum.
At this point in the game, you will not have come across any of these items. However, by the time you finish with Dorn's Deep, you should have tracked down all of the necessary "ingredients." Bring the seeds, barrel of pure water, cage of squirrels, and cage of exotic birds and turn them in one-by-one to Valestis. The squirrels are worth 84,000 experience points, the birds are worth 84,000 experience points, the water is worth 120,000 experience points, and the seeds are worth 150,000 experience points. When all four items are turned in, Valestis disappears.


