 Did we miss anything in this section? Is there something we didn't discover?
Let us know!
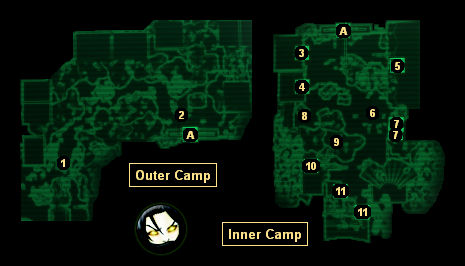
Overview
1 - Grouse
Did we miss anything in this section? Is there something we didn't discover?
Let us know!
Overview
1 - Grouse
When you approach this spot, Grouse will stop you, and you'll need to convince him that you should be allowed to enter Paradise Falls (Exit A). If you're evil enough, then your karma will get you in. If you beat a speech challenge, then you'll be able to bribe Grouse with 500 caps. Otherwise, Grouse will demand that you bring in some slaves to prove that you're a slaver. This latter approach is covered in the quest entry for
Strictly Business. You might want to accept the quest regardless just for the rewards (including the
Mesmetron).
Note: You can also attack Grouse, but if you do then all of the slavers in the camp (both inside and outside) will turn hostile towards you. This isn't really a bad solution, especially if you're playing a high karma character.
2 - Carter / Sammy / Forty
The first time that you approach the gate to the inner camp (Exit A), you'll witness a short-lived escape attempt where two slaves named Carter and Sammy will rush towards you followed by a slaver named Forty. Carter will go too far, and his head will explode because of his
Slave Collar. Sammy will stop in time, but neither he nor Forty will say much to you, and eventually they'll return to the inner camp.
Note: If you're attacking the slavers, then the scene will play out the same, except that Sammy will stay outside, and he'll update or trigger the main quest
Rescue from Paradise when you talk to him.
3 - Barracks
In the back of the barracks you'll find a
Vault 77 Jumpsuit and a holotape labeled "Burn This Jumpsuit." There isn't anything special about the jumpsuit; it won't generate any random encounters or anything. It's just a reference to a Fallout comic book about Vault 77, where a man entered the vault to find that he was the only resident there except for a crate of puppets. He became known as "the puppet man."
4 - Cutter's Clinic
This is where you'll find Cutter, a regular medical shopkeeper.
5 - Lock and Load
Lock and Load is a weapons shop run by Pronto. If you ask Pronto where he gets his wares, then he'll tell you that he only gets "leftovers" from the other slavers, and he'll ask you to help him out. If you bring him 20
Chinese Assault Rifles, then he'll be able to improve his stock, and, as a reward, you'll get a 20% discount. You won't receive any caps for the
Chinese Assault Rifles that you turn in, so you'd need to do a lot of shopping with Pronto to make the transaction worthwhile.
6 - Pool Table
You'll find the unique
Pool Cue
The Break on the pool table here. You'll also usually find Forty lounging nearby. You can steal the
Paradise Falls Box Key from Forty, but it's easier to get it from Eulogy (#8).
7 - Eulogy's Pad
This is where you'll usually find Eulogy Jones, the leader of the slavers, and his brainwashed slave "bodyguards" Crimson and Clover. If you go hostile to the slavers then you'll find
Eulogy Jones' Suit and the
Paradise Falls Box Key on Eulogy's corpse. Otherwise, if you keep things friendly, then you'll be able to make a few deals with Eulogy:
- If your karma is low enough, then you'll be able to buy Clover from Eulogy for 1000 (or 500 if your barter skill is high enough) caps. Clover will then become your companion.
- If you completed the side quest
Those! but haven't yet found a home for Bryan Wilks, then you'll be able to sell him to Eulogy for 100 (or 200 with a barter check or 300 with a speech check) caps. You'll then need to return to
Grayditch and convince Bryan to put on a
Slave Collar. This will cause Bryan to leave
Grayditch and disappear from the game.
- You'll be able to buy the child slaves in the camp. This will cost you 2000 (or 1200 if you pass a speech check) caps. See the quest entry for
Rescue from Paradise for more information on this deal.
- After visiting
Little Lamplight, you'll be able to ask Eulogy if he's ever considered kidnapping any of the children there. He'll reply in the affirmative -- "kids can get a killer price" -- and he'll make you a deal. If you can lure one of the children out of
Little Lamplight, then he'll give you a finder's fee. The only child you can kidnap for this is Bumble, who usually hangs out in the office building next to the front gate. You'll have to pass a speech check to get her to follow you, but if you take her outside then you'll be met by a child slaver, who will take Bumble to Paradise Falls. Then when you return to Eulogy, he'll give you the
Boogeyman's Hood.
Also in the pad you'll find some useful things: five bottles of
Nuka-Cola Quantum (behind the staircase), a
Bobblehead - Speech doll (on the back table in the back room),
Eulogy Jones' Hat (on the table next to the projector), a terminal / safe combination (in the back room), and the
Paradise Falls Box Key (on the table next to the bed). The key unlocks the slave structures in the inner camp (#9, #11).
8 - Food Court
You'll usually meet the slavers Ymir and Carolina Red and the slave bartender Frank here. Eventually, Ymir will decide that Frank has been watering down his drinks, and he'll kill him with his
Super Sledge. You won't be able to buy any food or drinks from Frank.
9 - The Box
The Box is a locked Pulowski preservation shelter. You'll need the
Paradise Falls Box Key (#6, #7) to open it. Inside you'll meet Rory Maclaren, but he won't say much to you except during the quest
Rescue from Paradise.
10 - Toilets
11 - Slave Pens
You'll need to acquire the
Paradise Falls Box Key (#6, #7) to open up the slave pens. On the left side you'll meet Penny, Sammy, and Squirrel, who you'll need to help escape for the quest
Rescue from Paradise. On the right side you'll meet the adult slaves. If you tell the adult slaves to make a break for it, then they'll run for the entrance (Exit A), even if the slavers are still around. There isn't any way to convince Breadbox to escape.
Exits:
- Entrance to the inner part of the camp.


