 Did we miss anything in this section? Is there something we didn't discover?
Let us know!
Background
Did we miss anything in this section? Is there something we didn't discover?
Let us know!
Background
There are two ways to trigger this quest. The best way is to revive Reilly in the Chop Shop in
Underworld (which requires you to pass a speech check or have a high medicine skill). You can also trigger the quest by tuning your radio to the "Ranger Emergency Frequency," which you'll pick up in certain parts of downtown D.C.
Walkthrough
Regardless of how you receive the quest, you should travel to
Underworld (located in the Museum of History) and talk to Reilly. She'll tell you how her team of rangers got stuck on the roof of the Statesman Hotel, and how she tried to sneak out to get help. Her trip didn't go well, obviously, and she doesn't know if her team is still alive or not, but she'll ask you to go there and find out. Reilly will also give you a bunch of useful information: the locations of the Statesman Hotel and the Ranger Compound, directions from Underworld to the Statesman Hotel, the passcode to an ammunition case that was lost during the fighting, and the passcode to open up the front door to the Ranger Compound.
The trick to the Statesman Hotel is that you can't get to the roof from the ground floor. You'll find an elevator on the ground floor (Exit B), but it won't have any power, and so you'll have to venture into the Our Lady of Hope Hospital (located to the southwest), and then use the bridge connecting it to the Statesman Hotel (Exit F) to climb higher into the hotel.
The hotel itself is a little bit confusing, especially in the mid-level map, just because of how many times it overlaps itself. But just keep heading up staircases when you find them. You'll know you're on the right track when you encounter dead super-mutants, because they're the "breadcrumbs" left over from Reilly's trek through the hotel.
Eventually you'll find yourself on the roof of the hotel, where you'll meet Brick, Butcher, and Donovan (#24). They'll tell you that the express elevator (Exit B) to the lobby is broken, and that they'll need a
Fission Battery (#22) to fix it. Any Fission Battery will work for this, and so if you just happen to have one, then you won't need to head back down into the restaurant to loot the maintenance protectron there.
To repair the elevator, you'll need to give the
Fission Battery to Donovan. When Donovan is done, he and the rest of the team will immediately run into the elevator and start fighting super-mutants on the ground floor (even if you cleared out that map before, more super-mutants will spawn for the battle). You can give the rangers some extra ammo before the fight, but it's not necessary. If you help them out then they'll win easily no matter what, and you'll only need one of them to survive to get the best possible reward from Reilly.
Note: If you kill the rangers, then you'll fail the quest but you'll find
Ranger Battle Armor, a
Ranger Battle Helmet, and the unique
Minigun
Eugene on their corpses, and so you'll get roughly the same reward. The main difference is that Reilly won't be happy with you when you return to her, and she won't offer you the job of mapping the wasteland, which will cost you a bunch of caps.
Another Note: If Donovan dies on the roof, then you'll find a wrench on his corpse. Supposedly this wrench will allow you to repair the express elevator (Exit B) yourself, even if you don't have a high enough repair skill.
Once you've finished off the super-mutants on the ground floor of the hotel, the rangers will take off for the Ranger Compound. When you catch up to them there, you'll find Reilly in the compound as well, and, if at least one ranger survived, then she'll give you your reward -- either
Ranger Battle Armor or the unique
Minigun
Eugene. We'd recommend that you take the armor.
After completing the quest, the rangers will remain in the compound. Donovan will repair your equipment, Butcher will heal you, and Reilly (assuming that at least one ranger survived) will give you a
Geomapper Module and pay you 30 caps for every location that you discover.
Note: You don't need to carry around the
Geomapper Module to log locations. It'll download the locations from your Pip-Boy, and so you can leave it in storage when you're not planning to visit Reilly.
1 - Front Desk
At the front desk you'll find a first aid box and a terminal / safe combination.
2 - Storage Room (Lower Level)
You'll find a pair of first aid boxes in the storage room.
3 - Staircases
You can use these staircases to move between the upper and lower levels of the ground floor of the Statesman Hotel.
4 - Room (Upper Level)
In this room you'll find
Tales of a Junktown Jerky Vendor, plus a bed that you can sleep on.
5 - Reception Desk
You'll find a turret control terminal, a booby-trapped terminal, and a wall safe here.
6 - Patient Rooms
In each of these rooms you'll find a first aid box and a bed that you can sleep on.
7 - Nurse's Station Terminals
If you hack into these terminals, then you'll be able to use them to unlock the nearby safes, where you'll find medical supplies and caps.
8 - Maintenance Room (Lower Level)
You'll find two ammunition boxes and a mine box here.
9 - Patient Room
In this patient room you'll find a first aid box, two beds, and a copy of the
D.C. Journal of Internal Medicine.
10 - Locked Room
If you can beat the "average" lock on the door, then inside the room you'll find a friendly Mister Handy robot, plus four first aid boxes.
11 - Desk
On the desk here you'll find two
Frag Grenades and three ammunition boxes. On the nearby file cabinet, you'll also find some
5.56mm Rounds.
12 - Cafeteria
On one of the tables in the cafeteria you'll find a copy of the
D.C. Journal of Internal Medicine.
13 - Staircase (Floors 1/2)
You can use this staircase to move between the first two floors of the mid-level map of the Statesman Hotel. You'll also find Theo (or what's left of him) and his ammo box here. If you got the passcode from Reilly in
Underworld, then you'll be able to open the ammo box, and inside you'll find 100
10mm Rounds, 200
5.56mm Rounds, 200
5mm Rounds, and four
Frag Grenades.
14 - Staircase (Floors 2/3)
15 - Locked Storage Closet (Level 3)
If you can beat the "easy" lock on the door, then inside the closet you'll find two mine boxes and a first aid box.
16 - Holotape (Floor 3)
On the bed in this room you'll find a holotape entitled "A Note from Little Moonbeam's Father." If you've already completed the side quest
Stealing Independence, then you might recognize "Little Moonbeam" as the nickname Sydney's father gave to her. If you give the holotape to Sydney (in
Underworld), then she'll reward you with
her "Ultra" SMG.
17 - Staircase (Floors 3/4)
18 - Storage Closet (Floor 4)
In a shelf in this closet you'll find a copy of the
Chinese Army: Spec. Ops. Training Manual.
19 - Locked Storage Closet (Floor 4)
If you can beat the "easy" lock on the door, then inside the closet you'll find an ammunition box and two first aid boxes.
20 - Locked Door
You won't find a key for this door. To get it open, you'll have to pick its "average" lock.
21 - Bar
Behind the bar you'll find two ammunition boxes, a bottle of
Nuka-Cola Quantum, two
Frag Grenades, some
Shotgun Shells, and a copy of
Grognak the Barbarian.
22 - Storage Closet (Lower Level)
If you enter this storage closet (tucked underneath a staircase) then you'll find a defunct maintenance protectron with a
Fission Battery. You might need the battery to get the express elevator (Exit B) running.
23 - Sheet Music Book
On the ground next to the chairs here you'll find a
Sheet Music Book, which you might want to give to Agatha after completing the side quest
Agatha's Song.
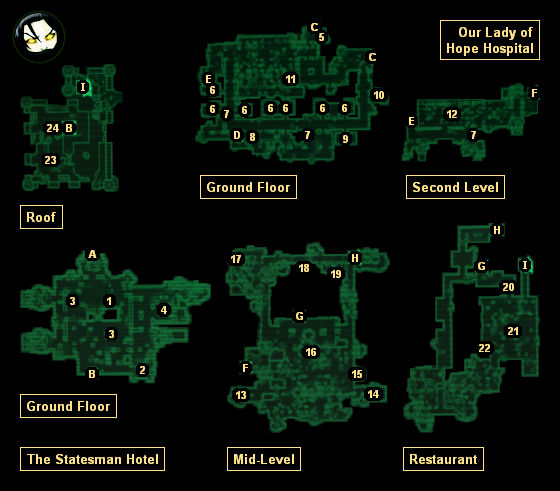
24 - Reilly's Rangers
You'll finally meet Brick, Butcher, and Donovan here.
Exits:
- Exit t the wasteland (The Statesman Hotel).
- Express elevator. The elevator will start out broken. You'll need a Fission Battery (#22) to fix it, but you won't be able to make the repairs until you've reached the roof.
- Exit to the wasteland (Our Lady of Hope Hospital).
- Exit to the Dry Sewer.
- Doorway between the ground floor and the second level of the Our Lady of Hope Hospital.
- Exit to the bridge connecting the Our Lady of Hope Hospital to the Statesman Hotel. You'll find an ammunition box and a first aid box next to the bridge.
- Elevator between the mid-level map and the restaurant of the Statesman Hotel. You'll need a high enough repair skill to get the elevator to work.
- Doorway between the mid-level map and the restaurant of the Statesman Hotel.
- Doorway between the restaurant and the roof of the Statesman Hotel.


