 Did we miss anything in this section? Is there something we didn't discover?
Let us know!
Main Objective
- Install the processor widget in the RobCo production facility mainframe.
Optional Objective
- Reprogram the RobCo production facility mainframe.
Walkthrough
When Moira introduces this task to you, she'll give you the
RobCo Processor Widget, and she'll mark the location of the RobCo Facility on your world map. If you have the Robotics Expert perk, then you'll be able to offer to write this section of the guide yourself, and save Moira the trouble. For this case, you'll get credit for the main and optional objectives without having to go anywhere, and you'll still get the regular rewards (see below). "As long as you don't write it all in ones and zeroes, then I guess it'll be fine."
If you have to actually go to the RobCo Facility, then you'll find it mostly powered down and empty -- except for some radroaches and mole rats. These enemies shouldn't pose much of a problem to you, so you might want to break out a melee weapon for the facility rather than waste bullets. If you have the
Repellent Stick from
Moira's Mole Rat Task, then you'll find it pretty effective here.
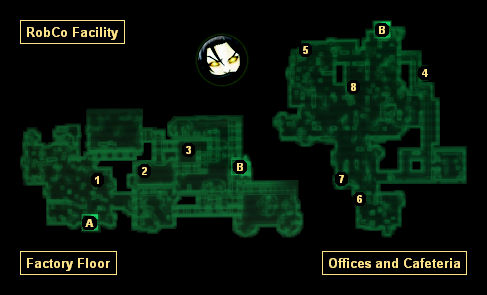
To reach the mainframe computer (#8), you'll need to do some exploring, which might get confusing because of the multiple levels of the maps. But if you head east from the entrance and then climb up into the catwalks, you should eventually find yourself at the doorway to the Offices and Cafeteria map (Exit B). After going through the doorway, you'll just need to head west and south to a staircase (#7), and then head straight north to the mainframe computer room (#8).
When you reach the mainframe (#8), you'll find that it's locked with an "average" lock. However, the widget from Moira is the "key" to the lock, and so you won't need to do any lockpicking to get the mainframe up and running. Activating the mainframe in this way will complete the main objective for the task, but it will also wake up all of the protectrons in the facility, and they won't be happy to see you.
There are a few ways to deal with the protectrons:
- Before activating the mainframe, you can "kill" all of the deactivated robots by damaging them while they're sprawled out on the ground. You won't gain any experience for this method, but then you also won't have to deal with the robots when you leave the facility.
- You can hack into the mainframe computer after turning it on. This will give you a few commands that you can issue to the robots, including "pest extermination" (they'll fight the radroaches and mole rats), "total liquidation" (they'll fight everything), and "stress testing" (they'll fight each other). You'll need to select one of these commands to complete the optional objective of the task.
- You can sneak out of the facility (perhaps by using the
Stealth Boy located in the mainframe room). The
RobCo Jumpsuit (#3) won't fool the protectrons.
- Finally, you can just fight everything. The bonus to this approach is that you'll find lots of
Energy Cells and
Scrap Metal on the defeated protectrons, and you'll also gain a decent amount of experience.
When you return to Moira in
Megaton, if you only completed the main objective of the task, then she'll reward you with five
Pulse Grenades. If you also completed the optional objective, then she'll add in a
Big Book of Science.
1 - Reception Desk
On top of the reception desk you'll find a copy of
Lying, Congressional Style. In the shelves behind the desk you'll find a
Pre-War Book and a first aid box.
2 - Ammunition Boxes
You'll find six ammunition boxes in the shelves here.
3 - Control Room
Around the computers here you'll find a
RobCo Jumpsuit, a
Pre-War Book, and a
Big Book of Science.
4 - More Ammunition Boxes (Lower Level)
You'll find three ammunition boxes on the ground here.
5 - Table (Lower Level)
On this table you'll find a copy of
Nikola Tesla and You, plus some other supplies.
6 - Desk (Lower Level)
On the desk here you'll find a copy of the
D.C. Journal of Internal Medicine, a first aid box, and some
Jet.
7 - Staircase
This staircase connects the two levels of the Offices and Cafeteria map.
8 - Mainframe Room (Upper Level)
This is the room where you'll find the facility's mainframe computer. It'll start out locked with an "average" lock, but if you have the widget from Moira, then you'll be able to turn it on without having to use your lockpick skill. Also in this room you'll find a first aid box, a
Pre-War Book, and a
Stealth Boy.
Exits:
- Exit to the wasteland.
- Doorway between the Factory Floor and the Offices and Cafeteria.