 Did we miss anything in this section? Is there something we didn't discover?
Let us know!
Main Objective
Optional Objective
Walkthrough
Did we miss anything in this section? Is there something we didn't discover?
Let us know!
Main Objective
Optional Objective
Walkthrough
Moira will give you a
Repellent Stick when she gives you the task, and she'll recommend that you head over to the Tepid Sewer (east of
Megaton) to try it out. You don't have to go to that location, but you'll encounter about a dozen mole rats there, and so it's perfect for the task. If you previously cleared out the Tepid Sewer, or if you just don't want to go there for some reason, you could also try the Jury Street Metro Station, or you could wander around the wasteland for a while, since mole rats are a common random enemy.
With the
Repellent Stick equipped, you should be able to kill mole rats in one or two hits, making the task pretty easy. When you return to Moira Brown in
Megaton, if you only met the main objective, then she'll reward you with two doses of
Jet and two doses of
Psycho, and she'll take back the
Repellent Stick. If you killed enough mole rats to meet the optional objective, then Moira will give you the same drugs as otherwise, but she'll also let you keep the stick.
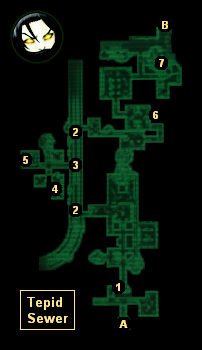
1 - Turret Control Terminal
You can shut down (or activate) the sewer's turrets here.
2 - Frag Mines
You'll encounter a bunch of live
Frag Mines surrounding the raiders' watch post (#3).
3 - Rocksalt's Watch Post
Rocksalt will drop a
Combat Shotgun, a key, and more when he dies. You can use the key to unlock a safe in the raider camp (#5). You'll also find a pile of
Frag Mines here, plus some ammo boxes and a first aid box.
4 - Skill Book
You'll find a copy of
Dean's Electronics here.
5 - Raider Camp
You'll find a pair of bunk beds here, which you'll be able to sleep on. Nearby you'll also find an
Assault Rifle, a
Pre-War Book, and a floor safe. You can use Rocksalt's key (#3) to unlock the safe.
6 - Locked Storage Room
If you can open the lock to the storage room (by picking the lock or by hacking the computer terminal next to the door), then you'll find a first aid box, a locked grenade box, a locked footlocker and more inside.
7 - Workbench
You'll find a
Bottlecap Mine at the workbench. Picking it up will automatically give you the recipe for it.
Exits:
- Exit to the wasteland
(Tepid Sewer).
- Exit to the wasteland
(Georgetown West).


