 Did we miss anything in this section? Is there something we didn't discover?
Let us know!
Background
Did we miss anything in this section? Is there something we didn't discover?
Let us know!
Background
After completing the main quest
The Waters of Life, Amata will start sending out a distress call from Vault 101. When you get close enough to the vault, you'll begin picking up the call on your radio, via the Vault 101 Emergency Frequency. Listening to the message will trigger the quest.
Walkthrough
In the message, Amata will say that "things got worse after you left," and she'll ask you to return to the vault to help sort things out. She'll also tell you the new password to the vault -- her name, if you remember it -- which will allow you to come inside.
When you enter the vault, you'll quickly run into Officer Gomez (#4) -- or Officer Armstrong, if Gomez somehow died during your earlier escape -- and Gomez / Armstrong will describe to you the current situation. Apparently, after you and your father escaped, some people in the vault decided that the wasteland might not be such a bad place, and the Overseer -- either Amata's father if he's still alive, or Allen Mack otherwise -- had to crack down to keep everybody in line.
This caused the vault to boil over with animosity, and you'll now need to pick a side to support: the Overseer (#9), who wants to keep the vault isolated, Amata (#14), who wants to deal with the outside world, or Butch (#12), who just wants to escape and avoid his fate as a hairdresser. You can also ignore the problem and simply leave the vault, or kill everybody and "solve" the problem that way.
Note: When you leave the vault after completing the quest, you won't be able to come back in. So be sure to explore the vault first -- particularly the medical clinic (#14), the security office (#7), and the Overseer's office (#9).
Siding with the Overseer
For this case you'll need to talk to the Overseer (#9). For safest results, you should ask Officer Gomez / Armstrong (#4) to escort you to him; otherwise you might be attacked by Officer Wilkins (#6) on the way, and the battle might turn the Overseer against you as well.
When you talk to the Overseer, he'll apologize (sort of) for what happened on the day you and your father escaped, but he'll stand adamant that the world outside is dangerous, and that the vault residents are "humanity's last chance." At the end of his spiel, you'll be given the opportunity to agree with him or not. If you want to help him, then you should offer to talk to the rebels.
You'll find the rebels, led by Amata, in the medical clinic on the lower level (#14). There are three ways to convince Amata to end the rebellion: you can kill her, you can read the note about the Enclave on the Overseer's computer (#9) and then tell her about it, or you can pass a speech check. If you're successful, then when you return to the Overseer, he'll reward you with a
Modified Utility Jumpsuit (provided that you didn't kill anybody), and he'll ask you to leave the vault. When you do, the quest will come to an end.
Siding with Amata
For this case you'll need to talk to Amata (#14). She'll call the vault a "police state," and she'll tell you that she'd like to interact with the outside world to keep the vault from dwindling away to nothing. She'll also tell you that she knows that the vault used to be open, and so the Overseer's argument of keeping the vault "untainted" is a lie.
If you want to work with Amata, then you'll need to agree with her reasoning and offer to convince the Overseer (#9) to open up the vault. There are three ways you can do this: you can kill Overseer, you can learn about the planned midnight raid by the officers (#7) and then tell the Overseer about it, or you can pass a speech check. If you're successful, then when you return to Amata, she'll reward you with a
Modified Utility Jumpsuit (provided that you didn't kill anybody), and she'll ask you to leave the vault. When you do, the quest will come to an end.
Note: If you killed the previous Overseer, then the current Overseer might not feel inclined to work with you, and you might need to kill him to stop him.
Siding with Butch
Butch (#12) doesn't have a faction, and, unlike everybody else, he'd simply like to leave the vault and take his chances in the wasteland. "Think about it, man. Down here, I'll always be stuck with the same job, the same food, with the same people, forever." However, the only way to let him out of the vault is to force everybody out of the vault. For a hint on how to do this, ask Butch what happened "that night" and he'll mention Stanley (#15) in the reactor room.
To sabotage the vault, you'll need to head into the sub-level (via Exit E). You'll find Stanley working on the water purifier down there. In the room behind him, you'll find a maintenance terminal. If you select "begin water chip service," and then "begin manual service," and finally "run systems purge," then the water purifier (and Stanley) will blow up, and everybody will start evacuating the vault.
On your way out, you might run into the Overseer or Amata, who won't be happy to see you, unless you can pass some difficult speech checks. "I should never have helped you that night. I should have stayed with my father, and watched him kill you." When you exit the vault, the quest will come to an end.
The interesting thing about this solution is that with the vault residents out in the wasteland, you might run into them in the future. For example, Butch should show up at the Muddy Rudder in
Rivet City, and if your karma is neutral, then he'll become available as a companion. However, most of the other residents, including Amata, won't fare as well, and you'll usually find them dead or dying.
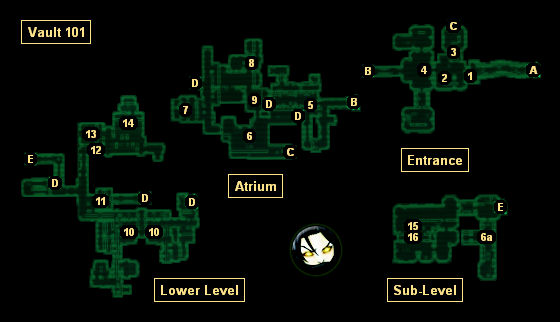
1 - Control Pod
If you've listened to Amata's distress call, then you'll know that the password to the door is "Amata." But before and after the quest, you won't know what the password is, and you won't be able to go inside the vault.
2 - Jim Wilkins
You'll find the corpse of Jim Wilkins here -- a pretty good clue that something is wrong in the vault.
3 - Secret Door
You might remember this door from your earlier escape from the vault. To open it, you'll need to activate the switch on the northern side of the door.
4 - Officer Gomez / Armstrong
5 - Officer Taylor / Freddie
When you get here you'll witness Officer Taylor taking a pot shot at the rebel Freddie Gomez.
6 - Officer Wilkins
If you don't ask Officer Gomez / Armstrong (#4) to escort you to the Overseer, then you'll encounter Officer Wilkins (#6) here, and he'll attack you no matter what your intentions are. Worse, if the Overseer is nearby, then he'll attack you as well. If you want to avoid bloodshed, then you can always skip this encounter by using the multiple exits to the lower level (Exit D) to loop around it.
Note: If you don't encounter Officer Wilkins in the atrium (#6), then you should find him in the sub-level (#6a).
7 - Security Office
You'll find three weapon lockers and a desk terminal in the office. The terminal has an "average" lock, but you can find the password for it in one of the lockers. If you read the confidential note on the terminal, then you'll learn that the officers are planning a midnight raid on the rebels. If you release Mr. Brotch from the holding cell to the west (which you can either pick open or use the terminal to unlock), then he'll tell you the same thing.
8 - Overseer's Apartment
You won't find much in here other than a handful of
Bobby Pins and a pair of beds to sleep on.
9 - Overseer's Office
This is where you'll usually run into the Overseer. You'll also find a locker and a terminal in here. Inside the locker you'll find some ammunition, meds, and the password for the terminal. From the terminal you'll learn that the Overseer has been in contact with the Enclave, but that he (wisely) doesn't trust them. You can also use the terminal to open the Overseer's secret tunnel, which will give you access to another exit to the entrance (Exit C).
10 - Bathrooms
You'll find pure water in the sinks and toilets of the bathrooms, and so you'll be able to drink (and heal yourself) without becoming irradiated.
11 - Diner
You might remember the diner from your tenth birthday party. The main difference between then and now is that instead of finding the area filled with happy partygoers and cake, you'll instead find Janice Wilkins' body on the floor behind the counter.
12 - Butch
If you kill Butch then you'll find
Butch's Toothpick on his corpse. If you don't kill Butch then you'll be able to get free haircuts from him.
13 - Classroom
This is where you took the G.O.A.T. during the tutorial quests.
14 - Medical Clinic
You'll find the majority of the rebels, including Amata and Freddie Gomez, inside the medical clinic. You'll also find a framed quote in the back office. If you pick its "average" lock, then inside you'll find some caps, a holotape labeled "Home Sweet Home," and
Schematics - Rock-It Launcher.
15 - Stanley / Water Purifier
16 - Maintenance Terminal
The terminal has "hard" encryption, but you can also steal the password to it from Stanley (#15).
Exits:
- Exit to the wasteland.
- Doorway between the entrance and the atrium.
- Secret doorway between the entrance and atrium. You'll only be able to access this doorway via the Overseer's office (#9).
- Doorway between the atrium and the lower level.
- Doorway between the lower level and the sub-level.


