 Did we miss anything in this section? Is there something we didn't discover?
Let us know!
Background
Did we miss anything in this section? Is there something we didn't discover?
Let us know!
Background
You can get this quest from two people -- Leroy Walker at the Lincoln Memorial and Hannibal Hamlin (#5) at the Temple of the Union.
Walkthrough
When you visit the Temple of the Union (located in the
northern suburbs), you'll meet a ragtag collection of former slaves led by Hannibal Hamlin (#5). The first time that you talk to him, Hannibal will ask you to promise never to reveal the location of the temple to slavers. If you announce that slaves are worth money to you, then everybody in the temple will attack you. Otherwise, they'll just wait for you to make the promise, at which point Hannibal will entrust you with a key to the front gate (#1).
Note: If you don't want to make any promises, then you'll need to pick the "very hard" lock on the front gate, or steal the key to it (from any of the residents of the temple) to get out.
If you continue talking to Hannibal, then he'll tell you that he founded the temple as a haven for runaway slaves, but that the temple simply isn't large enough. He'll add that he knows of a better location -- the Lincoln Memorial -- but unfortunately the memorial is rumored to be infested with super-mutants. If you're willing, he'll ask you to clear the place out. He'll also ask you to talk to Caleb (#2) before departing.
When you talk to Caleb, you'll learn that he's a mason, and that he'd like to restore the Lincoln Memorial to its former glory before the slaves move in (or at least get Lincoln's head re-attached). The only problem is that he doesn't know what the memorial used to look like, and so he'll ask you to find a picture of it in the Museum of History.
The Museum of History
The Museum of History is located right next to the
Washington Monument. You'll need to visit the
Washington Monument during the main quest
Galaxy News Radio, and so you might want to wait until you're in the area anyway before continuing.
The Museum of History has two parts. When you go through the main door, you'll find yourself in a small entrance hall. If you head north, then you'll enter the
Underworld, a city for ghouls. If you take the exit on the western side, then you'll enter the lower part of the museum, which contains lots of feral ghouls and Abraham Lincoln memorabilia. It's the lower area that you'll need to explore.
You'll find the
Lincoln Memorial Poster (#20) on the second floor of the Offices map in the lower part of the museum. It'll be hanging above a desk right next to the staircase. That's all you'll need to fetch to make Caleb happy, but you might also want to search the museum carefully to find the eight other Lincoln items, because you'll be able to sell them to collectors.
The three Lincoln collectors are Hannibal Hamlin at the Temple of the Union, Leroy Walker at the Lincoln Memorial, and Abraham Washington in
Rivet City. Here's what they'll pay you for each of the Lincoln artifacts:
Where there are two prices listed, the higher price is what you'll get with a successful speech check (with Hannibal and Walker) or barter check (with Washington). Clearly the slaves give the best prices and Abraham Washington gives the worst prices. Also, amusingly, Hannibal will equip the hat and the rifle if you sell them to him.
Note:
Lincoln's Repeater is a perfectly good weapon with a perfectly good value. Chances are, if you sell it to a regular vendor, then you'll beat any of the collectors' prices by quite a bit.
The Lincoln Memorial
The Lincoln Memorial is located straight west from the Museum of History. When you get there you won't find any super-mutants around -- alive anyway -- but you will find a special contingent of slavers from
Paradise Falls. One such slaver named Silas will stop you when you arrive, and he'll invite you to talk to Leroy Walker, who you'll find in the maintenance room under the memorial.
Walker will ask you if you've seen any escaped slaves recently. If you've already been to the Temple of the Union, then you'll be able to give up the slaves (perhaps getting 100 caps in return for the information), and Walker will invite you to be there when he rounds them up. If you haven't been to the temple yet, then Walker will ask you to find a Lincoln artifact at the Museum of History first (see above), and he won't say anything further to you until you do -- unless you pass a speech check, and then you'll be able to skip this step. Regardless, when the slavers learn about the temple, they'll head out to it, but it will take them a while to get there (usually a full day). When they arrive, they'll camp out under the bridge to the west, and they'll wait there until you talk to them. The slavers will defeat the slaves easily in the ensuing battle, and afterwards, when you talk to Walker again, you'll receive 300 experience points and the quest will come to an end.
If you don't tell Walker where the slaves are, then your objective will change, and you'll be tasked with defeating all of the slavers at the memorial. It's easiest to start the fight in the maintenance room, where you'll only face Silas and Walker, and then you can take the fight outside where the rest of the slavers are. Regardless, this can be a long and tough fight, so be sure to come prepared with lots of ammunition and Stimpaks.
Back at the Temple of the Union
When you return to the Temple of the Union, you'll need to give the
Lincoln Memorial Poster to Caleb (#2), and then you'll need to talk to Hannibal (#5). The slaves will then start out for the Lincoln Memorial, but it will take them a while to get there (usually a full day). They'll camp out at the Mall Northwest metro station to the east, and they won't attempt to move into the memorial until you talk to them, so if the slavers are still around, you should clear them out first.
When you talk to Hannibal at the metro station, he'll thank you for your help, and he'll give you
Schematics - Dart Gun. You'll also receive 300 experience points. Then the slaves will move into the memorial, and eventually they'll set up some tents to live in, and Caleb will re-attach Lincoln's head to his body.
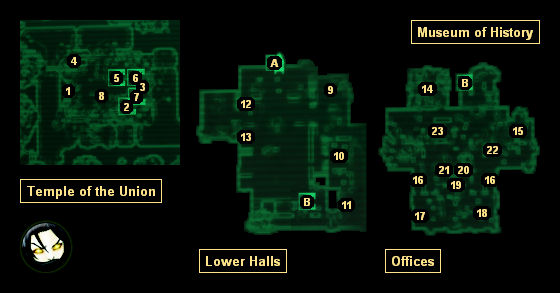
1 - Front Gate
The first time you approach the front gate, Simone Cameron will stop you and ask you what your business is. If you tell her that you're "just looking for a place to rest," then she'll open the gate for you. Otherwise she won't. If you give Simone the wrong answer then you'll need to ring the door bell (to the left of the gate) to get another chance. Later, Hannibal (#5) will give you a key to the gate.
2 - Caleb's Home (Lower Level)
You'll find a
Pre-War Book and a first aid box in here.
3 - Bed
You'll find a mattress on the floor here that you can sleep on.
4 - Staircase
You can use the staircase to reach all three levels of the temple.
5 - Hannibal's Home (Middle Level)
6 - Simone's Home (Middle Level)
7 - Locked Storeroom (Middle Level)
You'll have to pick an "average" lock to get into the storeroom, but you won't find much inside.
8 - Common Area (Middle Level)
You'll often find the residents of the temple sitting around the burning barrel here.
9 - Office (Lower Level)
You'll find a first aid box and a safe inside the office.
10 - Kitchen (Lower Level)
Inside the kitchen you'll find a first aid box and a copy of the
D.C. Journal of Internal Medicine (in the shelf next to the door).
11 - Crate (Lower Level)
You'll find a bottle of
Nuka-Cola Quantum inside the crate.
12 - Turret Control Terminal (Upper Level)
You can use this terminal to turn off (or on) the turret in the room to the west. You can also use the terminal to close (or open) the door to the room.
13 - Display Table
You'll find a copy of
Lincoln's Diary on the display table.
14 - Rubble
Sitting on the rubble here (next to a desk) you'll find
Lincoln's Hat.
15 - Office (Lower Level)
In this office you'll find two ammunition boxes, a grenade box, a first aid box, two gun cabinets, a wall safe, and an
Action Abe Action Figure (on a desk). You'll also find a turret control terminal here. Hacking into it will allow you to turn off (or on) the turrets, and open (or close) the security doors (#16).
16 - Security Doors (Lower Level)
You'll either need to pick open the "very easy" locks on the doors, or hack into a nearby computer (#15), to get these doors open.
17 - Shelf (Lower Level)
In the shelf here you'll find a
John Wilkes Booth Wanted Poster.
18 - Shelf (Lower Level)
In this shelf you'll find a
Civil War Draft Poster.
19 - Staircase
You can use this staircase to move between the upper and lower levels of the Offices map.
20 - Lincoln Memorial Poster (Upper Level)
You'll find the
Lincoln Memorial Poster on the wall here (right at the top of the stairs).
21 - Desk (Upper Level)
On top of the desk here you'll find
Lincoln's Voice.
22 - Shelf (Upper Level)
In the shelf here you'll find an
Antique Lincoln Coin Collection.
23 - Display Case (Upper Level)
Inside the display case you'll find
Lincoln's Repeater, a fairly nice gun that uses
.44 Rounds, Magnum. Next to the case you'll find a copy of the
Chinese Army: Spec. Ops. Training Manual.
Exits:
- Doorway to the entrance of the Museum of History.
- Doorway between the Lower Halls and the Offices of the Museum of History.


