 Did we miss anything in this section? Is there something we didn't discover?
Let us know!
Main Objective
Did we miss anything in this section? Is there something we didn't discover?
Let us know!
Main Objective
- Place the
Observer in a spawning pod in the Anchorage War Memorial.
Optional Objective
- Do not kill any mirelurks in the Anchorage War Memorial.
Walkthrough
There are two ways to complete this task, assuming that you want to meet the optional objective. The first way is to sneak your way through the memorial buildings, place the
Observer into one of the many spawning pods (#6), and then sneak back out. For this method, unless you've really been developing your sneak skill, you'll need to wait until you've picked up 2-3 (or more)
Stealth Boys so you can keep yourself hidden for the entire trip. There aren't very many mirelurks in the memorial, so as long as you're careful and save frequently, you should be able to get in and get out without being spotted.
The other method is to "cheat." The optional objective only starts keeping track of mirelurks
after you've accepted the task, and so you can go to the Anchorage War Memorial before talking to Moira Brown, and kill the ten or so mirelurks patrolling around inside first. Then when you accept the task, you won't have to worry about anything. You'll be able to just walk to one of the spawning pods (#6), place the
Observer inside, and then walk back out.
If you decide to kill the mirelurks, be sure to aim for their face. The others parts of their body are heavily armored and can withstand a lot of abuse. Also wait until you have some halfway decent weapons in halfway decent condition.
Combat Shotguns and
Assault Rifles are a good idea when facing mirelurks. Pistols will just cause you to waste a lot of
Stimpaks.
When you return to Moira Brown in
Megaton, if you only met the main objective, then she'll reward you with some
Stealth Boys. If you also met the optional objective, then she'll add in a
Shady Hat.
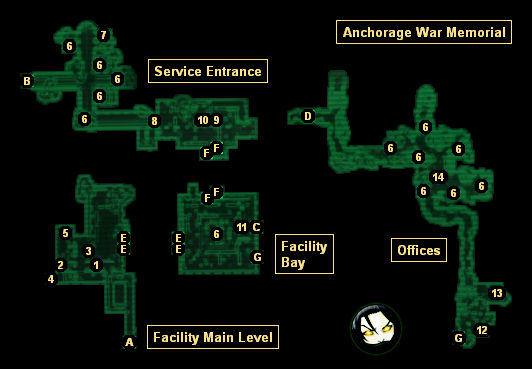
1 - Workbench (Upper Level)
You'll find a
Bottlecap Mine in the workbench. Picking it up will give you the recipe for it.
2 - Pre-War Books (Upper Level)
You'll find three
Pre-War Books on a table here.
3 - Computer Terminal / Ted (Lower Level)
If you read the note on Ted, you'll learn that there's a stash hidden somewhere in the facility (#10). To find it, you'll first need to hack into the computer terminal next to Ted. If you can't do it manually, then you can find the codes for the terminal behind the Nuka-Cola machine in the room. The terminal will give you access to the floor safe in the medical clinic (#5).
4 - Bed (Lower Level)
5 - Floor Safe (Lower Level)
This safe can be picked, and you can also unlock it via a nearby terminal (#3). Inside you'll find a
Door Component, a copy of
Dean's Electronics, and more. The
Door Component can be used to help you repair a utility door in the service entrance part of the memorial (#7).
6 - Mirelurk Spawning Pod
7 - Utility Room
When you click on the utility room door, you'll discover that it has been sabotaged. If your repair skill is at least 95, then you can get the door open by using your skill alone. If you found the
Door Component from the main level of the memorial (#5), then you'll only need a repair skill of 35 to get the door open.
Inside the utility room you'll find a bottle of
Nuka-Cola Quantum, a copy of
U.S. Army: 30 Handy Flamethrower Recipes, a sledgehammer named
The Tenderizer, a stash key, a stash note, and more. You'll need the key to open up the secret compartment in the freezer (#10).
8 - Closed Door
You'll need to activate one of the switches next to the door to open it.
9 - Kitchen (Middle Level)
In this room you'll find three first aid boxes, three refrigerators full of
Mirelurk Meat, and more.
10 - Freezer (Bottom Level)
In this room you'll find three refrigerators. If you have a PE of at least 5, then you'll notice that one of the refrigerators is smaller than the others, and has a secret compartment, but you won't be able to unlock it. If you have the key and the note from the utility room (#7), then you'll automatically open up the compartment and find 300 caps, a recipe for
Mirelurk Cakes, and more inside.
Note: The
Mirelurk Cake recipe isn't a real recipe. There isn't any way for you to create
Mirelurk Cakes. Plus,
Mirelurk Meat is better anyway.
11 - Dead Mercenary (Top Level)
You won't find much of interest on the mercenary's corpse, just a
Laser Pistol with some ammo, and a note. The note will detail how the mercenary planned to break up the mirelurk meat harvesting program going on in the war memorial. Little did he know that the mirelurks had already beaten him to the punch.
12 - Terminal / Safe
You'll find a computer terminal and a wall safe in the office here. You can either pick open the wall safe or unlock it by hacking into the computer.
Inside you'll find some random objects, including, probably, a gun and some ammunition.
13 - Bathrooms
You'll find a first aid box in each of the bathrooms
14 - Mirelurk King
Exits:
- Exit to the Wasteland.
- Exit to the Wasteland. This exit is locked with a "very easy" lock.
- Exit to the Wasteland. This exit is locked with an "average" lock. If you're inside the memorial, then you can also hack into a nearby computer terminal to unlock the door.
- Exit to the Wasteland. This exit is underwater.
- Door between the main level and the bay level.
- Door between the service entrance and the bay level.
- Door between the bay level and the offices.


