 Did we miss anything in this section? Is there something we didn't discover?
Let us know!
Background
Did we miss anything in this section? Is there something we didn't discover?
Let us know!
Background
Abraham Washington will give you this quest when you talk to him in the Capital Preservation Society museum in
Rivet City.
Walkthrough
Washington will ask you to steal the
Declaration of Independence from the National Archives. He'll even note the location of the archives on your world map.
When you arrive at the archives, you'll meet a treasure hunter named Sydney in the rotunda (#8). She'll have the room set up as a defensive position -- complete with landmines, so watch out -- but that's a good thing because before you can even talk to her two waves of super-mutants will attack. However, you'll only face regular super-mutants at this time, rather than brutes or masters, and so they shouldn't pose much of a problem.
After the battle (and perhaps after disarming all of the landmines in the room), Sydney will tell you that she was hired by Abraham Washington in
Rivet City to steal the
Declaration of Independence from the archives -- just like you, probably -- and she'll suggest that you work together.
If you agree, then Sydney will give you the password for the computer terminal in the northern part of the room, which will allow you to use the rotunda's elevator (Exit D), and she'll join you as a companion (but only while you're on the quest). She'll also expect a share of the reward money when you return to Washington.
If you refuse, then Sydney will leave for the
Underworld, and you won't be able to use the elevator (it requires a key that only Sydney has, and you won't get it from her if you kill her, either). You can bypass the elevator by going through the Sub-Basement, but the elevator is convenient, so if you're planning on killing Sydney, you should agree to work with her first (so you get the code for the elevator) and
then kill her.
Note: If you kill Sydney, or if she dies in battle, then you'll find
Combat Armor and
Sydney's 10mm "Ultra" SMG on her corpse. If you want the SMG but you don't want to do anything evil, then there's a non-violent way to get it from Sydney after completing the quest. See Sydney's entry in the
Underworld section for details.
As you explore the Secure East Wing, you'll have to battle a variety of robots, including protectrons, mister gutsies, and sentry bots. You might also come across the
Bill of Rights (#18) and the
Magna Carta (#19), which you can sell to Abraham Washington when you return to him.
Eventually, you'll come to an ornate office (#21) where you'll meet a protectron who thinks he's Button Gwinnett, the second signer of the
Declaration of Independence. He'll talk to you when you enter the office, giving you a few ways to deal with him:
- If you have the Robotics Expert perk, then you can just shut Button down. You'll get the password for the terminal in the office when you do this, allowing you to use the terminal to unlock the vault in the back of the room. You'll find the
Declaration of Independence inside the vault.
- If you play along with Button's delusion, and if you pass a speech check, then you can convince him that you're Thomas Jefferson (even if you're female), and he'll allow you to take the
Declaration of Independence from the vault in the back of the office.
- If you play along with Button's delusion, but fail the speech check, then you'll need to prove that you're not a Redcoat spy. To do this, you'll need to offer to fool the Redcoats by giving them a
Forged Declaration, but in order for the forgery to pass inspection, you'll need to retrieve a special
Ink Container from the
Arlington Library (located far to the southwest of the archives). When you return with the ink, Button will give you the
Forged Declaration, which will act just like the real
Declaration of Independence when you return to Abraham Washington.
- You can just open fire and kill Button. You'll find the password to the terminal in the office on his corpse, allowing you to use the terminal to unlock the vault in the back of the room. You'll find the
Declaration of Independence inside the vault.
After dealing with Button, if he's still functioning, you'll be able to give him your final orders. If you continue to play along with his delusion, and if you're nice to him, then you'll gain karma. If you tell him to blow himself up, or you're mean to him, then you'll lose karma.
When you return to Abraham Washington in
Rivet City, he'll reward you with
Schematics - Railway Rifle, and you'll also earn 300 experience points. If Sydney is still with you, then she'll receive the money part of the reward as her share, and then she'll retire to the
Underworld. If Sydney died during the quest, accidentally or not, then Washington will give you the money reward instead -- 400 caps.
If you picked up the
Bill of Rights (#18) and the
Magna Carta (#19) during your explorations, then you can turn those in to Washington as well. He'll pay you 100 caps for the former and 75 caps for the latter. If your barter skill is at least 70, then you'll be able to increase those prices by 25 caps each.
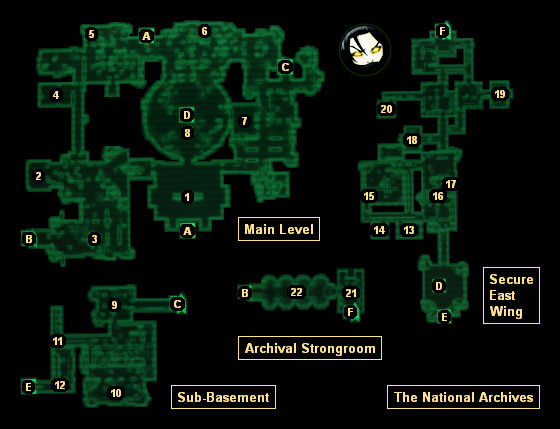
1 - Lobby
Inside the lobby you'll find a "guess and win!" terminal plus a prize redemption terminal. If you activate the "guess and win!" terminal, then you'll be asked eight trivia questions:
- The Declaration of Independence was an act of what body? Second Continental Congress.
- How many North American colonies rebelled against Great Britain in 1776? 13.
- Who was the first person to sign the Declaration of Independence? John Hancock.
- How many delegates signed the Declaration of Independence? 56.
- Which one of the following is not a written section of the Declaration of Independence? Ratification.
- Who was the ruler of Great Britain when the Declaration was enacted in 1776? King George III.
- Complete this famous phrase from the Declaration: "Life, liberty, and the pursuit of..."? Happiness.
- Who was the principal author of the Declaration of Independence? Thomas Jefferson.
If you get a question wrong, then the terminal will reset, and you'll have to answer all of the questions again. When you get all of the questions right, you'll receive an
Archives Prize Voucher, which you can use at the prize redemption terminal to receive
Berry Mentats,
Grape Mentats, or
Orange Mentats. You'll find more
Archives Prize Vouchers in Berkeley's Office (#7).
2 - Bathrooms
You'll find a first aid box in each bathroom.
3 - Office (Upper Level)
In this office you'll find two grenade boxes, two mine boxes, and a first aid box.
4 - Classroom
You'll find four grenades and two ammunition boxes in this classroom.
5 - Skill Book
In the corner of this room you'll find a copy of
Duck and Cover (on the overturned school desk), two
Missiles, and a cash register.
6 - Safe
On the floor here you'll find a safe with an "average" lock.
7 - Berkeley's Office (Upper Level)
In this office you'll find a terminal and a wall safe. You can use the terminal to unlock the safe, or you can just pick the lock on the safe. Inside the safe you'll find some miscellaneous items, plus six
Archives Prize Vouchers, which you can use with the prize redemption terminal in the lobby (#1).
8 - Rotunda
This is where you'll meet Sydney, and it's also where you'll have to fend off two waves of super-mutant attacks. If you kill Sydney, or if she dies in the fighting, then you'll find
Combat Armor and
Sydney's 10mm "Ultra" SMG on her corpse.
You can also get the SMG after completing the quest, if you visit Sydney in
Underworld.
9 - Storage Room
In this storage room you'll find a grenade box, a mine box, and an ammunition box.
Also, on top of the shelves along the northern wall you can pick up a
Sheet Music Book. After completing the side quest
Agatha's Song, you'll be able to trade one of these books (there are six in total) to Agatha for the unique
Scoped .44 Magnum
Blackhawk.
10 - Storage Room (Upper Level)
In this storage room you'll find three ammunition boxes, one first aid box, and a toolbox.
11 - Laser Rifle
You'll find a
Laser Rifle on the ground here.
12 - Locked Gate
If you can pick the "very hard" lock on the gate, then in the shelves beyond it you'll find
Metal Armor, a
Metal Helmet, a
Stealth Boy, a
Mini Nuke, and a copy of
Duck and Cover.
13 - Cash Register Room
You'll find nine cash registers in the back of this room. You'll also find a
Laser Rifle, an ammunition box, and some other supplies on the floor of the room.
14 - Machine Room
You'll find a
Laser Pistol, a first aid box, and an ammunition box in this room.
15 - More Cash Registers
You'll find 15 more cash registers here. You're rich!
16 - Utility Gate
You'll need a science skill of at least 67 to repair and open this gate.
17 - Turret Generator
If you disable this generator, then you'll turn off the turrets in the vaults (#18, #19).
18 - Vault
In this vault you'll find five ammunition boxes, a grenade box, a mine box, a first aid box, a copy of
Lying, Congressional Style, and the
Bill of Rights (inside the archives security safe).
19 - Vault
In this vault you'll find three ammunition boxes, a grenade box, a mine box, and the
Magna Carta (inside the archives security safe).
20 - Dead Mercenary
You'll find a
Super Sledge next to the mercenary's corpse.
21 - Button's Office
You'll meet a protectron who thinks he's Button Gwinnett here. Regardless of how you deal with him, you'll be able to use the security terminal in the office to open the vault in the back of the room and also the doorways to the west (including Exit B), giving you an easy route out of the archives.
Inside the office and its attached vault, you'll find
Button's Wig, the
Declaration of Independence, a copy of
Tales of a Junktown Jerky Vendor, lots of ammunition, and more.
22 - Protectron Maintenance Bay
The only protectron you'll be able to do anything with in the maintenance bay is the backup protectron. If you go to its terminal, then you'll be able to download Thomas Jefferson's personality into it, which will cause it to start playing Galaxy News Radio when you activate it.
Exits:
- Exit to the wasteland.
- Elevator between the Main Level and the Archival Strongroom. You'll only be able to use this elevator after meeting Button (#21).
- Doorway between the Main Level and the Sub-Basement. You'll need to pick the "easy" lock or hack into the nearby "easy" terminal to go through the doorway.
- Elevator between the Main Level and the Secure East Wing. You'll only get to use this elevator if you agree to work with Sydney (#8).
- Doorway between the Sub-Basement and the Secure East Wing.
- Doorway between the Secure East Wing and the Archival Strongroom.


