 Did we miss anything in this section? Is there something we didn't discover?
Let us know!
Overview
Did we miss anything in this section? Is there something we didn't discover?
Let us know!
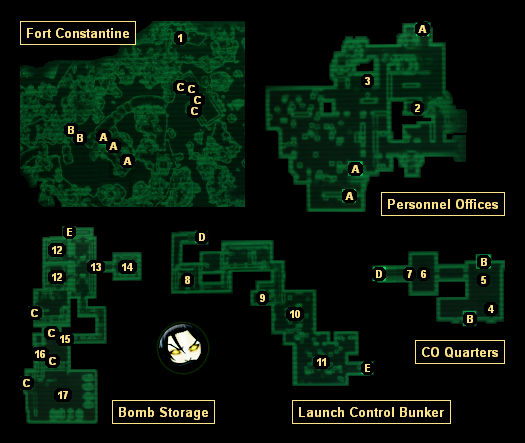
Overview
Fort Constantine is tied to the side quest
You Gotta Shoot 'Em in the Head. To reach everywhere in the fort, and especially to get into the super secure R&D storage room (#14), you'll need to pick up the three keys from the quest:
Dave's Special Key,
Dukov's Special Key, and
Ted Strayer's Special Key. Please refer to the
quest entry for more information about the keys.
1 - Water Tower
Depending upon where you are in the main questline, you might discover a lightly-defended Enclave camp near the base of the water tower.
2 - Locked Storage Closet
Inside the closet you'll find a first aid box and a copy of
Grognak the Barbarian.
3 - Turret Control Terminal
4 - Kitchen
You'll find a bottle of
Nuka-Cola Quantum in the kitchen's refrigerator.
5 - Living Room
You'll find a copy of
Guns and Bullets on the (non-usable) bed here. You'll also find a couple of
Pre-War Books in the shelves.
6 - Basement
You'll find a few useful things in the basement: a
Stealth Boy, a copy of the
Chinese Army: Spec. Ops. Training Manual (on a cinderblock), a
Bobblehead - Big Guns doll (in the open safe), and the
Fort Constantine Launch Codes (also in the safe). You can use the launch codes to initiate the launch of an ICBM (at #10), but the launch will fail, and nothing will come of it.
7 - Locked Door
You'll need
Ted Strayer's Special Key to unlock this door.
8 - Office
You'll find an
Assault Rifle and lots of ammunition here.
9 - Locked Storage Closet
To get into the closet you'll either need to pick the "average" lock on the door or hack into the "average" terminal next to it. Inside the closet you'll find a first aid box and not much else.
10 - Launch Control Office
Inside this office you'll find a launch control terminal, which you can use to launch an ICBM! Well, not really. If you attempt the launch, then you'll see lots of flashing lights and exploding computers, but nothing will happen. Afterwards, if you log into the computer again, it will report a "missile launch error" because of corrupted data.
Also in the office you'll find a copy of
Duck and Cover and a
Big Book of Science (both on desks).
11 - Living Quarters
You'll find two first aid boxes and several beds in this part of the bunker.
12 - Storage Rooms
To get into these storage rooms, you'll either have to pick "very hard" locks or hack into "very hard" terminals. Inside you'll find lots of guns and bullets, plus a copy of
Guns and Bullets (in the northern storage room).
13 - Locked Door / Tara
Slumped in front of the locked door you'll find the corpse of Tara, one of the mercenaries (along with Crowley et al) hired by Tenpenny to infiltrate the fort. You'll find the
Warhead Storage Key on her corpse. To get the door open, you'll need to use
Dave's Special Key.
14 - R&D Secure Storage Room
You'll find a few useful things in the storage room: a copy of the
D.C. Journal of Internal Medicine, a
Fat Man, two
Mini Nukes, and a terminal. If you log into the terminal and use it to shut down the nearby stasis field, then you'll also be able to grab a suit of
T-51b Power Armor and a
T-51b Power Helmet.
15 - Locked Door
You'll need the
Warhead Storage Key (#13) to open this door.
16 - Desk
You'll find a
Mini Nuke on the desk.
17 - Bomb Storage
You'll find lots of nuclear bombs in this storage room, but you won't be able to do anything with them (other than get yourself irradiated).
Exits:
- Entrances to the Personnel Offices.
- Entrances to the CO Quarters.
- Entrances into the Bomb Shelter. The two entrances on the ground level will start out locked with "very hard" locks, but you can open them using the
Warhead Storage Key (#13).
- Doorway between the CO Quarters and the Launch Control Bunker.
- Doorway between the Launch Control Bunker and Bomb Storage. You'll need
Dukov's Special Key to unlock the door.


