 Did we miss anything in this section? Is there something we didn't discover?
Let us know!
Overview
Did we miss anything in this section? Is there something we didn't discover?
Let us know!
Overview
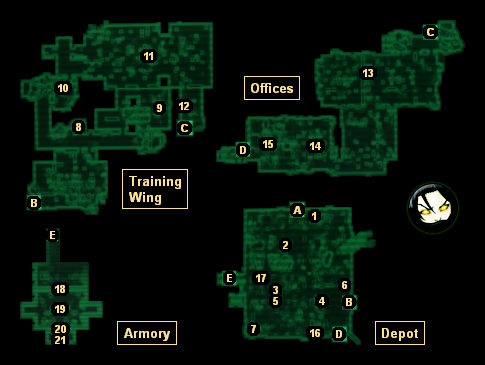
The main reason to visit the National Guard Depot is to gain access to its armory, which will require you to do some exploring. You'll start out in the main depot map, where you'll have to navigate through three overlapping levels. You won't be able to access the southern part of the highest level when you first arrive. To get to that part of the map and its all important electrical switch (#16), you'll first have to wind your way through the other parts of the main depot map and then make your way through the depot training wing and offices.
When you do finally reach the electrical switch, you'll just need to flip it to open the utility door (#5) on the lowest level of the main depot map (plus turn on the depot's alarms). Going through the utility door will give you access to the armory (via Exit E). Inside the armory (#19) you'll find the
Bobblehead - Small Guns doll, plus a bunch of guns, armor, ammunition, and drugs. You'll also find a terminal (#20) that controls access to a special bunker (#21), but you'll only be able to enter the bunker if you've tracked down all of the
Keller Family Transcripts in the wasteland.
1 - Machine Room (Level 1)
In this part of the depot, you'll find a bed, a workbench, and a first aid box.
2 - Turret Control Terminal (Level 1)
Hacking into this terminal will allow you to deactivate the turrets in the lower part of the depot map. The easiest way to get to the terminal is to drop down to it from above.
3 - Turret Control Terminal (Level 3)
Hacking into this terminal will allow you to deactivate the turrets in the upper part of the depot map.
4 - Storage Room (Level 1)
You'll find a copy of
Nikola Tesla and You in a shelf here.
5 - Utility Door (Level 1)
This door will start out locked, but you won't be able to pick it (despite its "very hard" lock). To get the door open, you'll have to make your way through the training wing and the offices, and then re-enter the main depot map on the highest level (via Exit D). On that level you'll find an electrical switch (#16), and flipping it will open the utility door plus turn on the alarms. Going through the utility door will give you access to the armory (via Exit E).
6 - Staircase
This staircase connects all three levels of the main depot map.
7 - Staircase
This staircase connects parts of Levels 2 and 3 of the main depot map.
8 - Turret Control Terminal
You can use the terminal here to shut down a nearby turret. Beneath the terminal you'll find a grenade box.
9 - Office (Upper Level)
You'll find a wall safe and
Tales of a Junktown Jerky Vendor (on a desk) in this office.
10 - Firing Range Reception Desk
You'll find some
Combat Helmets plus a bunch of guns and ammunition here.
11 - Firing Range
You'll find more
Combat Helmets, guns, and ammunition here.
12 - Shelves
You'll find three first aid boxes and an ammunition box in the shelves.
13 - Turret Control Terminal
14 - Long Counter
You'll find a copy of
Duck and Cover on the long counter here.
15 - Collapsed Ceiling
The debris here will allow you to climb up and reach the upper exit to the main depot map (Exit D).
16 - Electrical Switch (Level 3)
Flipping the switch here will turn on the alarms in the depot and also open up the utility door a couple of levels beneath you (#5). In fact, if you look to the northwest, you should be able to see the utility door and the flashing lights around it, making the trip to the now-accessible armory (via Exit E) pretty easy.
17 - Stairs
You'll need to flip the electrical switch on the northern wall to open the hatch covering the stairs.
18 - Utility Door
You'll have to flip yet another electrical switch to get this door open.
19 - Armory
You'll find a whole bunch of armor, drugs, weapons (including a
Minigun and a
Missile Launcher), and ammunition (including 10
Missiles) inside the armory. You'll also find the
Bobblehead - Small Guns doll on a shelf near the bunker door (#20).
20 - Bunker Door
The only way you'll be able to open this door is to learn the code for it. See the
Keller Family Transcripts section of the walkthrough for more information.
21 - Bunker
If you can make it into the bunker (which is actually much larger than what is shown on the map above), then you'll find lots of drugs, ammunition, and weapons, including an
Experimental MIRV and five
Mini Nukes. You'll also find a workbench, a safe, a bottle of
Nuka-Cola Quantum (in a crate under a table), a copy of
U.S. Army: 30 Handy Flamethrower Recipes, and several beds that you can sleep on. Just be careful of the glowing one (the last remnant of the Keller family?) that will attack you when you enter.
Exits:
- Exit to the wasteland.
- Doorway between the depot and the training wing. To reach this doorway on the depot side, you'll first have to climb the staircase on the eastern side of the building (#6) to reach Level 3, then you'll need to make your way west and north to the northwestern corner of the building, then you'll need to head straight south to reach the staircase to Level 2 (#7), and then you'll need to head straight east to find the exit. You'll know you're on the right track when you see a vending machine.
- Doorway between the training wing and the offices.
- Doorway between the offices and the depot. You won't be able to reach this exit directly from the lower levels of the depot. You'll only be able to use it as an exit after you've explored the training wing and the offices.
- Doorway between the depot and the armory.


