 Did we miss anything? Is there something we didn't discover? Let us know!
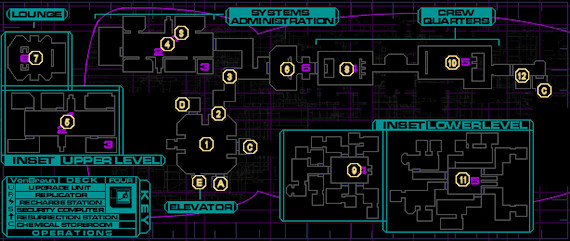
1 - Elevator Room
Did we miss anything? Is there something we didn't discover? Let us know!
1 - Elevator Room
After coming up from Hydroponics, you'll find yourself in a lobby area with Xerxes staring you down. Search around the right side for some crates containing Cigarettes, Version 2 Repair Software, and a Maintenance Tool, as well as an Audio Log sitting on top of them. The left side of the room has a Bio-Reconstruction Device for your convenience as well. Finally, there's another Audio Log on the floor at the North side of the room, where a possessed crew member details his hacking of the ship's Simulation Units.
For now, you'll find all the doors are locked, except the one marked at (A) leading to Bulkhead 41, otherwise known as Operations A. Proceed through the door to meet with Dr. Polito at last.
2 - Security Door
This door will only be open to you after you've visited Dr. Polito in Bulkhead 41/Operations A.
3 - Cyborg Assassin
Upon passing through the Security Door at (2), you'll see a strange robotic creature in red, as mentioned in the Audio Log found at (1). You'll have to hunt down and kill three of these guys throughout Operations in order to shut down the Simulation Units properly. As you get close, it will run off down the corridor; follow it to the left, but avoid the Security Camera near the entrance to the next room.
4 - Systems Administration
As mentioned above, be aware of the Security Camera on the way in. The Many will speak to you in a decidedly more threatening tone this time as you pass through the door. Inside, you'll find yourself attacked by a couple of new Hybrids - ones carrying grenades. They aren't any physically stronger, but you'll need to deal with them quickly to avoid a lot of pain. You may also come under attack by the
Cyborg Assassin you saw at (3) as you explore; although he's fast and has a somewhat powerful ranged attack, he's not that much tougher than a Cyborg Midwife. When he's dead, he'll drop a Quantum Simulation Chip, used to reprogram the Simulation Units you'll find around Deck 4; picking it up will yield you 10 Cyber Modules.
In the left-hand office as you enter, you'll find an Audio Log and Anti-Radiation Hypo in the desk; explore the end of the room, carefully, to find two Grub Pods hidden on the ceiling, which will dispense some Annelid Grubs on top of you if you get too close. The far-left office from the entrance has 15 Nanites in one desk and a Medical Hypo in another. The right-hand office houses some Anti-Personnel Bullets, while the far-right office has a perfect-quality Pistol and some Standard Bullets for you to find. The meeting room at the far end of Systems Administration has no loot, but take a look to see an analysis of Tau Ceti IV on-screen.
When you're done exploring, take the Grav Shaft in the middle of Systems Admin up to the second level.
5 - Systems Administration Upper Level
Above, things are laid out similarly to below. There's a Grenade Hybrid to deal with if you didn't kill him from below earlier. There isn't much to find here of critical importance, but there is a little bit of loot if you take the time to look.
The south-east office holds a desk with some useless junk, but you'll spot some not-so-useless Cyber Modules in a lower area. Upon jumping down, some steam vents inside will go off and start dealing minor damage. Quickly grab the 2 Cyber Modules and the box of 15 Nanites, then use the ladder to climb out. A desk in the south-west office holds 20 Nanites and Version 2 Modify Software for you, as well. All other offices are empty, so double back and proceed to the hallway at (3), then continue onward to Crew Quarters (6).
6 - Crew Quarters Foyer
Grab the Audio Log on the counter just before going through the door. Within, you'll find a dead body with a broken Shotgun, and some Rifled Slugs. Chances are you'll also hear a Monkey nearby, so proceed forward with caution, taking the Grav Shaft around the bend up to the Lounge at (7).
7 - Lounge
Up here you'll find not just a Monkey, but two Hybrids as well. Around the room, you'll spot a full suite of Upgrade Stations for you to use at your convenience, a Recharging Station, a corpse with 3 Cyber Modules, and a slot machine which, frankly, isn't worth using even once judging by my luck. When you're done upgrading, head back down and proceed into Crew Quarters (8).
8 - Crew Quarters & Replicator
Step through the door immediately upon entering and smack the Hybrid with your Wrench to avoid being taken by surprise later. Crew Quarters is laid out similarly to Systems Admin, a corridor with several rooms adjoining it, and two levels to explore. For now, head to the Replicator, but be wary of the corpse in front of it; it will release several Annelid Grubs as you approach. Deal with them and grab the 12 Anti-Personnel Bullets from the body, then check the Replicator; you'll need level 3 Repair to be able to fix it, but if you can, you'll be able to buy AP Bullets, Frag Grenades, Standard Bullets and Cigarettes, with a hack yielding EMP Grenades.
Once you're done poking around, take the Grav Shaft down to Crew Quarters Lower Level at (9).
9 - Crew Quarters Lower Level
There's a number of rooms to explore down here. The north-east one holds a Hybrid to kill and a Medical Hypo in a locker; the north-west contains 20 Nanites and an Anti-Toxin Hypo beyond a broken pipe; the south-east room holds Malik's body and an Audio Log detailing his final moments, as well as some Anti-Personnel Shells; the south-west room, meanwhile, holds Standard Combat Armor, Standard Bullets and another Audio Log.
Last, down the west hallway, you'll encounter a trap. As you proceed down towards the piano, an Annelid Arachnid will come out of one of the locked doors and attack you. It can be fairly tough to bring down if you're not prepared, so make sure you have some Anti-Toxin Hypos ready. On the floor of the piano room you'll find an Auto-Repair Unit, and in the bedroom locker, 3 Cyber Modules and 30 Nanites. The other two rooms are empty. When you're finished, ride the Grav Shaft back up to the top.
10 - Crew Quarters East
In the next room beyond the Replicator, you'll find several more rooms to explore. Beware of the Security Camera guarding the entrance, and another Cyborg Assassin (but not a red one). There's also a couple of Hybrids that will wander about, and you'll spot some Grub Pods and Grubs on the lower floor that you can take out from above. There's little to explore up here, but you will find an Audio Log on the east end of the room near its exit. Take the Grav Shaft down once more.
11 - Crew Quarters East Lower Level
There's some Annelid Grubs and their Pods to fend off if you didn't already do so from the upper level, but even so, there are a few minor dangers down here, as well as some reasonable loot. The south-east room holds a Maintenance Tool and more Annelids; the south room is home to 3 Cyber Modules in a bedroom locker, and some AP Bullets in the bathroom; the southwest room is guarded by a Cyborg Midwife and three Annelid Eggs, but yields 3 Cyber Modules, some Rifled Slugs, a Speed Booster, and 20 Nanites.
In the north-west room, some Annelid Grubs will drop from the ceiling down to you, and you'll find another Grub Pod to smash, in exchange for a Psi Hypo and Beaker in one bedroom locker, and, if you can hack the secure crate, 20 Nanites and a French-Epstein Device. The north room holds a Hybrid, as well as a SwiftBoost(TM) Implant, 10 Nanites and a Psi Hypo in separate lockers. Finally, there's a Monkey guarding a Medical Kit and some AP Bullets in the north-east room. Whew! Time to move on.
12 - Chemical Storeroom
Just outside, you'll find a hackable security crate containing an EndurBoost(TM) Implant if you need it. The Chemical Storeroom itself holds a manifest detailing its contents, among then some Sodium (Na) used to research the
Psi Boosters that you've likely spotted around the ship. The doorway nearby leads to Operations Sector C; feel free to enter when you're ready.
A - Transition to Operations Sector A
C - Transition to Operations Sector C
D - Transition to Operations Sector D
E - Elevator
S - Security Control Stations


