 Did we miss anything in this section? Is there something we didn't discover?
Let us know!
Enemies
Did we miss anything in this section? Is there something we didn't discover?
Let us know!
Enemies
- Phase Hunters
- Skeleton Marauders
Notable Loot
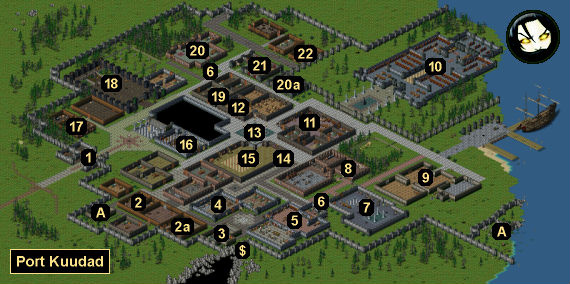
Annotations
1 - Front Gate
When you reach the front gate, you'll discover that just like Blackwater in Book I, you won't be able to simply walk inside. You'll have to do something to gain admittance. You'll have a few options for this:
- You can obtain a
Citizen Writ and show it to the gate guards. There are a few writs in the game, but the easiest to pick up can be found on a corpse in Wolfenwood.
- You can pay the gate guards 2000 gp.
- You can kill the gate guards and then open the gate yourself.
- You can hide from the guards (by using the Hide in Shadows skill or a
Potion of Invisibility) and then sneak into the gate house and open the gate yourself.
- You can enter the city via the
Port Kuudad Sewers (Exit A). To reach the outside entrance of the sewers, you'll need to enter the
Farrock Caves via the
Central Farrock Range, then exit the caves into the
Northern Farrock Range, and then head north into Port Kuudad.
2 - Warehouses
In the western warehouse (#2), you'll find a chest. If you open it, then you'll also open a secret entrance into the eastern warehouse (#2a). Upstairs in the eastern warehouse, you'll find a lever. Pulling the lever will open a gate upstairs in the mortuary (#3), which will lead you to an isolated part of the
Port Kuudad Sewers.
Note: Be careful when you go through the middle warehouse on your way to the eastern warehouse. The middle warehouse contains a few traps.
3 - Mortuary
Upstairs in the mortuary you'll discover a teleporter behind a closed gate. To open the gate, you'll need to pull a lever in the nearby warehouse (#2a). The teleporter will deposit you at a staircase, which will lead you down into an isolated part of the
Port Kuudad Sewers. Inside the sewers, a gate will close behind you, forcing you to take on a trio of Shadow Assassins. However, after defeating the assassins, you'll find two random chests (one locked), plus a lever that will re-open the sewer gate, allowing you to escape.
4 - Mama Fanny's Slop House and Hostel
Inside this inn, Fanny will sell you a variety of items, including skill books and potions. She'll also rent you a room for 30 gp a night.
5 - Excelsior Elixirs and Alchemy Supplies
Inside this shop, you'll meet Becka, who has many roles. She'll sell you ingredients, potions and recipes; she'll train you in Alchemy; she'll sell you a master recipe list for 750 gp (this is the only way to get the recipe for
Potions of Restoration); and she's involved in the side quest
Shortest Quest Ever.
To enter the back room of the shop, you'll just need to pull the lever in the bedroom. Becka will attack you if she sees you enter the back room (she won't care if you enter the bedroom), but inside you'll only find a bunch of ingredients.
6 - Well
7 - Mistfell Port Authority
Inside this building, you'll run into Ned, who will train you in Cartography and give you weather reports.
8 - The Mighty Hammer Ironworks
This is one of two smithies in the city. Inside you'll meet Big Sal, who will sell you a basic selection of weapons and armor. For more impressive equipment, you should head over to Radcliff's Exotics (#17). Big Sal will also give you the side quest
Shortest Quest Ever.
If you can steal your way into the back room of the smithy, then you'll find two weapon racks containing a random hammer and a random short sword. There isn't any way to reach the treasure chests in the smithy.
9 - Dock Warehouse
To enter this warehouse, you'll need to pull the lever next to its southern entrance. Inside, you'll encounter ten Phase Hunters. You'll have to defeat these spiders for the side quest
Spiders in the Warehouse.
10 - Lockston Hall
Inside the hall you'll meet Saint Gilhelm, who is involved in the main quests
Destiny Through a Viewing Glass (Part 3) and
The Secret Society. You might also notice a staircase past a closed gate. To reach the staircase (which leads down into the archives beneath the hall), you'll need to give Gilhelm the book
Orakur - Of Fact and Fiction, which is located in the
Southern Kessian Basin. Inside the archives, among other things, you'll find a bell tree. See the
Bells section for information about what to do with it.
11 - The Scholar's Inn
No matter what class you're playing, or what you say to Vincent the proprietor, Vincent won't want anything to do with you. However, you'll find four cabinets inside the rooms, and since the inn is located right next to the Port Kuudad quick travel point (#13), it makes a good spot for storing your extra gear.
12 - Marisa's Mercantile
Inside this shop, Marisa will sell you skill books, potions and more. If you can sneak into the back room of the shop, then you'll find two random chests (one locked and one trapped), plus a bag of gp.
13 - City Marker
When you activate the obelisk here, you'll add Port Kuudad to your Quick Travel menu.
14 - Captain Morgan
You might remember Captain Morgan from Book I. He was in charge of Darkford, and you probably stole a Gate Key from him. When you talk to him now, you'll learn that he was dishonorably discharged for losing that key, which allowed the Taurax to overrun Thaermore. Oops.
15 - Sonya's House of Pain II
Sonya will train you in Bludgeoning Weapons, Cleaving Weapons, and Swords.
Note: Just in case you didn't play Book I, Sonya was a trainer in that game as well, which is why her training facility is called "II" in this game.
16 - Office of Security and Authoritative Business
In this office you'll meet Edwin, the Minister of Affairs for Port Kuudad. He'll give you the quest
Spiders in the Warehouse, and he's also involved in the quest
News from Yoma Narrows. There isn't any way to get a
Citizen Writ from Edwin.
17 - Radcliff's Exotics
This is one of two smithies in Port Kuudad (the other is at #8). Radcliff the owner will sell you high quality weapons and armor.
18 - Druidic Temple of Atana
Inside this temple, you'll meet Magi Surami. For the right price, he'll heal you or de-curse you, and he'll also give you the side quest
Exterminator. If you venture into Surami's living quarters attached to the temple, then you'll find a cabinet containing a
Quill and Inkwell there. You'll need this item in the
Port Kuudad Sewers.
19 - Locked Apartment
In a chest in this apartment you'll find a
Citizen Writ and a
Compass.
20 - Magician's House
If you can defeat the locked and trapped front door of the house (#20), then inside you'll discover a teleporter that will take you to a nearby treasure chamber (#20a). However, when you move away from the teleporter in the treasure chamber, a trio of Skeleton Marauders will appear and attack you. This battle can be tough, but luckily you don't have to fight it all at once. If you get too damaged by the skeletons, then you can just run back to the teleporter and return to the magician's house. Just to the north of the house is a place you can camp and heal. As long as you can damage the skeletons each time you visit them, you should be able to defeat them eventually.
Inside the two chests in the treasure chamber, you'll find
Alchemy on the Go: A Field Guide, a
Blessed Rope Belt of the Healer, a
Healing Elixir II, a
Potion of Ogre Strength, a
Scroll of Abyssal Freeze, and a
Scroll of Ogre Strength.
21 - The Darkest Arts Magick Supplies
Inside this shop, you'll meet Luci, who will sell you scrolls, jewelry, ingredients and more. She'll also train you in Divination Magick and Elemental Magick.
22 - House
Inside this house, you'll meet a mother and her sick son. They're involved in the quest
To Save a Child's Life.
$ - Random Treasure Chest
Local Exits
- Entrance to the
Port Kuudad Sewers.
World Exits


