 Did we miss anything in this section? Is there something we didn't discover?
Let us know!
Enemies
Notable Loot
Annotations
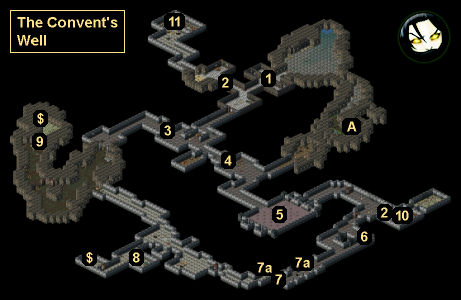
1 - Gate
Did we miss anything in this section? Is there something we didn't discover?
Let us know!
Enemies
Notable Loot
Annotations
1 - Gate
This gate is controlled by the levers on either side.
2 - Locked Doors
To open these doors, you'll need to pick their Level 4 locks, or you'll need to have the
Rusted Key (#8) in your possession.
3 - Gate
To open this gate you'll need to pull the lever on the northern side.
4 - Gate
To open this gate you'll need to pull the lever on the northern side.
5 - Cage Room
In the center of this room you'll find a lever. When you pull it, four cages will open, releasing Catacomb Rats. The exit gate will also open, and to keep it open you'll need to walk to it without stepping on any of the pressure plates in the room.
6 - Corpse
On this corpse you'll find a cloak and a pair of sandals.
7 - Secret Door / Pressure Plate
To open (or close) this secret door (#7), you'll need to stand on one of the nearby pressure plates (#7a).
8 - Julian
Julian is involved in the quest
A Missing Disciple. He'll attack you when you talk to him, and when he dies you'll find a
Rusted Key and earn 100 xp. The key will unlock two of the doors in the well (#2).
9 - Destructible Wall
This wall can be destroyed by a
Powder Keg. Conveniently, you'll find a
Powder Keg right next to it, so simply shoot the keg with a ranged attack to gain access to the room beyond.
10 - Table
On this table you'll find a
Scribbled Parchment, a
Quill and Inkwell (which you'll need later when you reach Port Kuudad), and a
Small Ruby.
11 - Survival Supplies
In this room you'll discover 17 sealed barrels plus a locked, trapped, random chest. If you take the time you bash open all of the barrels, then you'll find a bit of food, but it's probably not worth the effort.
$ - Treasure Chest
Local Exits
- Ladder to
Yoma River Valley.


