 Did we miss anything in this section? Is there something we didn't discover?
Let us know!
Enemies
Did we miss anything in this section? Is there something we didn't discover?
Let us know!
Enemies
- Brimstone Spiders
- Pyrus Dragonels
- Taurax Legionnaires
- Taurax Scouts
- Taurax Spearmasters
Notable Loot
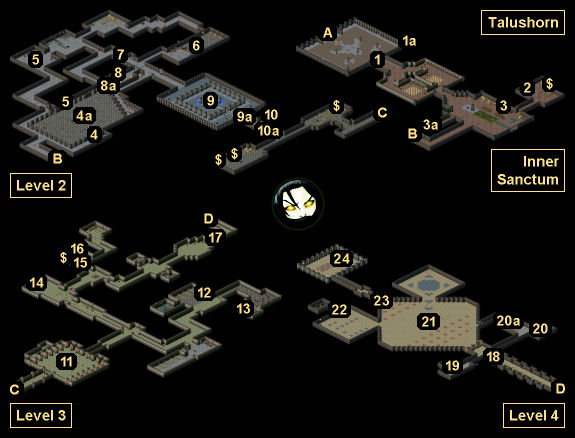
Annotations
1 - Closed Gate / Lever
To open the gate here (#1), you'll need to pull a nearby lever (#1a). Then when you go through the gate, you'll automatically step on a pressure plate that will close the gate behind you. But note: the pressure plate is a toggle. Stepping on it again will open the gate back up, so you won't be locked inside Talushorn.
2 - Treasure Chest
Inside this chest you'll find two
Healing Elixirs III and two
Mana Potions III.
3 - Levers / Gates
Pulling the first lever (#3) will open up a gate, which will allow you to access the second lever (#3a). Pulling the second lever will open the gate blocking the stairs to Level 2 (Exit B).
4 - Gate / Arena
To open the arena gate (#4), you'll just need to pull the nearby lever. Inside the arena itself (#4a), you'll discover a Taurax Legionnaire battling two Brimstone Spiders. If you want, you can join in the melee, or you can just pick off the winner.
5 - Powder Kegs
You'll find one or more
Powder Kegs in these locations.
6 - Target Range
You'll encounter a pair of Taurax Spearmasters here. You'll need to destroy one of the fences in the target range -- probably by using a
Powder Keg (#5) -- to delve deeper into the fortress.
7 - Closed Gate
You'll only be able to open this gate by pulling the lever on the eastern side.
8 - Lever / Gate
If you pull the lever here (#8), then you'll open a gate (#8a) leading into the arena (#4a). Next to the lever you'll find a random treasure chest.
9 - Prison / Gate
To open the outer gate to the prison (#9), you'll just need to pull the lever right next to the entrance. You won't be able to enter the inner prison, but if you click on the creature inside, then you'll learn that it's an Orakur named Shina. Shina will tell you that he and the One are beings alien to your world, and that you must not destroy any of the crux stones, or else "you will upset the balance of every living thing in Eschalon." After the conversation Shina will die, and three Taurax soldiers will attack you, opening a nearby gate in the process (#9a).
10 - Lever / Gate
Pulling the lever here (#10) will open the gate nearby (#10a).
11 - Dragonel Trap
|
 |
| Puzzle Clue |
|
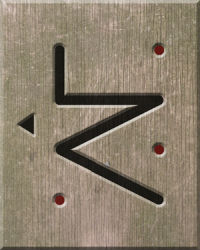
In this room you'll find two rows of four levers and a pressure plate in between them. What you'll need to do to solve the puzzle is move the levers into the correct position and then stand on the pressure plate. A clue for this puzzle is shown on the plaque just outside the room (and also shown in the insert to the right). The trick to the clue is that the arrow on it represents the exit rather than the entrance, which means to solve the puzzle you'll need to pull the first and third levers in the first row, and the second, third and fourth levers in the second row. Depending on which levers you move, there are two possible outcomes:
- If you step onto the pressure plate while the levers are in the correct position, then the exit gate will open, allowing you to proceed, but you won't earn any xp.
- If you step onto the pressure plate while the levers are in the wrong position, then the entrance gate will close, and 18 Pyrus Dragonels will be released to attack you. Pyrus Dragonels are much easier to kill than Taurax soldiers, so the trap isn't exactly deadly. Plus, Pyrus Dragonels are worth 100 xp each, so this is the route to take if you want the best reward.
After killing the dragonels, you'll need to pull the lever on the left side of the room. Doing so will open the entrance and exit gates to the room, allowing you to proceed.
12 - Treasure Chest
Inside this chest you'll find two
Healing Elixirs III and an
Elixir of Cure Ailment.
13 - Treasure Chest
Inside this chest you'll find the unique sword
Hellrime.
14 - Treasure Chests
In this room you'll find three random treasure chests, but when you approach them, two Taurax Spearmasters will try to ambush you from behind.
15 - Taurax Legionnaire
Somewhere around here, you'll run into a Taurax Legionnaire who will drop an
Advanced Key when it dies. You'll need the key to unlock the door (#17) blocking access to the exit staircase (Exit D).
16 - Cabinet
Inside the cabinet here you'll find a
Mighty Ring.
17 - Locked Door
To open this door, you'll need to pick its Level 10 lock, or you'll need to acquire an
Advanced Key (#15).
Note: You won't be able to use the Lock Melt spell to open the door.
18 - Gates
When you pass through the gates here, they'll close behind you, locking you inside Talushorn. So make sure you have the
Strange Viewing Glass and the
Crux of Fire with you because you'll need them for the end of the game.
19 - Strange Device
Destroying the strange device here will open the door right next to it and allow you to loot a treasure chest. Inside the chest you'll find a
Potion of Invisibility I and an
Elixir of Cure Ailment.
20 - Strange Device
Destroying the strange device here (#20) will open a nearby door (#20a). Next to the strange device you'll discover a chest containing two
Healing Elixirs III and two
Mana Potions III.
21 - Battle Chamber
When you enter this chamber, the entrance gate will close behind you, locking you inside. Inside the chamber you'll encounter General Ghorr plus a few other Taurax stragglers. General Ghorr is a tough melee boss -- he hits hard and he has about 1200 hit points -- but he's not very smart. If you run around in between the lava squares in the chamber, then Ghorr will happily walk into them, sometimes taking damage. If you're desperate then you can actually kill him this way if you're patient enough. Otherwise, just whack him with whatever your best attacks are until he eventually goes down.
When General Ghorr dies, you'll earn 10,000 xp, and you'll find a
Gold Key on his corpse. The key will allow you to open the exit door from the chamber (#23).
22 - Combination Door
To open this door, you'll need to enter in a 4-digit code. You can figure out the code by looking at the tiles on the floor, which display 2514. In the chests beyond you'll find a
Bar of Gold, a
Bar of Mithril,
Goblin Dice, two
Healing Elixirs III, a
Large Diamond, two
Mana Potions III, a
Skull, and a random amount of gp.
23 - Locked Door
To open this door, you'll either need to pick its Level 10 lock, or you'll need to acquire the
Gold Key from General Ghorr (#21).
24 - Crux of Ages
You'll find the Crux of Ages here sitting on a pedestal. Approaching it will complete the main quest
Destroy the Crux, Part 3: Locate the Crux of Ages. While you're near the crux, you'll need to activate the
Strange Viewing Glass, which will cause Korren to appear in the room with you. When you talk to Korren, you'll end the game (in the same way no matter what you say). Congratulations for completing
Eschalon: Book II!
Note: If you kill Korren in the crux chamber, then a window will pop up with the following words: "You have killed Korren, which has broken the game! You have earned the title Saboteur. We hope you are proud of yourself for the mess you've made." You won't receive an ending cinematic for following this path.
$ - Random Treasure Chest
Local Exits
- Exit to
Talushorn (Exterior).
- Stairs between the Inner Sanctum and Level 2.
- Stairs between Level 2 and Level 3.
- Stairs between Level 3 and Level 4.


