 Encounter any problems with this walkthrough? Have comments? Let us know!
1:
Encounter any problems with this walkthrough? Have comments? Let us know!
1: After your short trip to the cemetery, you're whisked away to Paris and dropped off on this roof. Over to one side, there are peep holes where you can see below. If you're good with a sniper rifle, you can take out at least 2 MJ12 commandos you see roaming below without any retrobution.
2: Head to the side of the rooftop building, switch on your light and blow open the door with a LAM or lockpick it open. Inside is a book with the lift code 4003. Use it on the nearby lift to take it down.
3: When you reach the bottom, head up the stairs to talk with a lone woman in a kitchen-type room who's been having trouble with greasels and her cats. She'll give you the code 0001 to access the sewers. Before leaving the room, climb the crates to a slanted crossbeam above. Climb the crossbeam to a small ledge and take it to a little area with crates and supplies. Exit back downstairs and then down the long square stairway to the bottom. Below is a hazmat suit in its hanger, useful for the room inside the window. Walk around to the large door and enter the code 0001 on the keypad to open it.
4: Don the hazmat and get ready to activate regen if your environmental training isn't up to snuff (mine usually isn't). The area is highly radiated, but all you need to do is stay to the left of the room and exit through the far open doorway. In the small rectangular room will be a repair bot and a ladder descending to the sewers.
5: Take the ladder down and follow the shaft to a greasel. Further up the shaft, without taking any branches is another one. I found the sniper rifle useful as they were all taken out in 2 shots (though my skill was maxed). Use whatever high-powered weapon you can find, as they bite hard. The other two greasels are huddled together in an alcove if you take the first right branch around the bend. When you've finished, head back the way you came to the woman for a decent skill point reward, and then back down here to the sewers, stopping at the repair bot as needed.
6: This time head all the way down the shaft without taking any side branches but turning where you have to, and you'll come to a small ladder with unlocked grate that unleashes you in the area you saw from the building above -- the exact one where you may have sniped the MJ12 commandos. In fact, there are three in this area. One along the southern fence, one on the western side near or on the ramp that says Metropolitan (or something like it), and another on the eastern side, near another building. Use your cloak aug if they spot you or take them any way you wish.
7: Two things of note in this area before we head behind the eastern building to break in. There's a small quest down the ramp with the Metro sign. Talk to Dafoe down there who will give you a good discount on his wares (weapon mod included) if you take down two guards further in who are cramping his business. If you take on the quest, just across from Dafoe is a grate. Enter and take a right. Lockpick your way into a large room with a security computer terminal on the wall. There will be a robot outside the room roaming the halls. Turn off the cameras with the security terminal and proceed quietly to the only door in the room. Beyond another antechamber are the two guards at their post (the guy says three but there are only two). Take them out with a prod or a gun, and return to Dafoe for a discount. There are some crates with useful ammo including 30.06 if you explore this small area where the robot roams.
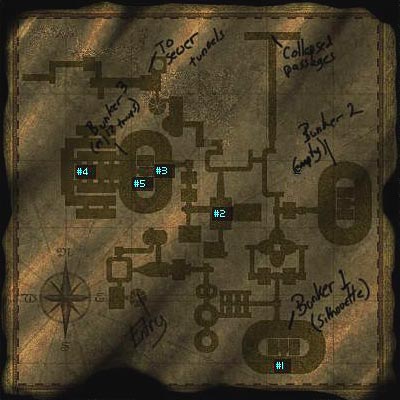
8: The other point of interest is on the western side of the courtyard you appear in after the sewers. Through a locked door you'll find a couple of plush offices and carpeted stairways. Take a right and go up the stairs to the first open office. Inside the locked cabinet is a datacube with the codes "rzelazny" and pass "shadowjack", along with a warehouse key. Use the security computer terminal with code "rzelazny" and "shadowjack" on the wall to disable the cameras. Take the stairs back down to a large door to the warehouse and unlock it using your key. Inside is a repair bot and key to the office along with some supply crates. Head back upstairs to the office around the first corner and unlock it with your key. Inside is a datacube with ATM account 2221969/dullbill. Now it's time to enter the catacombs through the building on the east side of the courtyard.
9: If you haven't dispatched or avoided three MJ12's in the area you've got one more. It may be around this building. Take the alley to the left (north) of the building and around to a boarded up door. Break them and enter, winding around to a set of circular stairs. Look in the nearby office for a datacube with map of the catacombs. Descend.
10: The catacombs are easy to navigate because they are linear. There's of course a few branches here and there but the map is easy to follow. Therefore I will provide detailed information without all the turn information. The map also has pre-written labels, but I've added my own to supplement it. You enter where it says enter and your first job is to make it to the Silhouette bunker where, appropriately, the map says Silhouette. Yet there are several MJ12 commandos (and normal troops) walking around. The best advice I can tell you with regard to the commandos is to snipe them in the head. With good sniping, even the commandos go down in one shot. All of them are also approachable from behind and can be taken down with a prod where the upper body meets the belt, right in the middle, if that's your thing, but it takes patience to wait for them to walk their patrols.
11: When you get to the T-intersection just above Bunker 1, push any of the two bricks jutting out and a wall will slide open, revealing the bunker. Walk around to the back to where I've marked #1 on the map, and have a chat with Chad. He'll help you if you do him a favor first. Rescue a couple hostages in Bunker 3, right in MJ12 territory. That's going to be a little more difficult but nothing you haven't handled yet but he gives you a blast door key (for the door at the intersection) and another map.
12: Using the map as a guide, in the clover shaped area in between Bunkers 1 and 2, there's a locked footlocker. Inside is a datacube with the access codes: "hela" and "ragnarok". Inside Bunker 2 is an equipment dealer selling darts, but nothing else of value. Passing up Bunker 2, if you go down that straightaway to the north you'll find a couple useful crates, one with 30.06 ammo. There's a LAM on the wall so be careful that you disarm as you approach.
13: Head to area #2, where a couple of MJ12 troopers await. You'll see a cross at the end of the right hallway. Take the south passage to a room with a ladder. Up it is an electrical generator you can jump up on if you have the Speed aug, and then crouch/jump up to the skinny ledge above that. In the next room, easily visible is a repair bot. Drop down into the room and press the switch to exit.
14: After checking the direct south passage from #2, head toward the cross (in the western hallway), crouch and enter a hole behind the cross. Follow the shaft to an opening where MJ12 commandos and troops patrol. Just ahead of you at #3 is a small pool at the base of the wall. Prepare for a semi-long breath and head down it. When you emerge at #4, crouch and hide behind the crates. There's a WIB standing just to the north and a couple MJ12 commandos patrolling the halls to the east. Either snipe her from behind the crates and wait until the coast is clear, or sneak up on her or the commando and use the prod by watching their patterns. Find the security computer terminal on the western wall where the MIB was and enter the code "hela" and "ragnarok" to disable the cameras. On the table are supplies plus the sewer entrance key.
15: On the east side of the hallway is stairway up with MJ12 commandos, troops and supplies. Dispatch them and head down again, either by the stairway or ladder on the opposite side. Watch for patrols and take them out if you see them because once the hostages are released, they'll be shot at if they pass the patrols. Open the blast door at #5, enter and free the hostages, and then follow them all the way back to the Silhouette bunker to speak with Chad. You'll get a large skill point bonus and their thanks.
16: Head back toward Bunker 3, but instead take the path to the note that says "to sewer tunnels". Open the gate using the sewer key you picked up in Bunker 3, and proceed until you dead end at a ladder leading down. Take it and you'll almost be inside the city proper. When you get to the first T-intersection, take a right. Follow it down to its end, which dead ends at a ladder leading up to a locked grate. The left branch by the way takes you to another ladder and unlocked grate, but leads out into the heart of MJ12 territory and you'd need to activate your Cloak or thermoptic camo to have a good chance of survival. The locked grate leads to a semi-remote area. We'll continue on the next page when you enter onto the streets of Paris.


