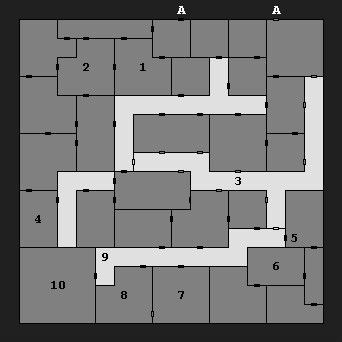
 Area Note
As you make your way through the Fire Knives Hideout, you'll find lots of dead Fire Knives.
That's because you're following in the wake of Gharri of Gond (the priest that Princess Nacacia
ran off with), who attempted to rescue the princess but failed (he only made it to #2). That
leaves the rescue up to you.
1 - Blade Barrier
Gharri of Gond cast "blade barrier" here. If you "enter the blades" then your party will take
a whole lot of damage, so instead you should "wait" for the blades to die down.
2 - Held Fire Knives
Gharri of Gond cast "hold person" here, and, as a result, you'll find a "number of people
frozen in positions of battle." If you "interrogate" them, then they'll tell you their
story (
journal entry 26), and you'll learn that Gharri of Gond was finally captured
in this room. If you "kill" them, then you won't learn or receive anything.
3 - Secret Passage
The Fire Knives don't know about this passage, so it is safe to rest here.
4 - Torture Chamber
You'll have to fight six Fire Knives here, but if you defeat them then you'll be able to
rescue Gharri of Gond from his torture rack. He'll insist that you go on without him.
"Don't worry about me. Rescue Nacacia; she's in here somewhere."
5 - Office
If you "look" here you will find a desk with some papers inside (
journal entry 9).
You'll also discover five
darts +2,
padded armor +1, and some money and
jewels.
6 - Library
In the library you'll find a charred body clutching a piece of paper (
journal entry 29).
7 - Hospital
You'll hear some "mutterings" here (
journal entry 27).
8 - Armory
When you enter the armory you'll discover a metal box. Inside you'll find a
necklace of
missiles,
elfin chain mail, a
long sword +3 frost brand, a
long sword +1
flame tongue,
bracers of AC 10 (cursed), a
mace +2, and a
flail +2.
9 - Checkpoint
You'll have to face seven Fire Knives here.
10 - Fire Knives Leader
The Fire Knives leader will address you when you enter the room (
journal entry 11),
but then Princess Nacacia will slip out of her bonds and give you an opportunity to attack.
You'll have to face about 20 Fire Knives and a mage. The Fire Knives aren't very tough,
and the mage will be far enough away that it won't be able to cast "stinking cloud" on you,
so try to spread out your forces a little to prevent the Fire Knives from hitting your
spellcasters with arrows. Then just methodically work your way through them, focusing your
ranged attacks on the mage first. If you have a couple "fireball" spells available, you might
be able to kill most of the Fire Knives with them, making the battle much easier.
Once the battle is over, Princess Nacacia will force the Fire Knives leader to remove one of
your bonds (
journal entry 54). Then the king will arrive, and while he won't be happy
that you tried to kill him earlier, he'll take into consideration that you tried to rescue his
daughter Nacacia, and so he'll only banish you from Cormyr lands (
journal entry 53).
Finally, Gharri of Gond will stumble into the room, and he and the princess will flee to the
north.
Next you'll find yourself in a camp outside the city. After having a strange dream, you'll
appear on the Wilderness map, and you'll have to pick a place to go. You won't be able to
re-enter Tilverton. We suggest that you first "camp" to heal your wounds and then travel to
Hap via Ashabenford, the Standing Stone, and Essembra.
Exits:
-
Passage to the Tilverton Sewers.


