 Did we miss anything in this location? Is there something we didn't discover? Let us know!
OVERVIEW:
Did we miss anything in this location? Is there something we didn't discover? Let us know!
OVERVIEW:
Ulgoth's Beard is a small village added into the original Baldur's Gate by the Tales of the Sword Coast expansion pack. The three extra components of the expansion pack, Durlag's Tower, Ice Island and Werewolf Island, all have their starting points within Ulgoth's Beard, along with the quests that relate to them specifically.
There is no combat within the village, and there are some nice items to purchase. However, access to the village itself is difficult early on, due to the ankhegs which are situated within map AR1400 and AR0900. As such, most groups will arrive at Ulgoth's Beard some time in Chapter 4 or 5.
STORY:
The village of Ulgoth's Beard lies on the banks of the River Chionthar, just upstream from Baldur's Gate and the open sea beyond. This farm-dotted countryside is usually a peaceful haven from the turmoil of the Sword Coast, although as of late the same can not be said of Ulgoth's Beard itself. The simple fishing village has become the source of many a rumour in recent days. Rumours of an ancient cult risen again, unsubstantiated tales of a murderous creature stalking the night, and talk of strange goings on in the house of Shandalar, the powerful and eccentric mage who makes his home in the normally sleepy village. You have also heard with certainty that tours of the fabled Tower of Durlag operate from Ulgoth's Beard, and that it is truly a place where adventurers can test their mettle. Perhaps such a test will better prepare you to fight the darkness that threatens to destroy the Sword Coast and you with it.
QUESTS "AT-A-GLANCE":
- Join Ike's tour of Durlag's Tower.
- Retrieve Hurgan's grandpa's dagger from Durlag's Tower.
- Retrieve Shandalar's cloak from Ice Isle.
- Retrieve Dalton from Durlag's Tower.
- Retrieve the sea charts for Mendas.
- Retrieve Balduran's log book for Mendas.
ITEMS "AT-A-GLANCE":
- Ring of Free Action (Dushai)
- Scroll of Web (Dushai)
- Bastard sword +1, +3 vs Shapeshifters
- Warhammer +1, +4 vs Giant Humanoids (Hurgan)
- Darts +1
- Darts of Stunning
- Acid Arrows
- Arrows +2
- Bolts +1
- Bolts of Lightning
- Bullets +2
- Large Shield +1
- Cloak of Displacement
- Quarterstaff +3
- Greagan's Harp
- Wand of the Heavens
- Wand of Frost
- Ring of Invisibility
- Greenstone Amulet
- Mental Domination
- Defensive Harmony
- Protection vs Lightning
- Remove Curse
- Emotion
- Greater Malison
- Improved Invisibility
- Feeblemind (Shandalar)
- Otiluke's Resilient Sphere (Shandalar)
- Emotion (Shandalar)
- Greater Malison (Shandalar)
- Spirit Armour (Shandalar)
- Shandalar's Wardstone
- Chainmail +3 (Baresh - only after Werewolf Isle has been visited)
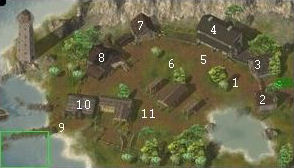
LOCATIONS:
1 - DUSHAI (GNOME MYSTIC):
The first time you talk with her she says she's meditating and does not want to speak with you for the time being. Speak with her several hours later, and she can be paid to tell of Balduran, the hero who built Baldur's Gate. Pickpocket her for a Ring of Free Action and a Scroll of Web.
2 - EMPTY HOUSE:
Bedside tables: 13gp.
Bookcase: History of Amn.
Locked cabinet: Long Sword, Chainmail.
3 - COMMONER'S HOUSE:
A generic commoner dwells within. Bedside tables: History of the Valley of the Gods, a Pearl and a dagger. Bookcase: History of the North. Locked cabinet: Bastard sword +1, +3 vs shapeshifters (Kondar), 33gp, cursed potion of speed. Note that attempting to get the pearl or opening the locked cabinet automatically summons the guards, even if the commoner is slain.
4 - ULGOTH'S BEARD INN:
Hurgan Stoneblade. A dwarf who speaks to the party as soon as you enter the Inn. He has a Quest - retrieve his granda's dagger Soultaker from the bottom level of Durlag's Tower. Pickpocket him for his Warhammer +1, +4 vs giant humanoids and a diamond.
Galkin - offers to give the group a dwarven wardstone in exchange for covering his 900gp bar tab (that's a lot of drinking!). He also mentioned that the wardstone is stolen, and the original owner may come looking for it. The wardstone can then be used within Durlag's Tower.
Locked bedside table - 52gp. Locked wardrobe - 70gp, Warhammer +1.
Bartender - all four rooms. No stealing or ID. Many good items to purchase including Darts +1, Darts of Stunning, Acid Arrows, Arrows +2, Bolts +1, Bolts of Lightning, Bullets +2, Large Shield +1, Cloak of Displacement, Quarterstaff +3, Greagan's Harp, Wand of the Heavens, Wand of Frost, Ring of Invisibility, Greenstone Amulet, and scrolls of Mental Domination, Defensive Harmony, Protection vs Lightning, Remove Curse, Emotion, Greater Malison and Improved Invisibility.
5 - IKE:
He offers to lead the party through Durlag's Tower for 60gp, and won't lower his price regardless. If you accept his offer, he vanishes, telling you to meet him at the base of the Tower as soon as possible. Both the Journal and World Map are updated. Refer to that section for more information on Ike.
6 - SHANDALAR:
He asks the party to retrieve his cloak from the Ice Labyrinth, and will teleport the group there directly. If the group has previously been to Oberan's Estate (in Central Baldur's Gate) and killed the three mages on the top floor, his attitude is quite different. {NB: my evil party will check this out when they get to this section.} Pickpocket him for scrolls of Remove Curse, Feeblemind, Emotion, Greater Malison, Otiluke's Resilient Sphere and Spirit Armour, Shandalar's Wardstone, and two potions of Heroism. You gain 500XP for returning his cloak, but no other reward.
7 - THERELLA'S HOME:
Therella begs for you to find and return her son Dalton, who journeyed to Durlag's Tower with some adventurers.
Bedside table - 2gp, a dagger.
Bookcase - History of the Bell in the Depths.
Locked Vabinet - 3gp.
Taking any of these items summons the guards.
8 - SHANDALAR'S HOME:
This house has two levels - the main level and a basement. The main level is laid out similar to a shop, however there is nothing here to steal. The basement has a large sigil on the ground, that has (at this point in time) no apparent usage.
9 - FENRUS BOULON:
Fenrus tells you the story of Durlag from the infamous Durlag's Tower. Pickpocket him for a Rainbow Obsidian necklace and an Onyx Ring.
10 - MENDAS' HOUSE:
Mendas speaks to the group when they enter, asking them to help him locate an island in the Trackless Sea. Whilst he organizes a boat, he asks you to retrieve charts from the Merchant League in the Northeast section of Baldur's Gate (refer to that section for more information). When you return with the charts, he gives you 2000gp as a reward, and says he has a boat ready to head to the island. Heading outside to the docks, Mendas then offers to send you to Werewolf Island (refer to that section for more information).
Locked cabinet - 980gp.
As you leave Mendas' house, Calahan approaches you. For 20gp he will tell you that Mendas is not from where he claims to be. He can be pickpocketed for a Black Opal and a Gold Ring.
When the group returns from Werewolf Isle, they are approached by Baresh, servant to Mendas, who gets a little upset when he notices that Kaishas is not with you. Entering Mendas' house precipitates some angry questions from Mendas, which rapidly degerated into combat. Both Mendas and Baresh turn into Loup Garou. Baresh is worth 420XP, and Mendas 2200XP. Baresh's body has Chainmail +3 and some non-magical items, Mendas has 93gp.
11 - DELSVIRFTANYON:
A gnome merchant who is closing down his business due to lack of customers (the bandits on the roads are stopping the tours to Durlag's Tower). For 500gp you can purchase his entire stock (alternatively it can all be pickpocketed from him as well, although this may take several save-restores before all of his stock can be claimed). His stock consists of a gold ring, a silver ring, an onyx ring, a short sword, a silver necklace, a fake wardstone and a Dwarven Rune Wardstone.
AT THE COMPLETION OF DURLAG'S TOWER:
Please keep in mind that this sequence is only triggered if you are carrying Soultaker, the dagger from the Demonknight at the bottom of Durlag's Tower.
The Village of Ulgoth's Beard has been overrun with Cultists! At the entrance to the village waits the first (there are several others invisible around him) and he demands the return of Soultaker. Not giving it to him precipitates combat - and this is quite a hard combat too, as the Cultists backstab, are Hasted and also are no slouches when it comes to fisticuffs. The initial bunch are two Cult Assassins, a Cult Enforcer (fighter/mage), two Cult Guards and two Cult Archers. Swarm them with summons if you can, but you will be in melee straight away. Try not to get killed!
The Enforcer drops a Wand of Frost, a Long Sword +1 and a Knave's Robe. The Assassins drop a Potion of Heroism and some non-magical stuff. The Archers drop 5 Arrows of Biting and some non-magical stuff and the Guards drop a Potion of Heroism and a bunch of non-magical stuff.
Approaching Shandalar's House, you will note that the front door is guarded by a Cult Guard. Speaking with him summons a bunch of Cultists, so the best way to handle him is to kill him on the spot.
Before entering Shandalar's House prepare for a large and nasty fight - however try to save your spells for the next stage of dealing with the Cult. There are two Cult Assassins, two Cult Enforcers (fighter/mages), two Cult Guards, two cult Archers and a Cult Mage. This is a very messy fight, as the Assassins will Hide in Shadows and backstab a lot (they target your Clerics, too), and the Enforcers and the Mage cast a ton of spells (Charm, Fear, Horror and Web were all seen). Not much in the way of treasure, either, mostly non-magical stuff. The Mage drops 100gp, a Staff +1, a Wand of Sleep and Traveller's Robes. The Enforcers drop a Wand of Frost, a Long Sword +1 and a Knave's Robe. The Archers drop 5 Arrows of Biting. The rest is non-magical, with a little bit of coins thrown in.
Downstairs you'll face probably the toughest battle in ToSC - Aec'Letec the Nabassu. Even the final battle with Sarevok is not as difficult. You NEED to buff up as much as possible. Potions of Storm Giant Strength, Invulnerability, Haste, Chant, Defensive Harmony, Protection versus Evil, Chaotic Commands, Protection from Magic. Use them all, you will need them!
Upon entering the basement, you will see Tracea Carol, the leader of the Cult, and six Cult members (who stand around and do nothing). If you are really quick, you can whack Tracea for some damage before the conversation with her starts. During the conversation you can attempt to convince her to stop summoning Aec'Letec, but regardless of what you say, she will summon the demon regardless.
When Aec'Letec appears, immediately block him with summons. Kill Tracea first - she is a reasonably powerful spellcaster, and will cast Confuse, Dire Charm and other irritating spells along those lines. Next kill off the six Cultists who are just standing around doing nothing. If you don't kill them - Aec'Letec takes over their bodies when you slay it's original form, and you have to kill it again!
The really dangerous part of this fight is Aec'Letec's Death Gaze. When he locks eyes with a PC, that character is held and will shortly turn into a Ghoul (and permanently slain), unless the gaze effect is cancelled (via a Dispel Magic). Increasing your saves is the only real defence (and it's not a certain one, either). Potions of Invulnerability are a must for front line fighters.
With my Good party, I filled the area where Aec'Letec appears (the rune) with summons, and sent Minsc wearing Boots of Speed to kill the six Cultists, whilst Ajantis attacked Aec'Letec (no way was he going to do enough damage to kill the demon before Minsc killed all six Cultists). The remaining guys concentrated on Tracea (although several Magic Missiles took care of her). Then the fighters dog-piled Aec'Letec and the rest of us hit him with missile weapons and spells - which did little but certainly helped!
Tracea is worth 2000XP, and has 102gp. Aec'Letec is worth 16000XP but drops no treasure (drat him!).
Once the Cult is cleared, return to chat with Hurgan Stoneblade, he will thank you for a job well done and wander off. No reward from him either! I was thankful I picked his pocket earlier. :)
Thus finishes Tales of the Sword Coast. Now, on to Sarevok (who, after Aec'Letec, is a complete wuss)...


