 Did we miss anything in this location? Is there something we didn't discover? Let us know!
OVERVIEW:
Did we miss anything in this location? Is there something we didn't discover? Let us know!
OVERVIEW:
Level Three of Durlag's Tower isn't very large, and only has a few enemies to deal with. That said, those enemies can be extremely dangerous, and are quite tough. The level itself is very straight-forward, and there are no real quests or tasks for you to do whilst here. The only real conundrum facing the group is how to get down to Level 4.
STORY:
This level was originally (hypothetically) constructed as somewhere for the Clan to relax (the Topiary Room) and as somewhere Durlag could show off his greatest trophy (the huge ancient dragon skeleton). After the Clan was destroyed by the Faceless Ones (dopplegangers) Durlag had the level converted into a death trap, with powerful monsters and several very nasty traps.
Also, this level was meant to be a puzzle preventing the invaders from accessing the hidden Level 4, where Durlag placed the remains of his wife and son.
QUESTS "AT-A-GLANCE":
- Find an exit to Level 4.
ITEMS "AT-A-GLANCE":
- Please refer to below locations for the items you can find on this level. The list is too extensive to detail all the items here.
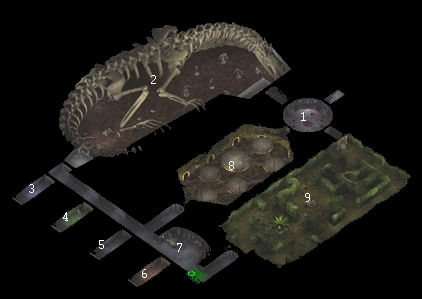
LOCATIONS:
1 - FIREBALL ROOM:
This room has a constant Fireball spell going off. The best way to avoid it is to wait until the Fireball occurs and reaches its maximum explosive range, and then run for an open door, one character at a time. Don't take too long! There is some scattered treasure on the floor - 13gp, a Potion of Freedom, 2 Potions of Healing, 8 Darts of Wounding, 19 +1 Darts, 40 +1 Arrows and 10 Ice Arrows.
2 - GREATER WYVERNS & STATUES:
Walking into this room you are greeted by a skeleton, which warns the group of the (very dangerous) Greater Wyverns which are located in the southern section of the room. The skeleton also tells you that you can press one of the statues into service for a short while (they are actually petrified heroes), but the "great hero" will eventually turn on you for revenge. (My good aligned party did not use any of the heroes.)
The Greater Wyverns are really nasty - magic resistant, hard to hit, have great THAC0s and do lots of damage with massive poison as well. Holding them off with summons and hitting them with missile weapons is the only way to go. Note that there are three of them in this room, so have plenty of Summon Monster and Animate Dead spells ready. The only treasure is the heads of each beast, although they are worth 5000XP each.
As a side note - thankfully none of the dragons in Baldur's Gate 2 are as big as the skeleton which makes up the one side of this room!
3 - ICE:
At the end of this corridor is a doorway into an icy cavern. In here you will find Kaldren the Bear, a huge polar bear with a powerful "freezing ranged attack" which, if it hits, will freeze the character solid for quite some time. With him are four tough winter wolves. It's best to drop some Fireballs and Exploding Potions on the baddies, then summon some monsters. Quite a tough fight, but not as bad as the Greater Wyverns! Kaldren is worth 3000XP, the wolves 975XP each. No treasure is to be found, except for winter wolf skins.
4 - SLIME:
At the end of this corridor is a doorway into a slimy pit, where a Fission Slime dwells. Make sure to only use fire weapons and fire magic against this beast, or you'll end up with half a dozen of these slimes to face - not a healthy prospect, as these slimes hit hard! Killing the Fission Slime is worth 3000XP, but again there is no treasure.
5 - AIR:
An Air Aspect (4000XP) is waiting here, and it's a nasty little beastie too. Again, hold it off with summons and pound it with missile weapons. No treasure. Be careful proceeding further into the cavern, as three Invisible Stalkers (3000XP ea) are also present, and they get a backstab as their first attack. If any of your summons survived the Air Aspect, use them to absorb the first attack, and then more missile weapon action! The stalkers drop minor treasure.
6 - FIRE:
In this lava room is a Phoenix Guard. Don't let her fire her arrows, as they are Arrows of Detonation. The Phoenix Guard is only worth 100XP and doesn't leave any treasure.
Note that once you have slain all four Elemental Guards, the party is teleported directly to the CHESS BOARD (see below). If you leave Durlag's Tower, and later return, entering one of these rooms will teleport you directly to the CHESS BOARD. The Guardians do not respawn.
7 - HEAD ROOM:
Two Greater Ghouls (1000XP ea) are sitting here. Easy pickings, if you have a screen of animated skeletons up. They drop minor treasure as per ghouls.
*TRAP* Halfway down this room, and a little to the right, is a deadly trap.
The side of this room is lined with the heads of great statues. Talking to a statue gives hints on how to handle the various enemies in ICE, SLIME, AIR and FIRE. It also gives a hint about the "Game" (The CHESS BOARD - see below). 16 Fire Arrows are also lying on the floor here - pick them up to handle the Fission Slime, if required.
8 - PLATFORM ROOM:
This room is laid out in an array of platforms, suspended over some multi-coloured goop. Each platform is trapped (except for the smaller North-Western one), and also has on it several skeletons with ice arrows, acid arrows, fire arrows and dispelling arrows. There is also a stash of treasure on the Southern most platform, it contains more arrows and some gold, but nothing major. These skeletons seem to be quite tough, too, and are quite accurate with their shots!
9 - NATURAL CAVERNS WITH TOPIARY:
This area looks like natural caves, with a large hedge grown in a maze-like structure. There are several traps, so send your thief ahead to check whilst moving about. Greater Ghouls can also be found around the area, they can be particularly bothersome. However, much more dangerous are the invisible Ashirukurus lurking here. Be very careful, as they get backstabs! And they don't drop any treasure, either.
The (trapped) statue in the centre of the garden contains Bala's Axe, 3 Potions of Healing, Hold Monster, Domination, Potion of Heroism, Potion of Master Thievery and 10 Dart of Stunning.
CHESS BOARD:
Arriving here, a phantom voice outlines the rules - basically your characters can only move as per the chess piece they represent else they get struck by lightning. However this is largely irrelevant, as the opposition charges to the attack straight away. This is a relatively straight-forward fight, with little surprises. The King and Queen are pretty tough, and the Queen is a powerful spell caster, but keep her pinned with missile weapons and she can do little. An important point, however, is to make sure your PCs do not move from the square they are standing on, unless they obey chess rules. Else they will set off a lightning bolt trap.
Some very nice treasure to be collected here - the King has 418GP, the Two Handed Sword +3, 10 Darts of stunning, Potion of Frost Giant Strength, Champion's Strength Scroll, Emotion Scroll, Remove Curse Scroll, Protection from Evil 10' Radius Scroll. The remaining chess pieces have a smattering of gold and some non-magical arms and armour.
The break-down of XP for the fight is as follows: Pawn - 150XP, Rook - 1500XP, Knight - 2000XP, Bishop - 2000XP, Queen - 5000XP, King - 2000XP.
Note that the exit from the Chess Board takes the group to Level Four of Durlag's Tower, and is the only way to access that level.


