 Did we miss anything in this section? Is there something we didn't discover?
Let us know!
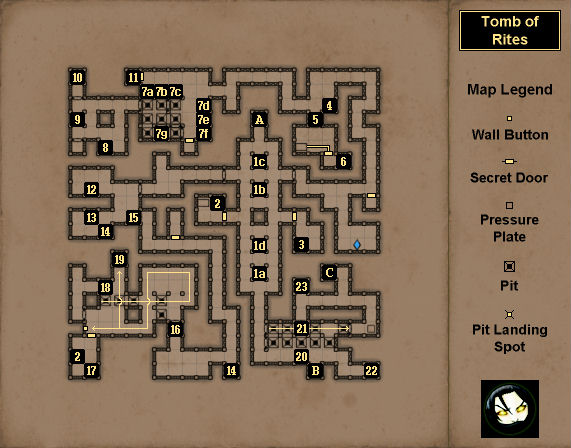
Map Summary
Overview
1 - Lighted Squares
Did we miss anything in this section? Is there something we didn't discover?
Let us know!
Map Summary
Overview
1 - Lighted Squares
You might notice sometimes when stepping onto these squares that you'll hear a click and the light will turn off. There's actually a proper order to the squares -- #1a, #1b, #1c, and then #1d -- and if you step onto them in that order, then the secret doors to the east and west will open, releasing some Mummies and Snakes to attack you.
2 - Scrolls
Each of these two scrolls is half of a clue to a treasure chest in the
Cemetery. When you put them together they'll read: "Three steps west and four south from Cemetery entrance."
3 - Locked Chest
This chest is one of the secrets in the game. Inside you'll find a
Sickle Sword.
4 - Poison Bombs
You'll find two
Poison Bombs here.
5 - Burul the Hedonist's Tomb
You'll learn the owner of this tomb from an offering Note in the
Pyramid of Umas. If you place the
Mirror Gauntlets (from the
Pyramid of Umas) on the sarcophagus in the tomb, then the secret door to the east will open up.
6 - Secret Food Cache
This food cache is one of the secrets in the game. In it you'll find a slice of
Blueberry Pie, two loaves of
Bread, a wedge of
Cheese, a
Lizard on a Stick, two
Potions of Vitality, and a
Salted Sausage.
7 - Altars and Pits Puzzle
When you put an item onto one of the six altars here (#7a-f), some of the pits in the puzzle will open or close. Your goal is to make your way to the lever to the south (#7g). When you pull it, you'll open the door to the west, where you'll be able to make your exit. The trick to the puzzle is that no combination of items on the altars will create a path allowing you to move from the puzzle entrance to the lever. You'll need to make an adjustment while you're in the puzzle.
In detail, you'll need to place items on all of the altars except for #7d. This will open a route to the exit but not the lever. Next, you'll need to move to the southern side of altar #7b and take the item from the altar. This will block your route back to the entrance but open a route to the lever. You'll then be able to pull the lever and exit the puzzle.
8 - Cannon Balls
You'll find four
Cannon Balls here.
9 - Shelf
In this shelf you'll find a Tomb Key. However, when you pick it up, the doors to the north and south and three secret doors to the east will open up, releasing some Medusae, Mummies and Snakes to attack you. You'll need the Tomb Key in the
Ceremonial Chamber.
10 - Pearl Shield
You'll find a
Pearl Shield here.
11 - Healing Potion
You'll find a
Healing Potion here.
12 - Guardian of the Moon
13 - Champion of the Sun
14 - Pellets
You'll find 10
Pellets here.
15 - Closed Door
To open this door, you'll need to put a
Torch in all of the sconces in the Champion of the Sun room (#13) and remove all of the
Torches from the Guardian of the Moon room (#12).
16 - Shooting Fireball Puzzle
Your goal in this puzzle is to have the shooting fireball hit a receptacle (#19) rather than a wall. To do this, you'll have to press the button on the western side of the puzzle. This will create a new windgate that will turn the fireball towards the receptacle, which will be blocked by a door. You might recognize the symbol on the door. It's the same symbol that was on the door leading to the
Pyramid of Umas, where you had to use the special attack from the
Serpent Staff to get it open. This door will open the same way.
With the door open, the fireball will hit the receptacle, which will cause the gate next to the button to open or close, giving you a route to the shelf containing a Tomb Key (#18). The fireball hitting the receptacle will also open the two secret doors in this part of the pyramid, which will release Medusae, Mummies and Snakes to attack you.
17 - Shelf
Inside the shelf here you'll find an
Archmage's Scapular.
18 - Shelf
Inside this shelf you'll find a Tomb Key. You'll need the Tomb Key in the
Ceremonial Chamber.
19 - Receptacle
20 - Moving Windgate Puzzle
Your goal in this puzzle is to acquire a
Power Gem (#23), not to mention reach the stairs leading to the
Ceremonial Chamber (Exit C). There are two windgates in the puzzle. One will cycle through six squares to the north (as shown on the map above), while the other one (Exit B) will transport you to the moving one.
What you'll need to do is wait until the moving windgate is at the gate (#21) and then move to it. If you look east from this spot, then you'll see a door with a special symbol on it. This is the same symbol as you might remember from the entrance door to the
Pyramid of Umas, and the door here will open using the same method. That is, you'll have to wait until the windgate is out of the way and then use the special attack from the
Serpent Staff on the door.
With the door open, you'll need to return to the puzzle gate (#21) again, and this time throw an object east so it lands on the pressure plate in that direction. This will open the gate, giving you access to the
Power Gem and exit.
21 - Gate
22 - Loot
At this spot you'll find a
Lizard on a Stick and a set of
Lock Picks.
23 - Power Gem
You'll find a
Power Gem here.
Exits
- Stairs down to the
Pyramid of Umas.
- One-way windgate.
- Stairs up to the
Ceremonial Chamber.


