 Did we miss anything in this section? Is there something we didn't discover?
Let us know!
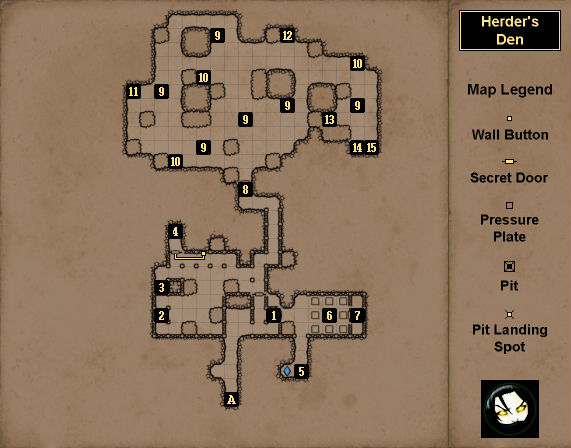
Map Summary
Overview
1 - Locked Gate
You'll need a Mine Key (#2) to open this gate.
2 - Chest
Inside this chest you'll find a
Battleaxe, a Map, and a Mine Key. You'll need the Mine Key to open the gate to the east (#1). The Map will give you a clue for a treasure chest in the
Forgotten River.
3 - Pickaxe
On the ground here you'll find a
Pickaxe.
Note: The
Pickaxe is just a regular weapon. It won't allow you to clear rocks or do any mining.
4 - Secret Cache
In this cache you'll find an
Iron Basinet and an
Antivenom potion.
5 - Timepiece
You'll find a
Timepiece on the pedestal here. It will show you the time of day while you're resting. You can also right-click on it to see what time it is.
6 - Runemaster's Trial
In this puzzle you'll have a 3x3 grid of pressure plates to work with, and you'll see a spell shooter beyond the closed gate to the east casting fireballs at a receptacle. The clue for the puzzle is its name. You use runes to cast spells, and they're arranged in a 3x3 grid in the interface. So what you'll need to do is recognize the spell being cast beyond the gate, work out which runes are needed to cast it, and then weigh down the associated pressure plates. The tricky part is that the pressure plates are set up so they look right when you're facing them from the western side. That means the eastern row of pressure plates (and not the northern row) represents the top row of runes.
To complete the quest, you'll need to use the pressure plates to "cast" three spells: Fireball, Ice Shards, and Lightning Bolt. Please refer to the
Magic Spells section if you need to see the rune layout for those spells. Once you've cast the spells correctly, the gate to the east will open up, allowing you to claim your prize (#7).
7 - Serpent Staff
You'll find a
Serpent Staff in the shelf here. The staff won't look like much, but you'll need it to enter the
Pyramid of Umas, so be sure to hang onto it.
8 - Herder's Den Challenge
When you step past the gate here, it will close behind you, and you'll start the Herder's Den Challenge. What you'll need to do in the challenge is destroy all six of the Herder Spore Pods (#9). The pods will produce herders over time, so if fighting herders is difficult for you, then you should make a beeline to the pods and take them out as quickly as possible. However, if the herders aren't a problem for you (or if your poison resistance is really good), then you can leave a pod or two active, and just grind some xp. When all of the Herder Spore Pods are dead, the entrance gate will open back up, allowing you to leave.
9 - Herder Spore Pods
10 - Pellets
You'll find 10
Pellets here.
11 - Skull
You'll find a
Skull on the ground here.
12 - Sack
You'll find a Sack here containing a
Crystal Shard of Healing, three
Fire Bombs, and a Hub Key. The key will unlock the Hub windgate in
Keelbreach Bog.
13 - Lock Picks
You'll find
Lock Picks here.
14 - Power Gem
You'll find a
Power Gem here.
15 - Sack
Inside the Sack here you'll find
Etherweed,
Mudwort, and the recipe for
Potions of Bear Form.
Exits
- Stairs up to
Keelbreach Bog.