 Did we miss anything in this section? Is there something we didn't discover?
Let us know!
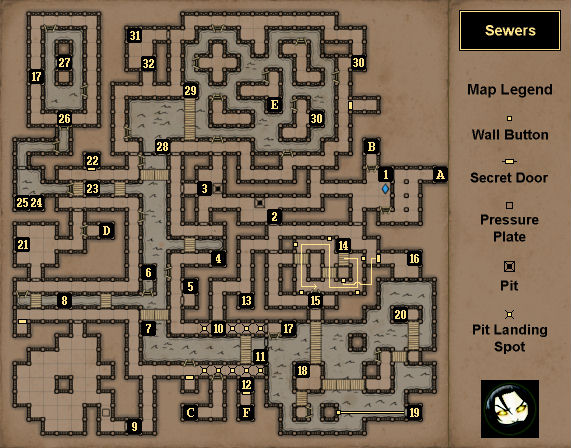
Map Summary
Did we miss anything in this section? Is there something we didn't discover?
Let us know!
Map Summary
- Secrets:
#16 (Archmage's Cap),
#19 (Mortar and Pestle),
#26 (Silver Roaches),
#31 (Crystal Gauntlets)
- Epic Items:
#21 (Meteor Shield),
#27 (Crystal Shield),
#31 (Crystal Gauntlets)
- Skulls: #9
- Power Gems: #18
- Enemies: Fire Elementals (275 xp), Ratlings
(Pellets,
Throwing Knife, 150 xp), Toads
(Toad Tongue, 240 xp), Wasps (150 xp), Zarchtons (82 xp)
Overview
1 - Recipe
On the ground here you'll find a Recipe that will give you a hint for creating bombs.
2 - Closed Gate
You'll only be able to open this gate by pulling the lever on its southern side.
3 - Lever
When you pull the lever here, you'll open (or close) the gates to the south and west. You'll also cause poison bolts to shoot at you through the gates, so you should be sure to move out of the way first.
4 - Lightning Bombs
You'll find two
Lightning Bombs here.
5 - Shelf
In the shelf here you'll find a
Two-Handed Sword.
6 - Underwater Cache
In the deepest part off the water here you'll find a
Diviner's Cloak and a
Shaman Staff.
7 - Lightning Bomb
In the water here you'll find a
Lightning Bomb.
8 - Leather Boots
In the water here you'll find
Leather Boots.
9 - Gate / Ratling Boss
The gate here will start out open, but when you step onto the pressure plate to the west, it will close and lock. A Note on the ground will warn you about this: "Enter at your own risk."
In the room beyond, you'll encounter the Ratling Boss, plus a bunch of regular Ratlings. The Ratling Boss will have a
Hand Cannon, and he'll do major damage to you should any of his shots connect. So you'll need to maneuver around, and ideally you should keep the central column of the chamber in between you and the boss, so he can't hit you when you're not looking. If you can kill the Ratlings while avoiding the boss, then it shouldn't be too difficult to defeat the boss one-on-one.
After the battle, you'll find a bunch of things in the room to loot: two Brass Keys, four
Cannon Balls, four pieces of
Cheese, a
Hand Cannon,
Leather Brigandine, a
Potion of Resurrection, a
Potion of Vitality,
Shoes, a
Skull, and a
Throwing Axe. One of the Brass Keys will unlock the entrance gate. The other one will unlock the Reservoir Access Gate (#10).
Note: After defeating the Ratling Boss here, at some point you'll get ambushed by his twin brother in the
Hamlet of Stormbreach. It'll be roughly the same fight, and the same strategies should work.
10 - Reservoir Access Gate
You'll need a Brass Key (#9) to open this gate.
11 - Healing Potion
You'll find a
Healing Potion in the water here.
12 - Shortcut
You'll need an Iron Key to open the secret door here. You'll find the key in the House of Braids in the
Hamlet of Stormbreach.
13 - Minor Loot
At this spot you'll find
Antivenom and a
Smoked Sea Bass.
14 - Spike Trap Puzzle
In this puzzle you'll have to press five buttons in a certain order while avoiding spike traps. A clue for the puzzle can be found next to the exit gate (#15). If you read the Note there, then you'll see that you should "follow the leader." That is, you should press the buttons using the same route that the spike traps take (which is shown on the map above). If you're successful, then the exit gate will open.
Note: There are six buttons in the area with the spike traps. The five outer wall buttons are the ones involved in this puzzle. The inner wall button opens the secret door to the east.
15 - Puzzle Exit
16 - Shelf
The room with this shelf is one of the secrets in the game. In the shelf you'll find an
Archmage's Cap. On the ground near the shelf you'll find a
Crystal Shard of Protection.
17 - Lock Picks
You'll find
Lock Picks here.
18 - Power Gem
You'll find a
Power Gem here.
19 - Underwater Secret Room
You can open the door to this underwater secret room by pressing the button to the west. Inside the room you'll find a Sack containing two
Blooddrop Caps, two
Etherweeds, two
Falconskyres, and a
Mortar and Pestle.
20 - Locked Chest
Inside this chest you'll find a
Blooddrop Cap and a
Burrow Rat Shank.
21 - Shelf
In this shelf you'll find a
Meteor Shield. However, when you pick it up, the Trickster will show up and block off the entrance that you came through. He'll then attack you using
Fire Bombs. If you can get your bearings quickly enough, then the battle shouldn't be too bad because the Trickster won't have anywhere to hide. Once you've done enough damage to the Trickster, he'll disappear again, but he'll leave behind a
Fire Bomb and an Ornate Key.
The Ornate Key will allow you to unlock the exit door to the south, but when you open it up, you'll also open up four secret doors in the Sewers (including one in the Tetris Island puzzle area, #28), which will release five Fire Elementals to attack you. So make sure you have a spell like Dispel or Frost Bolt ready to cast.
Next to the shelf on the ground you'll find 10
Pellets.
22 - Greater Healing Potion
You'll find a
Greater Healing Potion here. The secret door blocking access to it will open when you use the Ornate Key nearby (#21).
23 - Throwing Axe
You'll find a
Throwing Axe in the water here.
24 - Lever
The lever here will open the gate to the north.
25 - Sack
Inside this sack you'll find three
Poison Bombs and a
Potion of Vitality.
26 - Secret Garden
This garden is one of the secrets in the game. The
Silver Roaches in the pool here will respawn more quickly than other fish, making the garden a good place to visit every so often.
27 - Gold Key Cache
The lock for this cache can be found on the southern side of the pool. Inside the cache you'll find a
Crystal Shield.
28 - Underwater Gate
You'll be able to swim through this gate to reach the Tetris Island puzzle (#29).
|
 |
| Map Clue |
29 - Tetris Island Puzzle
Your goal in this puzzle is to visit the five islands in the right order. You'll get a clue for this puzzle from a Map in the
Hamlet of Stormbreach. The correct order is: southeastern island, southwestern island, northeastern island, northwestern island, and then central island. If you get the order right, then a windgate will appear on the central island (Exit E), which will take you to the room to the west, where you'll gain access to a secret chest (#31).
30 - Pellets
You'll find 10
Pellets at each of these two locations.
31 - Secret Chest
This chest is one of the secrets in the game. You'll gain access to it by completing the Tetris Island puzzle (#29). Inside the chest you'll find
Crystal Gauntlets and three
Throwing Axes.
32 - Lever
The lever here will open the gate to the south.
Exits
- Stairs up to the
Archives.
- Stairs up to the
Hamlet of Stormbreach (East).
- Stairs up to the
Hamlet of Stormbreach (South).
- Stairs up to the
Hamlet of Stormbreach (West).
- One-way windgate. This windgate will only appear after you've completed the Tetris Island puzzle (#29). It will take you to the chamber to the west.
- One-way windgate. This windgate will take you back up to the House of Braids in the
Hamlet of Stormbreach.


