 Did we miss anything in this section? Is there something we didn't discover?
Let us know!
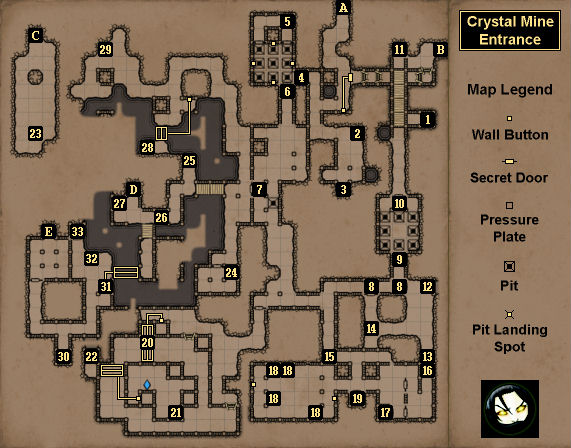
Map Summary
Overview
1 - Sack
Did we miss anything in this section? Is there something we didn't discover?
Let us know!
Map Summary
Overview
1 - Sack
You'll only be able to reach this Sack via the secret door to the west. Inside the Sack you'll find four
Blooddrop Caps and one
Etherweed.
2 - Full Helmet
You'll find a
Full Helmet behind the crates here.
3 - Gold Key Cache
Inside this cache you'll find 10
Cannon Balls and 50
Pellets.
4 - Nine Pits Puzzle
In this puzzle you'll need to press four buttons to manipulate nine pits so you can pull a lever (#5) and exit the puzzle to the south (#6). The buttons will toggle the two nearest rows (or columns) of pits, not counting the closed pit you're standing on. The lever will toggle the three gates in the puzzle. You'll need to pull the lever once (and only once) to open up the exit.
Your first goal in the puzzle should be to close the pits next to the two northern gates. That will allow you to advance to the north, pull the lever, and then return to the puzzle board. Then you'll just need to create a path to the exit. A solution from the starting position of the puzzle is shown below (where "X" represents a closed pit and "O" represents an open pit). If you climb (or fall) down one of the pits, then the puzzle will reset to its starting position.
|
|
|
Starting Position. You should press the southern button.
|
|
|
|
You should press the eastern button.
|
|
|
|
You should head north (through the northeastern gate) and pull the lever. Then you should head
back south (through the northwestern gate) and press the western button.
|
|
|
|
From this position you should be able to exit the puzzle.
|
5 - Lever
6 - Puzzle Exit
7 - Locked Gate
You'll need a Mine Key (#19) to open this gate.
8 - Closed Gates
Theses gates will open when you solve the Fearless puzzle to the north (#9).
9 - Fearless Puzzle
If you look at the sign here, then you'll see that "only the fearless can pass." This is a hint for the puzzle. You should also notice a button on the western wall. Pressing this button will reset the puzzle.
The puzzle has two parts. For the first part, you'll need to stand in the middle of the puzzle (on the non-pit square) and toss an item onto the pressure plate just to the north (#10). This will open the gate next to the pressure plate, open all of the pits around you, and cause the spell shooter well to the north (#11) to shoot a fireball at you. If you stand still and let the fireball hit you, then you'll be teleported onto the pressure plate to the north (#10), giving you access to the second part of the puzzle.
For the second part of the puzzle, you'll need to throw an item onto the pressure plate by the spell shooter to the north (#11), and then get out of the way so that when the spell shooter responds by firing a bolt towards you, it will travel all the way to the south and hit a receptacle there. To do this, you'll first need to walk over to the spell shooter. You'll briefly see the Island Master there, but then he'll disappear, clearing the way.
Starting back at the first pressure plate (#10), you'll need to move four squares north. This will put you within throwing range of the second pressure plate (#11). Then when you throw an item north, you should have plenty of time to retreat back to the south and get out of the way of the fired bolt.
If the bolt manages to hit the receptacle to the south, then the row of pits closest to you in the puzzle will close, and the two gates to the south (#8) will open, releasing a few Spiders to attack you. To escape the puzzle, you'll just need to remove the item you threw onto the first pressure plate (#10). This will close the remaining pits, giving you a route to the exit.
10 - Pressure Plate / Gate
11 - Pressure Plate / Spell Shooter
12 - Shelf
In the shelf here you'll find
Crystal Boots.
13 - Lock Picks
You'll find
Lock Picks here.
14 - Pedestal
On the pedestal here you'll find a Scroll of Meteor Storm.
15 - Simulacrum Puzzle
Your goal in this puzzle is to pull a lever (#17), which will open up a reward room (#19). The gate leading to the lever will start out closed; to open it you'll need to press a button (#16). The complicated part of the puzzle comes from the four magical barriers blocking your access to the lever and button. To move the barriers, you'll need to push the floating stones in the western part of the puzzle. Each stone controls one of the magical barriers, so you'll need to push the stones where you want the barriers to go.
The solution is shown on the map above. If you push the stones where indicated (#18), then you'll create a path to the button and the lever. If you manage to push the stones into a position that you can't get them out of, then pressing either of the buttons on the western side of the puzzle will reset the floating stones.
16 - Button
17 - Lever
18 - Correct Stone Positions
19 - Puzzle Reward
To open the gate leading to the pedestal here, you'll have to complete the Simulacrum puzzle (#15). On the pedestal you'll find a Mine Key, which will allow you to open the gate in the center of the map (#7).
20 - Bridge Ambush
When you start crossing the magical bridge here, you'll get ambushed by two Eyctopuses (who will blind you) and two Xeleroids (who will paralyze you). This can be a nasty battle. We'd recommend immediately running away back towards the mine entrance. That way you should be able to attack the enemies one or two at a time, making things much easier.
21 - Cannon Balls
You'll find five
Cannon Balls here.
22 - Secret Shelf
This shelf is one of the secrets in the game. In it you'll find a
Crystal Shard of Protection. However, when you pick up the shard, you'll get teleported to the northwestern part of the map (#23), where you'll get attacked by two Fire Elementals and an Ice Guardian.
23 - Secret Shelf Destination
When you appear here (from #22), you'll get attacked by two Fire Elementals and an Ice Guardian. After surviving the ambush, if you scour the chamber, then you'll find two
Broadhead Arrows, 20
Pellets, and a
Poison Bomb.
24 - Shelf
In the shelf here you'll find a
Crossbow. On the ground in front of the shelf you'll find three
Crossbow Quarrels. Nearby in the room you'll also find five
Cannon Balls and an
Energy Potion.
25 - Pellets
You'll find 10
Pellets here.
26 - Climb-Down Point
If you climb (or fall) down from this point, then you'll land on an isolated ledge in the
Crystal Mine Core, where you'll discover a secret.
27 - Pedestal
On this pedestal you'll find a Recipe that will give you a hint for creating attribute-boosting potions.
28 - Secret Locked Chest
This chest is one of the secrets in the game. Inside you'll find
Meteor Gauntlets.
29 - Sack
Inside this Sack you'll find two
Antivenom potions and a
Salted Sausage.
30 - Minor Loot
At this spot you'll find a
Salted Sausage and a
Speed Potion.
31 - Lever
Pulling the lever here will create a magical bridge nearby.
32 - Power Gem
You'll find a
Power Gem here.
33 - Gold Key Cache
If you spend a
Gold Key to open this cache, then inside you'll find a
Repeater, the best firearm in the game.
Exits
- Passage to the
Hamlet of Stormbreach.
- Passage to
Twigroot Forest.
- One-way windgate. This windgate will return you to the secret shelf (#22).
- Stairs down to the
Crystal Mine Core.
- Stairs down to the
Crystal Mine Core.


