 Did we miss anything in this section? Is there something we didn't discover?
Let us know!
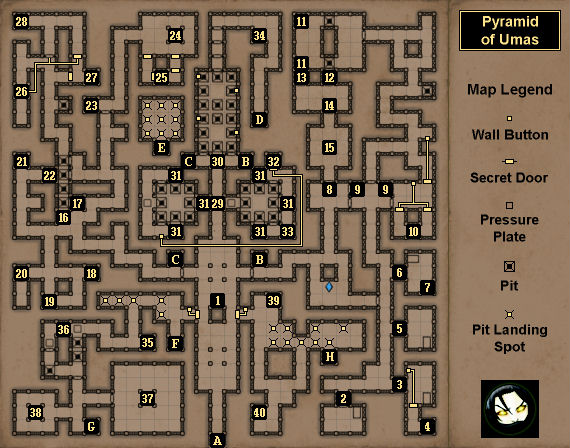
Map Summary
Overview
1 - Shelf
Did we miss anything in this section? Is there something we didn't discover?
Let us know!
Map Summary
Overview
1 - Shelf
Inside this shelf you'll find the recipe for
Speed Potions.
2 - Numum's Tomb
You'll learn the owner of this tomb from a Note in the shelves to the north (#7), which will indicate that Numum's tomb should have three people in it.
3 - Tomb
4 - Secret Cache
This cache is one of the secrets in the game. In it you'll find a
Storm Amulet and a set of
Lock Picks.
5 - Hamon's Tomb
You'll learn the owner of this tomb from a Note in the shelves to the north (#9), which will indicate that Hamon spent his life alone.
6 - Tehep's Tomb
You'll learn the owner of this tomb from the Note on the sarcophagus inside.
7 - Loot
At this spot you'll find a
Greater Healing Potion and
Pitroot Bread.
8 - Closed Door
This door will open when you take the Tomb Key from the sarcophagus to the north (#15). Just to the west of the door you'll find two
Darts.
9 - Shelves
In the western shelf you'll find a
Wand of Fear and a Note. The Note will indicate that the wand is for Hamon the Merchant (#5), who led a solitary life. In the eastern shelf you'll find a
Moonblade and a Note. The Note will indicate that the blade is for Numum the Warrior (#2), who is entombed with his companion and their child. In you place the offerings on the right sarcophagi, then the door in between the shelves will open.
10 - Shelf
This shelf is one of the secrets in the game. In it you'll find
Mirror Gauntlets and a Note. The Note will indicate that the gauntlets are for Burul the Hedonist, who was so fat that his tomb required six vessels. You'll find Burul's tomb in the
Tomb of Rites. One square west of the shelf you'll find a set of
Lock Picks.
11 - Pressure Plates
If you throw items onto the two pressure plates here, then the nearby pits blocking access to them will close, and a pit farther to the east will open.
12 - Pressure Plate Puzzle
To close the pit to the north, which will grant you access to this pressure plate, you'll need to put items onto two nearby pressure plates (#11). If you stand to the north of this pressure plate and drop an item onto it, then you'll open the gate to the west (#13) and close a gate to the south (#14). If you then head through the western gate and drop an item onto the pressure plate from the south, then you'll be able to take back the first item you dropped onto the pressure plate without either of the gates moving. You'll then be able to head back to the square just south of the pressure plate and take back the second item you dropped onto it, which will close the gate to the west (#13) but open the gate to the south (#14).
13 - Gate
This gate is involved in the Pressure Plate puzzle (#12).
14 - Gate
This gate is involved in the Pressure Plate puzzle (#12).
15 - Sarcophagus
You'll be able to reach this sarcophagus by completing the Pressure Plate puzzle to the north (#12). When you take the Tomb Key from the sarcophagus, the closed door to the south (#8) will open. You'll need the Tomb Key for the locked doors in the central corridor (#29). To the southwest of the sarcophagus you'll find four
Cannon Balls.
16 - Pit Row Puzzle
For this puzzle, you'll need to step onto four pressure plates (#17, #19, #22, #24). The pressure plates will close the four pits here, which will allow you to cross them to the north.
17 - Pressure Plate
Stepping onto this pressure plate will close the first pit in the Pit Row puzzle (#16). You won't need to leave an item on the pressure plate to keep the pit closed.
18 - Loot
At this spot you'll find 10
Pellets and two
Shuriken.
19 - Pressure Plate
Stepping onto this pressure plate will close the second pit in the Pit Row puzzle (#16). You won't need to leave an item on the pressure plate to keep the pit closed.
20 - Closed Door
Stepping onto a pressure plate to the north (#22) will open this door.
21 - Embalmer's Headpiece
You'll find an
Embalmer's Headpiece here.
22 - Pressure Plate
Stepping onto this pressure plate will do three things. The secret door just to the south will open, releasing some Rats and Mummies to attack you. The door far to the south (#20) will open, releasing a Snake. The third pit in the Pit Row puzzle (#16) will close. You won't need to keep an item on the pressure plate to keep the doors or pit stationary.
23 - Throwing Knife
You'll find a
Throwing Knife here.
24 - Pressure Plate
Stepping onto this pressure plate will close a wall at the entrance to the room (a button next to the wall will open it back up) and also open the secret doors to the south, releasing some Mummies and Snakes to attack you. This pressure plate will also close the fourth pit in the Pit Row puzzle (#16). You won't need to leave an item on the pressure plate to keep the doors or pit stationary.
Next to the pressure plate to the northeast you'll find a
Torch. You'll need a
Torch in the
Tomb Underground in the area beneath the Pit Row puzzle.
25 - Loot
At this spot you'll find 10
Pellets. Just to the west you'll also find two
Shuriken.
26 - Button
You'll find a button on the eastern wall here. Pressing it will cause a bolt to be shot from the demon mouth to the south. If the bolt makes it to the receptacle to the north (requiring you to get out of the way), then a gate and a secret door to the east will toggle their position (one will open while the other closes).
27 - Secret Shelf
The room with this shelf is one of the secrets in the game. Inside the shelf you'll find
Mirror Greaves. To get into the room, you'll first have to press the button to the west (#26). This will open a gate but close a secret door between you and the room. Then you'll have to press the button again. This will close the gate and open the secret door, but as long as you're quick enough to make it through the gate before it closes, then you'll be able to make it into the room. Once inside the room, you can pull the lever to the west of the shelf to open the secret door on the western wall, which will allow you to escape.
28 - Shelf
Inside this shelf you'll find a Tomb Key. You'll need the Tomb Key for the locked doors in the central corridor (#29).
29 - Locked Doors
You'll need a Tomb Key (#15, #28) for each of the two locked doors here.
30 - Figure Eight Puzzle
In this puzzle you'll need to close enough pits in the room so you can reach the exit to the north and also press the four buttons on the walls (which will open the four exit gates). The trick is in recognizing that the two squares of pits here react the same as the two squares of pits to the south, where the square to the southeast controls the northern square here, and the square to the southwest controls the southern square here. Each of the southern squares has four pressure plates connected to it. Placing an item onto a pressure plate will toggle the three pits closest to it.
To solve the puzzle, you'll just need to weigh down six of the eight pressure plates (#31).
31 - Pressure Plates
You'll need to weigh down these pressure plates (and only these pressure plates) to complete the Figure Eight puzzle (#30),
32 - Secret Shelf
This shelf is one of the secrets in the game. In it you'll find a
Mirror Tagelmust.
33 - Loot
At this spot you'll find a
Shuriken. In the corner to the north you'll also find 10
Pellets.
34 - Loot
At this spot you'll find a
Boiled Crag Beetle and a
Poleaxe.
35 - Minor Loot
At this spot you'll find
Mole Jerky and a
Torch.
36 - Tomb of the Guardians Puzzle
Your goal in this puzzle is to exit to the south. The two pressure plates will help you to do this:
- The western pressure plate will open the two closed pits in the puzzle -- the third pit can't be closed so it will always be open -- and put a windgate over the eastern pit. The windgate will take you to the other side of the grate on the western side.
- The eastern pressure plate will open the exit door but also put a windgate between the western grate and the exit.
Here's how to solve the puzzle. First, place an item on the western pressure plate so you can reach it from the southern side of the grate. Then walk into the windgate created by the pressure plate (on the eastern side). This will put you on the southern side of the grate. Then take the item from the western pressure plate. This will close the pit in the southwestern corner of the puzzle, which will allow you to walk to the exit door. From the door, throw an item north so it lands on the eastern pressure plate. This will open the exit door.
Note: Before walking away from this puzzle, there's one more thing you can do with it. If you place an item on the northeastern pit (where the western pressure plate's windgate appears) and step onto the western pressure plate, then the item will fall down before the windgate appears, and it will land on a pressure plate in the
Tomb Underground, opening the way to a secret. To reach the secret, you'll just need to climb down one of the other pits in the puzzle.
37 - Battle Chamber
The only way you'll be able to enter this chamber is via the nearby windgate (Exit G). When you appear in the chamber, you'll immediately get attacked by two Medusae and three Snakes, so you'll need to have your spells and potions ready to go. Completing the battle will open the exit gate and also remove the barrier from the
Ancient Claymore (#38).
38 - Ancient Claymore
The
Ancient Claymore here is one of the game's secrets. To remove the barrier surrounding it, you'll have to complete the battle to the east (#37).
39 - Lever
Pulling this lever will turn on an exit windgate (Exit H).
40 - Loot
In this room you'll find a
Greater Energy Potion, 10
Pellets, and
Xafi Khakis.
Exits
- Exit to
Sleet Island.
- Tomb of the Highborn windgate.
- Tomb of the Forgotten windgate.
- Stairs up to the
Tomb of Rites.
- Windgate back up to the Altars and Pits puzzle in the
Tomb of Rites. You'll find a
Poison Bomb right next to the windgate.
- Windgate back up to the Shooting Fireball puzzle in the
Tomb of Rites.
- One-way windgate. This windgate will send you to the battle chamber (#37), where you'll have to fight two Medusae and three Snakes.
- Windgate back up to the Moving Windgate puzzle in the
Tomb of Rites. You'll need to pull a lever (#39) to activate it. Near the windgate you can pick up a
Shuriken.


