 Did we miss anything in this section? Is there something we didn't discover?
Let us know!
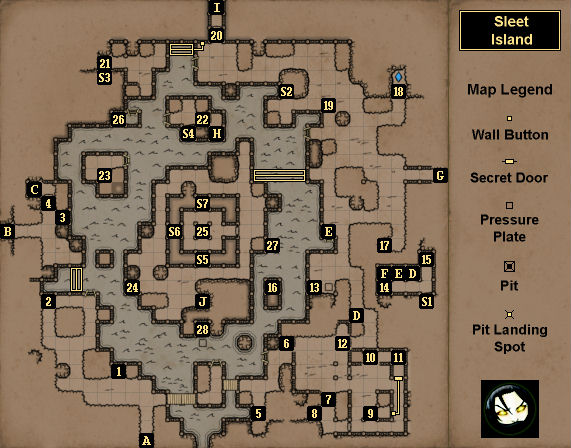
Map Summary
Overview
1 - Tree
Did we miss anything in this section? Is there something we didn't discover?
Let us know!
Map Summary
Overview
1 - Tree
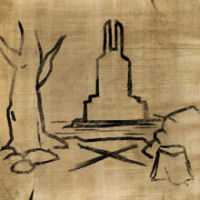
Stuck in the tree here you'll find an Island Map and a Letter. Neither one will help you much, although the map will show you a bridge to the central island where there isn't one now. You'll receive a clue for how to get that bridge back from a stone head in the
Cemetery. It will point you to the silent stone head in this map (S2).
2 - Sign
At this spot you'll see a sign that reads, "I am the guardian of the bridge; wake me up." If you throw any item at the nearby demon mouth, then a magical bridge will pop up, allowing you to visit the island to the north.
|
 |
| Map Clue |
3 - Locked Treasure Chest
You'll find a Map clue for this treasure chest in the
Tomb Underground beneath the
Pyramid of Umas (Exit I). Inside the chest you'll find a
Shield Potion and a
Zarchton Harpoon. You should hang onto the harpoon since it's the only weapon that works underwater.
4 - Closed Gate
You'll only be able to open this gate from the northern side. It's part of an exit from the
Archives (Exit C). You'll find a
Horned Fruit by the gate.
5 - Pedestal
On the pedestal here you'll find an
Arquebus. However, when you pick it up, you'll get dropped down into a crypt (in the
Flooded Dungeon), where you'll get surrounded and attacked by about a dozen Mummies.
6 - Mind and Matter Puzzle
This puzzle is basically the same as the Philosopher's Stone puzzle in the
Twigroot Tunnels, except that this time you'll have to work with two floating stones and two destinations for them. The first thing you should do in the puzzle is turn it on (#7), which will allow you to move the stones. Then you should push the closest stone east into the puzzle so you can access the back part of the puzzle. Finally, you should press the button on the eastern edge of the puzzle, which will open a secret door, and then clear the way so you can shoot the bolt between the demon mouth and the receptacle (#9), which will open a gate in the puzzle. With the two extra doors open, you should be able to circle around the stones as necessary to push them where they need to go.
7 - Lever
This lever will turn the Mind and Matter puzzle on and off.
8 - Leather Cap
You'll find a
Leather Cap here.
9 - Button
When you press this button, a bolt will shoot out of the demon mouth to the north and head towards the receptacle to the south. If the path is clear so the bolt makes it all the way, then the nearby gate to the west will open up.
10 - Lock Picks
You'll find
Lock Picks here.
11 - Wooden Box
Inside the Wooden Box here you'll find
Bread,
Horned Fruit, a
Salted Sausage, a
Smoked Sea Bass, and the recipe for
Rage Potions.
12 - Closed Gate
You'll only be able to open this gate by completing the Mind and Matter puzzle (#6).
13 - Danger
The sign here will warn you about "danger," which you'll encounter when you step onto the pressure plate next to it. Three sets of wasps will appear and try their best to kill you. However, after defeating the wasps, if you step onto the pressure plate again, you'll cause two windgates to appear nearby (Exits D and E). They won't quite last long enough for you to run over to them, but if you stand where the northern windgate appears (Exit D) and throw an item from there onto the pressure plate, then you'll be transported to a secret area (#14) instantly. Standing on the northern windgate's position will also give you enough time to make your way to a third windgate in the secret area (Exit F), which will take you to another secret area (#16).
14 - Skull
You'll find a
Skull here.
15 - Loot and Button
On the ground here you'll discover
Lock Picks, 10
Pellets, and a Scroll of Shock Shield. You should also notice a button on the eastern wall. Pressing it will cause three nearby windgates (Exits D, E and F) to appear briefly, giving you a chance to escape. You'll need to move quickly to reach the windgates in time, but nothing tricky is required.
16 - Pedestal
The pedestal on the small island here is one of the secrets in the game. On it you'll find a
Stormseed Orb. The only way to reach the pedestal is via a pair of windgates (Exits D and F). This maneuver is explained in the Danger entry (#13).
17 - Sack
At this spot you'll find a Sack containing
Pitroot Bread and a
Rage Potion.
18 - Pedestal
On the pedestal here you'll find the recipe for
Antidote and
Antivenom potions.
19 - Meteorite
You'll get clues about the
Meteorite from a pair of stone heads: the "left eye" in the
Hamlet of Stormbreach and the "right eye" in
Keelbreach Bog. The heads will mention that they saw the
Meteorite fall, and so you'll have to find the intersection of their sight lines, which is this square here. You'll just need to dig up the square to reveal the
Meteorite, which is one of the secrets in the game.
To make use of the
Meteorite, you'll need to take it to the Forge of the Fallen Stars in the
Crystal Mine Abyss, where you'll be able to craft it into the
Meteor Hammer.
20 - Pyramid Door
The door to the
Pyramid of Umas will start out closed. If you read the Letter in the shelf next to the door, then you'll see that a "strange kind of key" is required. The only hint for the key is the pair of snake statues near the door. The key is the
Serpent Staff from the Runemaster's Trial in the
Herder's Den. When you use the staff's special attack on the door, it will open.
21 - Crystal Flower
You'll find a
Crystal Flower here.
22 - Closed Gate
You'll only be able to open this gate by pulling the lever on its eastern side. That is, this gate is only intended as an exit from the
Barren Desert (Exit H).
23 - Pedestal
On the pedestal here you'll find a Note giving you a clue about a treasure chest in
Keelbreach Bog. On the ground next to the pedestal you'll find a
Tribal Shield.
24 - Pedestal
On the pedestal here you'll find a
Venomfang Pick.
25 - Shrine of Water
If you place four
Power Gems on the table in the center of the shrine, then you'll be granted an
Essence of Water. You'll find a Scroll of Frost Shield in the shrine.
26 - Secret Underwater Cache
When you first visit the map, you'll discover a barrier blocking the deepest part of the water here. To remove the barrier, you'll need to press the button on the island to the north. Inside the cache, you'll find a Wooden Box containing a
Mirror Cuisse, 20
Pellets, and a
Runestone Necklace. The cache is one of the secrets in the game.
27 - Wooden Box
At this spot underwater you'll find a Wooden Box containing
Embalmer's Pants.
28 - Secret Underwater Cache
To open this cache, you'll need to "hold your breath" and stand on the pressure plate in front of it for several seconds. This might be a difficult wait early in the game before you build up your Energy reserves. Inside the cache you'll find an
Antidote potion and a
Skull.
S1 - Stone Head
"Here, even the winds are guided by him and them."
S2 - Silent Stone Head
"..."
If you stand next to the stone head and face south for a few seconds during the night, then you'll witness the Trickster creating a magical bridge to the central island. The bridge will only remain there for a little while, but if you rush over and cross it, then it will remain standing for the remainder of the game, allowing you to visit the central island whenever you want. You'll get the hint for the bridge from a stone head in the
Cemetery.
S3 - Stone Head
"The gate to the fifth shrine is hidden from sight."
S4 - Stone Head
"The silent one has a friend who is more willing to speak. Head towards the sunrise, beyond the gate, to find him."
That is, a stone head in the
Cemetery will give you information about the silent stone head (S2).
S5 - Stone Head
"This is the elemental shrine of water. Water is the rune of willpower and frost. Southeast is whence the forces of water are strongest."
S6 - Stone Head
"Oh thee seeker of the hidden shrine. Only by standing in the place with perfect elemental equilibrium shall thou summon forth the gate to the hidden one."
S7 - Stone Head
"Bring forth four power gems to fuse them into the essence of the element. Not all of the gems lie under skies; some of them are buried deep underground."
Exits
- Path to
Forgotten River.
- Stairs down to the
Ruins of Desarune.
- Windgate to the
Archives.
- Temporary two-way windgates. These windgates will only appear when you step on a pressure plate (#13) or press a button (#15).
- Temporary two-way windgates. These windgates will only appear when you step on a pressure plate (#13) or press a button (#15).
- Temporary one-way windgate. This windgate will only appear when you step on a pressure plate (#13) or press a button (#15). It will take you to a secret (#16).
- Path to the
Cemetery.
- Exit windgate from the
Barren Desert.
- Entrance to the
Pyramid of Umas.
- Stairs down to the
Flooded Dungeon.


