 Did we miss anything in this section? Is there something we didn't discover?
Let us know!
Map Summary
Did we miss anything in this section? Is there something we didn't discover?
Let us know!
Map Summary
- Secrets: #3 (Full Helmet),
#9 (Pearl Shield),
#15 (Dragonbreath Revolver), Exit B (Scroll of Dispel)
- Skulls: #6
- Enemies: Green Slimes (250 xp), Ice Guardians (500 xp), Skeletons (99 xp)
Overview
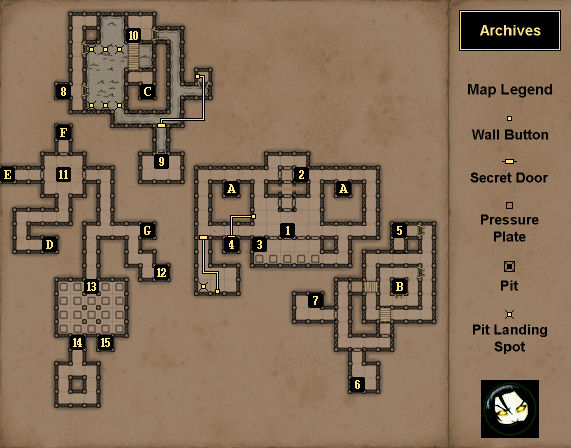
1 - Pressure Plate
This pressure plate plays a role in the Pit puzzle in the
Ruins of Desarune above. Whenever the spider falls down into the caged area to the north, you'll just need to step onto the pressure plate to send it back up to the
Ruins of Desarune.
2 - Broadhead Arrows
You'll find two
Broadhead Arrows here.
3 - Secret Shelf
The room with this shelf is one of the secrets in the game. The secret door leading to the room will open up once you've completed the Pit puzzle in the
Ruins of Desarune. Inside the shelf you'll find a
Full Helmet.
4 - Shelf
You'll be able to enter the room with this shelf after pressing the button on the wall to the northeast. Inside the shelf you'll find a Scroll that will give you a hint for the Pit puzzle in the
Ruins of Desarune.
5 - Loot
At this spot you'll find a
Crystal Shard of Healing and three
Fire Bombs.
6 - Skull
In this corner of the room you'll find a
Skull. In the opposite corner you'll find some
Cheese.
7 - Plate Cuirass
You'll find a
Plate Cuirass here. Just to the west you'll also find some
Lock Picks.
8 - Crossbow Quarrels
You'll find two
Crossbow Quarrels here.
9 - Secret Room
This room is one of the secrets in the game. Inside you'll find three
Broadhead Arrows, two
Frost Bombs, and a
Pearl Shield.
10 - Rogue Pants
You'll find
Rogue Pants here.
11 - Pressure Plate
You'll need to place an item on the pressure plate here to keep the nearby gates open.
12 - Shelf / I Dare You
At this spot you'll find a shelf with a
Tome of Energy in it, but to reach it you'll have to stand on a closed pit. Next to the pit you should notice a sign that says, "I Dare You." If you take everything from the shelf, then the pit will open up and drop you into the
Lexiconary, where you'll get attacked by several ratlings. If you don't want to fall down, then you can just place something else in the shelf before taking the tome.
13 - Archives Puzzle
You'll find two signs at the southern end of this room. For the Archives you'll see the code: "UHU NA. AR E. TE NA. LAM E. AR NA." For the Storage Room you'll see the code: "TE. UHU NA. PALA. UHU NA. PALA NA. AR E. FAAM KO. LAM KO." To decipher these signs, you'll need to make your way down into the
Lexiconary (via Exit G) and solve most of the puzzles down there. That will allow you to enter a room called the Lexiconary, where you'll find a note showing you what most of the words mean. For the remaining words, you'll just have to figure them out through trial and error.
Eventually, you should be able to translate the two signs:
- The Archives: "Move forward once. Strafe left once. Strafe right twice. Move backward once. Strafe left twice."
- The Storage Room: "Strafe right once. Move forward twice. Turn left once. Move forward twice. Turn left twice. Strafe left once. Turn right three times. Move backward three times."
If you have the translations correct, then the only tricky part is where you should begin -- and that's on the first square in the room (where we put #13), facing south. Then when you make the correct moves, the gates leading to the Archives (#14) and the Storage Room (#15) will open, granting you access to some nice prizes.
14 - Archives
To open the gate to this room, you'll need to solve the Archives puzzle to the north (#13). Inside the room, you'll find four Letters and a
Crystal Flower. Upon examination, you'll discover that one of the Letters is from the Island Master, congratulating you for making it this far; the other three Letters are clues for a puzzle in the Cemetery.
15 - Storage Room
To open the gate to this room, you'll need to solve the Archives puzzle to the north (#13). The room itself is one of the secrets in the game. Inside the room, you'll find a
Dragonbreath Revolver, two
Lock Picks, and a
Potion of Strength.
Exits
- Stairs up to the
Ruins of Desarune.
- Meditation Spire. This spire is a secret area. You'll find a Scroll of Dispel here. If you wait at the top of the spire for several seconds (or rest for a few seconds), then you'll get teleported back to the spire in the
Ruins of Desarune.
- Windgate back up to the
Ruins of Desarune.
- Stairs up to the
Ruins of Desarune.
- Stairs down to the
Sewers.
- Windgate to
Sleet Island.
- Stairs down to the
Lexiconary.


