 Did we miss anything in this section? Is there something we didn't discover?
Let us know!
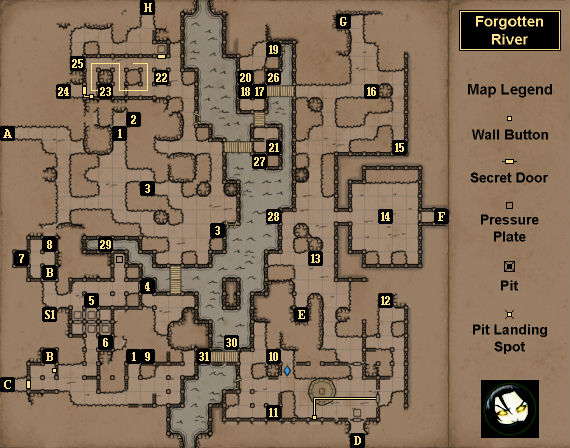
Map Summary
Overview
1 - Underbrush
2 - Locked Chest
Did we miss anything in this section? Is there something we didn't discover?
Let us know!
Map Summary
Overview
1 - Underbrush
2 - Locked Chest
Inside this chest you'll find a
Thraelm Tribal Chestplate and a
Torch.
3 - Horned Fruits
You'll find
Horned Fruits at these locations.
4 - Closed Gate
If you read the sign next to the gate, then you'll see that "a keen eye and a sharp aim" are needed here. To open the gate, you'll need to head across the river to the north and then throw an object west so it lands on a pressure plate.
5 - Shrine of Entanglement
For this puzzle, stepping on a pressure plate will toggle all of the gates around it, either opening or closing them. What you'll need to do is cross the shrine from north to south, while keeping enough gates open so that bolts can shoot from east to west and hit their targets. If you're successful, then when you press the button on the southern side, the windgate blocking you from going south will disappear for a few seconds, and you'll be able to continue on in that direction.
After solving the puzzle, you'll probably have to make your way through it several more times during the course of the game. Noting that stepping onto a pressure plate twice will keep the gates exactly how they started, you can always follow the same sequence to get through the puzzle: forward (onto the first pressure plate), back, forward, forward, forward, back, forward.
6 - Leather Boots
You'll find
Leather Boots here.
7 - Locked Chest
This chest is one of the secrets in the game. To open the gate blocking it, you'll just need to pull the lever right next to the gate. Inside the chest you'll find
Rogue Gloves and
Thraelm Tribal Legplates.
8 - Cheese and Button
At this spot you'll find
Cheese plus a button on the eastern wall. When you press the button, a secret door past the windgate to the south will open up, giving you a route into a secret part of
Twigroot Forest (Exit C).
9 - Loot
At this spot you'll find a
Healing Potion, a
Longsword, and a Scroll of Invisibility.
10 - Skull
You'll find a
Skull here.
11 - Loot
At this spot you'll find a
Short Bow and three
Broadhead Arrows.
12 - Locked Chest
This chest is one of the secrets in the game. Inside you'll find a
Rogue Hood and a
Fire Bomb.
13 - Locked Treasure Chest
You'll discover a clue for this treasure chest on a Map in the
Herder's Den. Inside this chest you'll find
Cheese,
Reed Sabatons, and three
Shuriken.
14 - Castle Nex Courtyard
In this courtyard you'll find four statues, each with a pedestal in front of it. If you approach the door on the eastern side of the courtyard, then sometimes a man will look out, but he won't open the door. To get the door open, you'll have to place the four elemental essences on the pedestals in the right order:
The stone heads in the elemental shrines will tell you where the essences go. When you have the essences placed correctly, the door to the east will open (when you approach it again), granting you access to
Castle Nex.
Note: Just in case you were wondering why you were collecting
Power Gems, this is why. Each elemental shrine will allow you to convert four
Power Gems into an essence.
After gaining access to
Castle Nex, if you cast the Balance spell (just the middle rune selected) in the center of the courtyard, then you'll be sent to the Shrine of Balance in the
River Tunnels.
15 - Loot
At this spot you'll find
Leather Gloves and a set of
Lock Picks.
16 - Gold Cache
If you use a Gold Key to unlock this cache, then inside you'll find a
Nectarbranch Wand.
17 - Warhammer
You'll find a
Warhammer on the pedestal here.
18 - Loot and Lever
On the ground here you'll find a
Smoked Sea Bass and 10
Pellets. If you pull the lever here, then you'll open the gate on the island to the south (#21).
19 - Loot
You'll find
Reed Gauntlets and a
Tattered Cloak here.
20 - Power Gem
You'll find a
Power Gem here. You'll have to swim to reach the "island" with it.
21 - Gate
To open this gate, you'll need to pull the lever to the north (#18).
22 - Shrine of Pain
Your goal at the Shrine of Pain is to get through it while taking as little damage as possible. What you'll need to do is avoid the spike traps while making your way to the lever in the shrine (#23). Pulling the lever will open the exit gate in the northwestern corner (#24). Once through, you'll be able to step on a pressure plate near the entrance, which will open a secret door and allow you to avoid most of the shrine in the future. You'll have to complete the Shrine of Pain in order to reach
Sleet Island (Exit H).
The only trick for the shrine is that the spike traps will always follow the same path (shown on the map above). So the best course to take is to wait for the spikes to start heading for the western side, then move to one square east of the lever, then wait for the spikes to hit the lever square, then move west and pull the lever, then wait for the spikes to pass you on their way east, and then finally escape the shrine.
23 - Shrine Lever
24 - Locked Chest
This chest is one of the secrets in the game. Inside you'll find
Bearclaw Gauntlets and a
Shield Potion.
25 - Pedestal
On the pedestal here you'll find another taunting Letter.
26 - Crossbow Quarrels
You'll find two
Crossbow Quarrels in the water here.
27 - Poison Bombs
You'll find three
Poison Bombs in the water here.
28 - Wooden Box
In the water here you'll find a Wooden Box containing a
Gold Key, a
Leather Cuisse, and a
Torch.
29 - Energy Potion
You'll find an
Energy Potion in the water here.
30 - Lever
Pulling the underwater lever here will open up the secret cache on the other side of the bridge (#31).
31 - Secret Cache
This underwater cache is one of the secrets in the game. In it, you'll find
Reed Legmail and three
Frost Bombs.
S1 - Stone Head
"There are four sides to everything."
Exits
- Path to
Twigroot Forest.
- Windgate. This windgate will appear when you press the button right next to it.
- Path to
Twigroot Forest. To temporarily gain access to this exit, you'll need to press a button to the north (#8).
- Path to
Keelbreach Bog.
- Stairs down to
River Tunnels (The Cache).
- Entrance to
Castle Nex.
- Stairs down to
River Tunnels (The Hub).


