 Did we miss anything in this section? Is there something we didn't discover?
Let us know!
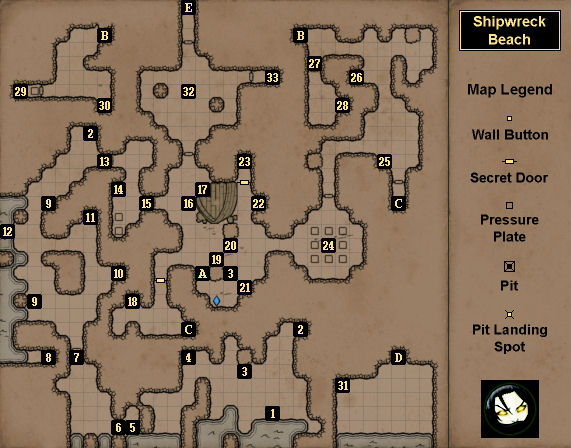
Map Summary
Overview
1 - Cage
Did we miss anything in this section? Is there something we didn't discover?
Let us know!
Map Summary
Overview
1 - Cage
This is where you'll begin in the game (in case it wasn't clear from the intro movie, you're playing prisoners again). To open the cage, just attack the door until it gives. Be sure to take the
Branch before leaving.
2 - Rocks
You'll find a
Rock at each of these locations.
3 - Horned Fruits
You'll find a
Horned Fruit at each of these locations. Be sure to give them to an insectoid in your party (since insectoids can gain attribute points from eating fruits).
4 - Torn Breeches
You'll find
Torn Breeches here.
5 - Bone Club
You'll find a
Bone Club here.
6 - Underbrush
You'll need to attack and destroy this underbrush so you can continue exploring the beach.
7 - Gate
To open this gate, simply press the button on its right side.
8 - Chest
This chest is one of the secrets in the game. Inside you'll find
Shoes, a
Smoked Sea Bass, and a
Torch.
9 - Turtle Eggs
You'll find a
Turtle Egg at each of these locations. Be sure to give them to a lizardman in your party (since lizardmen can gain attribute points from eating eggs).
10 - Darts
You'll find three
Darts here.
Darts deal more damage than
Rocks, but they're so much tougher to see on the ground that they're not a recommended throwing weapon.
11 - Iron Key
You'll find an Iron Key on the ground here. You'll be able to use it to open a nearby gate (#13).
12 - Sandals
You'll find
Sandals in the water here.
13 - Locked Gate
You'll need to use the Iron Key (#11) to open this gate.
14 - Tattered Shirt
You'll find a
Tattered Shirt here.
15 - Gate
This gate is linked to the pressure plates to the west. To open the gate -- and keep it open -- you'll need to place an item on the northern pressure plate and then the southern pressure plate.
16 - Pedestal
On this pedestal you'll find a letter from the Island Master "welcoming" you to the island.
17 - Xafi Robe
You'll find a
Xafi Robe here.
18 - Button
This button will open the secret door to the east.
19 - Treasure Chest
You'll learn about this treasure chest from the note in the wooden box to the north (#28). To dig it up, you'll need to have a character equip a
Shovel (you'll find one with the note) and then use it while facing the square with the chest. Inside the chest you'll discover an
Embalmer's Robe and a
Healing Potion.
20 - Throwing Knives
Stuck in the tree here you'll find three
Throwing Knives.
21 - Pedestal
On this pedestal you'll find the Scroll of Fireburst.
22 - Statue of Kilhagan
This statue works just like the one to the east (#25). That is, to unlock it, you'll need to put a
Rapier (#28) in its hands. When you do, it'll open a secret door to the north, giving you access to a Gold Key (#23). The secret door will remain open permanently, allowing you to take back the
Rapier.
23 - Pedestal
To reach this pedestal, you'll have to destroy some underbrush, and you'll have to make the nearby statue (#22) happy. The
Gold Key you'll find on top of the pedestal is one of the secrets in the game.
Gold Keys can be used to open special equipment caches (such as the one at #33), but you'll discover more caches than keys, so you should always save first before using a
Gold Key to ensure that you receive something useful for your party.
24 - Pressure Plate Puzzle
If you read the sign by the gate to the north, then you'll see that "X marks the spot." So to complete the puzzle, you'll need to place objects on the center pressure plate and the four corner pressure plates. When you do, the gate will open permanently, and you'll be able to take back your objects.
25 - Statue of Kilhagan
If you read the sign to the east of this statue, then you'll learn that Kilhagan's "second most precious thing in life" was his sword. That means to unlock the statue, you'll need to place a
Rapier (#28) in its hands. When you do, the nearby door will open, granting you access to the
Dead Sailor's Cave (Exit C). The door will remain open permanently, allowing you to take back the
Rapier.
26 - Peasant's Cap
If you destroy the underbrush here, then you'll find a
Peasant's Cap.
27 - Locked Gate
You'll need an Ornate Key (#29) to open this gate. Past the gate you'll encounter two zarchtons. If you have trouble fighting them at the same time, then feel free to use the nearby windgate (Exit B). The zarchtons won't follow you, so you can use it to rest and heal and then return.
28 - Wooden Box
Inside this box you'll find a Note, a
Rapier, a Scroll of Poison Cloud, a
Shovel, and a
Smoked Sea Bass. The note will tell you that a treasure chest is located "at the lone oak, in the shadow of the blue light." That is, the treasure chest can be found adjacent to the tree near the Crystal of Life (#19).
29 - Chest
To get to the chest here, you need to drop an item onto the pressure plate in front of it. That is, you'll have to drop the item through the gate blocking your access. When the item lands on the pressure plate, the gate will open. Inside the chest you'll find a
Dagger, a
Healing Potion, and an Ornate Key. The key will open up the gate on the other side of the windgate (#27).
30 - Sack
Inside the sack you'll find a
Sling and three
Rocks.
31 - Locked Chest
You'll need a set of
Lock Picks to open this chest. You can find a set in the
Dead Sailor's Cave. Inside the chest you'll discover a
Thraelm Tribal Mask and a
Healing Potion.
32 - Circle of Stones
In order to open the gate to the north, you'll need to survive a challenge from the Island Master. To start the challenge, you'll need to stand in this circle of stones and use the
Horn of Summoning (found in the
Dead Sailor's Cave). When you do, the entrance gate to this part of the map will close, locking you inside, and two viper roots will attack you. You're not required to stay in the circle of stones for the fight. In fact, you should move around as much as possible so you don't get cornered by the roots.
The key to the roots is that they can't turn once they've surfaced, so when you see one pop up, you should immediately maneuver yourself to hit it from the side or from behind. That means you should stay in the center of the arena where you can move, rather than going to the sides, which look like they might be safer but where you're much more likely to get trapped. The roots are also vulnerable to fire damage, so you might want to have your melee fighters equip
Torches.
The roots are intended to be a good challenge, so don't lose hope if they kill you a few times. When you do eventually defeat the roots, they'll drop a
Power Gem, which you'll need later.
Note: The
Horn of Summoning can be used in one other place in the game, so don't throw it away.
33 - Chest
You'll only be able to reach this chest by using a Gold Key to unlock the gate leading to it. Inside the chest you'll find
Backbiter, 10
Pellets, and a
Potion of Strength.
Exits
- Hub Windgate. This windgate will take you to the Hub underneath the
Forgotten River, but it will only appear after you've used the windgate on the Hub side of the connection.
- Windgate. You'll need to press the button next to the eastern windgate to turn it on.
- Stairs down to the
Dead Sailor's Cave.
- Stairs down to the
Dead Sailor's Cave. Using these stairs is considered one of the game's secrets.
- Path to the
Twigroot Forest.


