 Did we miss anything in this section? Is there something we didn't discover?
Let us know!
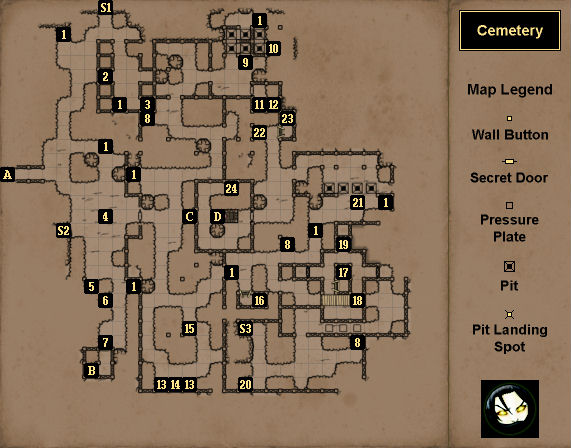
Map Summary
Overview
1 - Graves
Did we miss anything in this section? Is there something we didn't discover?
Let us know!
Map Summary
Overview
1 - Graves
You can dig up these graves using a
Shovel. The contents of the graves are random-ish. You can receive one of the following items --
Antivenom, a
Frost Bomb, a
Healing Potion,
Leather Gloves, eight
Pellets, a
Skull, or a Sack containing
Bread, a
Burrow Rat Shank, and
Cheese -- or you can be attacked by a ghoul. From what we can tell, if you loot all of the graves (including the graves at #8 and #13), then you'll receive all of the item rewards once and get attacked by ghouls the other times.
2 - Crystal Flower
You'll find a
Crystal Flower here.
3 - Locked Chest
Inside this chest you'll find 30
Pellets.
4 - Cemetery Puzzle
There are two clues for this puzzle: the nearby stone head (S2), which will point you to the Archives, and then the Letters found in the Archives, which will describe the path taken by a pilgrim from Xafi:
- He began traveling towards the frozen tundras.
- The sun was setting.
- Then he looked at the path leading to the burning hot desert he called home.
- Finally, the star of the north came to lead the way.
- And he continued walking along the path.
Each line represents a direction. To solve the puzzle, you'll need to push the floating stone block towards the five directions, returning it to the center after each move. It's easy to understand that the second line means "west" and the last two lines mean "north." For the other two lines, you'll just have to use trial and error to figure out that they mean "north" and "south" respectively. That is, the five directions are NWSNN. When you follow that path with the floating stone, the gate to the east will open, allowing you to explore the rest of the Cemetery.
5 - Locked Treasure Chest
You'll receive a clue for this chest if you combine together two Scrolls from the
Tomb of Rites. Inside the chest you'll find a
Bracelet of Tirin and five
Cannon Balls.
6 - Gold Key Cache
If you spend a
Gold Key here, then you'll gain access to a
Boneblade.
7 - Closed Gate
You'll only be able to open this gate from its southern side. That is, the gate is intended as an exit from
Orul's Crypt (via Exit B). Just past the gate you'll find a set of
Lock Picks.
8 - Riddle Graves
These graves are just like the other graves in the Cemetery (#1), except that their headstone epitaphs are clues for discovering a treasure chest. If you look at the capital letters in the epitaphs, then you'll see:
BETWEEN / ERHEP / HAARO
You'll find Erhep's and Haaro's graves in the southern part of the Cemetery (#13). If you dig right between them (#14), then you'll find a treasure chest.
9 - Six Pits Puzzle
This puzzle consists of six pits, arranged as shown below:
Two of the pits will start out closed, while the other four will be open. There are also five buttons, but you'll only be able to reach two of them at the start.
The buttons will rotate the closed pits in a clockwise fashion, so what you'll need to do is move the closed pits so that you can create a path to the lever at the end (#10). Pulling the lever will open the gate to the nearby
Power Gem (#12) and also toggle the exit gate in the area beneath the puzzle (so the exit windgate will always return you to the side of the puzzle you fell down from).
The tricky part to the puzzle is that while two of the western buttons will move one of the closed pits, and the two eastern buttons will move the other closed pit, the button at pit position 1 is random, and you won't know which closed pit it controls until you start solving the puzzle. So there's a 50-50 chance that you'll end up falling down a pit even if you understand the puzzle.
To solve the puzzle, you should press the western button (at the front of the puzzle) enough times to move a closed pit to position 4, and then press the eastern button (at the front of the puzzle) to move a closed pit to position 1. This will allow you to walk to position 1, where you'll find another button. If the random number gods are with you, then pressing this new button twice will move the closed pit from position 4 to position 2, allowing you to exit the puzzle to the north. If pressing the button at pit position 1 opens the pit beneath your feet, then you'll have to repeat the first step and reverse the positions (so you'll need to press the western button to move a closed pit to position 1, and press the eastern button to move a closed pit to position 4).
From the northern side of the puzzle, you'll need to press the western button (north of the puzzle) to move a closed pit to position 3, and press the eastern button (at pit position 3) to move a closed pit to position 6. This will allow you to reach the lever (#10) and pull it.
To escape the puzzle, you'll just have to reverse what you did previously, but at least this time you'll know which closed pit the button at pit position 1 controls, and so you shouldn't fall back in.
11 - Sack
Inside this Sack you'll find an
Antidote potion, a Hub Key, and a Scroll of Lightning Bolt. The Hub Key will allow you to turn on the Hub windgate in the Cemetery (Exit C).
12 - Power Gem
To open the gate leading to the
Power Gem, you'll need to solve the Six Pits puzzle (#10).
13 - Haaro's and Erhep's Graves
These graves are just like the other graves in the Cemetery (#1), except they're also clues for a treasure chest (see #8).
14 - Locked Treasure Chest
You'll get clues for this treasure chest from some of the graves in the Cemetery (#8, #13). Inside the chest you'll find a
Gold Key and the
Rites of the Moon, plus a Letter from Jakon Riddle bequeathing the contents of the chest to you.
15 - Broadhead Arrows
You'll find two
Broadhead Arrows here.
16 - Minor Loot
In this lower ground grave you'll find a
Shovel and a
Smoked Sea Bass.
17 - Three Gates Puzzle
When you step onto the pressure plate here, the three gates to the north, east and west will open briefly in a random order. What you'll need to do is throw objects into the windgates behind the gates during one round of the puzzle. If you're successful, then the gate to the east of the puzzle (#18) will open, allowing you to continue on in the Cemetery. If you fail, then any object that made it to a windgate will appear behind you, and you'll need to drop down to the lower ground (where Ghouls will attack you) to retrieve the rest.
Note: The gates will open and close quickly enough that you won't be able to rely on one character to do the throwing. You'll need to equip three of your characters with thrown / missile weapons.
18 - Gate
This gate will open when you complete the Three Gates puzzle.
19 - Sack
Inside this Sack you'll find two loaves of
Bread and a
Horned Fruit.
20 - Pedestal
On the pedestal here you'll find the recipe for
Potions of Resurrection.
21 - Pottery Puzzle
Your primary goal in this puzzle is to break three sets of pottery. You'll have line-of-sight for two of the sets, so they should be easy to break. But for the third set, which is blocked by a fence, you'll have to use the windgates on the northern side of the puzzle so your thrown objects can make their way to their target.
Here's how to do it. The pressure plate at the front of the puzzle will toggle the two windgates. So you'll need to stand one square east of the pressure plate and drop an item on it. This will cause the eastern windgate to become active. Then you'll need to throw an object at the eastern windgate. The object will hit the windgate and turn left towards the western windgate, but before it gets there, you'll need to remove the item from the pressure plate. If you get the timing right, then the thrown object will hit the western windgate and turn left again, this time hitting the last set of pottery. You'll probably have to hit the pottery twice to destroy it.
Once you've destroyed the pottery, you'll just need to press the button at the front of the puzzle. This will cause the spell shooter in the puzzle to shoot a bolt to the west and hit a receptacle (which had been blocked by the pottery). When the bolt hits the receptacle, one of the open pits in the puzzle will close, allowing you to continue exploring the Cemetery.
22 - Pedestal
On the pedestal here you'll find an
Ethereal Blade, which is a useful weapon because it's one of the two ways (the other being the Dispel spell) that you can damage Air Elementals.
23 - Skull
In the lower ground here, you'll find a
Skull and a Note. The Note will give you a clue to a treasure chest in the
Hamlet of Stormbreach.
24 - Loot
At this spot you'll find a
Machete and a
Round Shield.
S1 - Stone Head
"Knowledge flourishes on the island. Death and decay have fed its growth."
S2 - Stone Head
"The orders came and the gates closed. The answers were sealed in the Archives."
S3 - Stone Head
"Every night the silent one sees something. Look where he looks and be patient."
This refers to the silent stone head in
Sleet Island.
Exits
- Path to
Sleet Island.
- Windgate to
Orul's Crypt.
- Hub windgate. You'll need to complete the Six Pits puzzle (#10) to acquire the Hub Key (#11), which will allow you to activate the windgate.
- Stairs down to the
Wormbound Catacombs.


