 Did we miss anything on this map? Is there something we didn't discover? Let us know!
Straddling the rocky shores of Maer Dualdon and the alpine forest of Lonely Wood from which the town borrowed its name, Lonelywood has the dubious honor of being the northernmost settlement in all of Faerûn. The town lies in the shadow of Kelvin's Cairn, and the solitary mountain peak acts as a barrier that shelters both the town and forest against the harsh winds that blow down from the Reghed Glacier. Although the town is protected from the wind, the weather is hardly temperate. Snow still covers the ground year round, and at night the temperature drops below freezing.
Did we miss anything on this map? Is there something we didn't discover? Let us know!
Straddling the rocky shores of Maer Dualdon and the alpine forest of Lonely Wood from which the town borrowed its name, Lonelywood has the dubious honor of being the northernmost settlement in all of Faerûn. The town lies in the shadow of Kelvin's Cairn, and the solitary mountain peak acts as a barrier that shelters both the town and forest against the harsh winds that blow down from the Reghed Glacier. Although the town is protected from the wind, the weather is hardly temperate. Snow still covers the ground year round, and at night the temperature drops below freezing.
Lonelywood is one of the youngest of the Ten-Towns. It was only in recent years that it was recognized by the council as the tenth town. Fifty years ago, there was nothing in the way of civilized settlements north of Termalaine and the area surrounding the Lonely Wood was rife with logger camps and lone trappers. With the establishment of the Whistling Gallows Inn, however, Lonelywood gained a sense of permanency, and a small town slowly grew up around the Inn.
Its isolated position in the North makes Lonelywood vulnerable to attacks from the barbarian tribes that dwell in the icy plains surrounding the Ten-Towns.
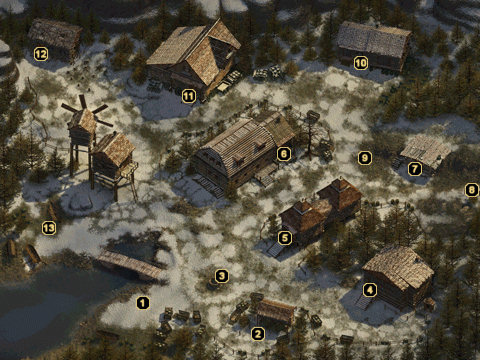
1 - Arrival
After offering your aid in stopping an impending battle between two barbarian tribes back in
Kuldahar, Hjollder casts Wind Walk and brings your party to Lonelywood. Hjollder explains that, of the Ten-Towns, Lonelywood would be the first to fall if war should erupt. At this point, Hjollder leaves you to travel the remaining distance to his people's camp alone.
2 - Rawleigh Gallaway
Rawleigh Gallaway is the caravan master for the Gallaway Trading Coster. He and his men are stuck in Lonelywood because of some "idiot savages" out on Bremen's Run. If you prod Rawleigh for some general information about the area and the barbarian situation, he will give you directions to their camp (which updates your world map).
3 - Hailee Dunn
You'll come across a small girl by the name of Hailee Dunn standing by the well here. She will tell you that her brother has fallen into the well and ask that you retrieve some rope from her father to help save him. If you pay a visit to Tybald Dunn at area #10 or Ambere Dunn at area #6, though, you'll discover that Hailee doesn't even have a brother.
When you expose Hailee for telling a lie, you'll receive 15,000 experience points. However, the little girl will reveal that she tells such lies because she hates it here in Lonelywood. Her father works all day, her mother is a drunk, and there are no other children in town to play with. This pretty much makes you forget about the trouble she put you through, but you don't want to leave her be just yet. Keep talking to her about other activities she does to keep herself occupied here in Lonelywood to learn that she spies on the citizens. In fact, during her spying she has uncovered a secret about the inn. Either give her a gold piece or trade secrets with her to learn that Kieran bought the Whistling Gallows Inn because it has a magic mirror that acts as a portal. This will earn you another 15,000 experience points.
Once you have all the information you need from Hailee, tell her that she needs to go home and protect her father. This will earn you a third bonus of 15,000 experience points.
4 - Emmerich's Archery
Emmerich Hawk is a local bowyer that will sell your party an assortment of bows, crossbows, and ammunition. Two of the most notable items you can pick up from his store are the fun-but-slightly-impractical
Goblin Arrows and the
Storm Bow.
If you chat with Emmerich for awhile, he'll tell you that his true calling is really to be a "caretaker" for the surrounding woods. However, because of Emmerich's inability to keep trappers out of the area, the bowyer is worried that he has fallen from the favor of Silvanus. If you inquire about his reasoning behind such a fall from favor, he tells you that he was attacked by a massive white wolf three days ago and barely survived. Emmerich believes that this wolf was a manifestation of Silvanus and that he was being punished for the presence of trappers.
If you inquire about the trappings, he will tell you about three of Lonelywood's citizens named Dolan, Digby, and Doogal. Apparently these three have been trapping animals within the forest at an alarming rate. Over the course of your travels to and from Lonelywood, two of these trappers will be killed by a wolf in the forest. If you question Emmerich after both trappers have been killed (having either learned that the wolf is magical or encountering the Greater Werewolf firsthand at area #9), you'll come to the conclusion that Emmerich has become a werewolf and has unknowingly been killing the trappers during the night. This will earn you 420,000 experience points.
Once Emmerich's lycanthropy has been uncovered, pay a visit to Kieran Nye in the Whistling Gallows Inn. He will provide you with an amulet called Selune's Caress that's capable of keeping Emmerich's lycanthropy at bay. Turn the necklace over to Emmerich and you'll receive another 420,000 experience points.
After receiving both experience rewards and buying all the supplies you'll ever need from Emmerich, you may want to consider killing him. Doing so has no reprecussions (other than the loss of three points of reputation) and you'll be able to loot 100 gold pieces, three
Potions of Extra Healing, twenty
Confusion Arrows +3, twenty
Arrows of Piercing, twenty
Inferno Arrows +2, a
Shadowed Cloak, some
Bracers of Archery, and a
Long Bow +4: Hammer from his corpse. A nice haul as long as your conscience doesn't get the best of you.
5 - Temple of Waukeen
Stop by this so-called "Golden Lodge" if you need healing or to speak with Quinn Silverfinger about a few happenings around Lonelywood. When the subject turns to Baldemar, Quinn accuses him of having the political grace of a walrus. If you've spoken to Tybald Dunn about the way Baldemar has cornered the contract business, then you can mention this to Quinn to learn that Targos is making plans to expand their shipping trade and will be in need of skilled coopers. Obviously this is something you should mention to Tybald when you get the chance.
Before leaving the temple, head to the back room and take a closer look at the corner wall. A little searching will uncover a secret panel with a locked chest behind it. Pop the chest open for 1500 gold pieces, five gems, and
Quinn's Fancy Sling.
6 - Whistling Gallows Inn
The Whistling Gallows is where you'll find most of the action in Lonelywood. This is where Ambere Dunn - wife of Tybald Dunn and mother to Hailee Dunn - spends most of her days. The woman is so unhappy with her life that she's willing to drink nonstop and sleep with any man willing to take her out of Lonelywood (sleeping with her will lower your reputation by one point). If you convince her that she has an honest husband that does honest work, a beautiful daughter, and a home removed from the craziness of the south, she will eventually leave the inn and try to repair the damage she has done to her family. This will earn you 15,000 experience points.
You'll also run into Murdaugh of Auckney, self-proclaimed "wandering bard and failure extraordinaire." He'll fill you in on the town of Lonelywood, the threat the barbarians pose to the Ten-Towns, and his penchant for drinking. If you offer to buy him a drink, he'll spin you a tale about his love for the Princess of Auckney and why it drove him to travel through this region in search of a Glacier Rose. Keep this tale in the back of your mind as you travel to the
Gloomfrost Caverns and talk to Tiernon. The dwarven smith can craft you a rose made from ice, which you can then bring back to Murdaugh. The bard is absolutely amazed when you give it to him, and begins preparations to return to Auckney in order to finally marry the Princess. This will earn your party a hefty 630,000 experience points.
Then there's Roald Tunnelfist, a dwarf who has seen his fair share of battle. Roald barely escaped with his life during a recent visit to the
Barbarian Camp, and will offer to give you directions to the camp if you don't already have it marked on your map.
Kieran Nye, the proprietor, has a history that you can reveal. If you've unearthed Hailee Dunn's secret, then you already know that Kieran has a secret door behind the mirror in his bedroom. Quiz him about the door and he'll confess that he is an exile from the Hosttower of the Arcane, an organization that is willing to kill him for leaving and starting a new life. If you're willing to keep his secret safe, then Kieran offers to sell you some of the magical artifacts he has gathered over the years. This is the only place you'll be able to pick up the
Dagger of Safe Harbor or
Zilzanzer's Magnificent Darts, so you'll definitely want to inquire about it during one of your visits to the inn.
Once you've discovered that Emmerich is a werewolf, you can ask Kieran if he knows of a way to lift the curse. While he doesn't possess the power to cure the affliction, he does have an amulet called Selune's Caress that will inhibit the effects of the curse and keep Emmerich from undergoing the process of transfiguration each night. Bring this amulet to Emmerich for a hefty 420,000 experience point reward.
If you've installed
the free Trials of the Luremaster add-on, then you'll also come across a dwarf named Hobart Stubbletoes, who tells you about a "dangerous, yet potentially rewarding mission" that he'd like your party to participate in. Apparently a ruined castle nearby has been sealing the fate of various adventurers that have entered it and Hobart believes that you might be the group to finally conquer its defenses and plunder its riches. If you agree to accompany him, your whole party will be whisked away to the
Castle Maluradek Courtyard.
Finally, there are several sources of loot within the inn. If you investigate the back room with the mirror, you'll discover a locked chest that contains a
Robe of the Neutral Archmagi. Proceed through the mirror's secret door to find a scroll of Seven Eyes lying on a shelf. For some additional loot, head upstairs and plunder the containers and loose floorboard for a single gold piece, a Rogue Stone, an
Oil of Speed, and five
Translocation Arrows.
After you have exposed Wylfdene in the
Barbarian Camp and have returned to town for some last-minute supplies, make a quick stop by the Whistling Gallows. When you leave, a mage named Vaarglan will approach your party just outside the inn's main entrance. He'll claim that he's seeking an old colleague named Alacander, though the description he gives sounds much like Kieran Nye, the inn's proprietor. Vaarglan's whole story seems pretty suspicious, and you'll probably guess (correctly) that the mage is from the Hosttower of the Arcane and intends to kill Kieran. If you choose to tell Vaarglan that his "old colleague" is the innkeeper, he will summon several friends to his side and the whole lot will go inside in an attempt to assassinate Kieran. You'll hear the sounds of battle from within and one of the assassins, Alpheus, will run outside enshrouded in flame before dying at your feet. When you go back inside the inn, you'll discover that Kieran has managed to kill every single one of them singlehandedly. He's pretty disappointed that you gave up his identity, but there are no reprecussions to this method other than a lack of loot and experience (though you do get Alpheus' items).
A more lucrative approach is to either insult or lie to Vaarglan. He'll summon in five of his friends and you'll have to do battle with all six of them, but it's well worth it if you can handle the fight. Try to focus on slaying the two casters right away and the other four will go down without much trouble afterwards. Aside from the fairly decent experience you'll gain, each of the Hosttower assassins carries a nice assortment of magic items. Vaarglan's corpse can be looted for some gold, a
Robe of the Neutral Archmagi, a
Ring of Free Action, a
Ring of Protection +2, a
Golden Girdle, a
Barrier Amulet, and a
Wand of Paralyzation. Alpheus' corpse turns up more gold, a
Mage Robe of Fire Resistance, some
Bracers of Defense AC 6, a
Potion of Magic Shielding, and a couple of
Potions of Extra Healing. The Priestess of Shar drops some gold, a suit of
Plate Mail Armor (shadowed) and a
Fast Flail +2. The Mercenary Thief carries some gold, a pair of
Boots of Stealth, a
Short Sword of Backstabbing, and a suit of
Studded Leather +4: Shadowed. Finally, the two Mercenary Warrior corpses can be stripped of their two suits of
Full Plate Mail +1,
Gauntlets of Weapon Expertise,
Gauntlets of Ogre Power,
Battle Axe +3: Fatigue,
Long Sword of Action +4, and
Large Shield +1. Jackpot!
With Vaarglan and his fellow Hosttower thugs dead, head inside the inn once again and speak with Kieran. He overheard your "conversation" outside and thanks you for not revealing his whereabouts. This will earn you 630,000 experience points.
7 - Purvis' Home
Purvis is the town gravedigger, the unfortunate target of Hailee's briarcone throwing entertainment, and, as you'll learn later on, a dangerous assassin. The first couple of times that you return to Lonelywood during the campaign, you'll notice Purvis burying a dead trapper from area #12. Each one of the trappers was killed by a wolf, and Purvis makes sure to "digs them a nice hole" even though there isn't a whole lot left of them.
When you return to Lonelywood after exposing Wylfdene's true identity, you'll discover that Purvis has been living a double life. If you visit Baldemar's house, you will find that Purvis has assassinated both the councilman and his wife. Check area #11 for more information about this particular encounter.
8 - Exit
Exiting Lonelywood via this pathway will bring up the world map and allow you to travel to the
Barbarian Camp or
Gloomfrost once you've discovered their locations.
9 - Greater Werewolf
After you've freed Hjollder from the
Burial Isle, there's a chance you'll encounter a Greater Werewolf to the west of Purvis' home (during the evening hours, anyway). Once you've reduced the beast to "Almost Dead", it will drop to four legs and run off the map to the east.
At this point, you'll probably have figured out that the Greater Werewolf is actually Emmerich from area #4. If you've experienced this encounter or have spoken to Doogal about the wolf being magical, then you can confront Emmerich about it when he finally shows up in his shop the next day.
10 - Tybald Dunn's Home
Tybald Dunn is Hailee's workaholic father. If you tell him that his son has fallen in the well at area #3, he'll tell you that he doesn't even have a son and that his daughter is just making up another story for attention.
After the situation with Hailee is resolved, you can quiz Tybald about Baldemar, the town representative. Apparently Baldemar has been taking all of the lucrative trading contracts and only provides Tybald with enough to keep food on the table. After chatting with Quinn at the Temple of Waukeen, you can tell Tybald about an opportunity to move to Targos for better and more frequent work. This will earn your party 20,000 experience points.
You can also stop by the Whistling Gallows Inn and convince Tybald's alcoholic wife Ambere that her life isn't so bad in Lonelywood. She'll clean up her act and a return visit to Tybald will get you a sincere thank you (but no experience).
Finally, if you're desperate for more loot, check the locked chest in the back room of Tybald's home to uncover some
Boots of the North.
11 - Baldemar Thurlow's Home
Baldemar Thurlow is Lonelywood's representative to the council of the Ten-Towns, though popular belief seems to be that he isn't a very good one. His wife Arden will be hanging out on the lower level of the home when you first arrive. She isn't too happy to see that you've barged into her home, but if you're polite she'll overlook your trespassing. Chat with her to learn that her marriage to Baldemar was arranged and that Baldemar made his fortune supplying caravan wagons to the trading costers in the region. At the end of the conversation, she'll tell you that Baldemar is upstairs scribbling in his ledgers.
If you haven't yet played through much of the expansion's campaign, then you won't have much to say to Baldemar when you head upstairs. However, if you've paid a visit to the
Barbarian Camp and learned that an assassin was sent to kill Wylfdene, you can ask Baldemar about it. He'll deny it, of course, but you can threaten to bring the matter to the attention of the council and he'll finally admit to it.
Baldemar will claim that it wasn't his idea and that a secretive group of council members threatened to have him removed if he didn't go along with the plan. Tell him that he should have had the courage to stand up to them even if it cost him his seat on the council and he'll agree to make the entire council aware of the matter at their next meeting. This will earn you 420,000 experience points.
It's also worth noting that you can grab four
Elixirs of Health in a container downstairs and uncover a "Council Letter" in Baldemar's bedroom that suggests that he's involved with something sinister.
If you stop by Baledamar's home after exposing Wylfdene and causing Icasaracht to flee from the
Barbarian Camp, you'll discover that both he and his wife have been murdered. When you enter Baldemar's office upstairs, Purvis (yes, the gravedigger from area #7) will step from the shadows and reveal himself as an assassin. It seems that the one-eyed man that Baldemar had dealt with previously was not the assassin intended to kill Wylfdene - it was Purvis. When Wylfdene caught wind that an assassination had been planned, he doubled the guards in his camp and made it impossible for Purvis to do his job. Now that you've removed Wylfdene from the equation, though, Purvis intends to take credit for your work and kill your party to ensure nobody finds out the truth. Instead of confronting you here, however, he quaffs a potion and runs downstairs and out of the house.
When you follow him outside, Purvis jumps your party. Demonstrate how ridiculous his feeble assassination attempt was by crushing his skull, then grab the
Oil of Speed,
Boots of Stealth,
Ring of Free Action,
Cloak of Non-Detection, and
Short Sword of Backstabbing from his carcass.
12 - Dolan, Digby, and Doogal
These are the three trappers causing problems for Emmerich at area #4. After you return from your first visit to the
Barbarian Camp, you'll learn from either Dolan or Doogal that Digby has been killed by a wolf while checking on some traps. If you talk to Emmerich about this, he just brushes it off as self-defense on the wolf's part.
Then, when you've returned from the
Burial Isle after freeing Hjollder, you'll learn from Doogal that Dolan has been killed by a wolf too. Doogal tells you that he tried stabbing the wolf with his knife while it was killing Dolan, but the blade couldn't penetrate its flesh. Doogal thinks that Emmerich has been summoning magical wolves to kill him and his brothers, but there's obviously something else going on here. Speak with the bowyer again after this conversation with Doogal and you'll finally uncover the truth.
13 - Young Ned
Remember Old Jed, the fisherman that practically drank himself into a coma in the basement of the Winter's Cradle Tavern during your
Return to Easthaven? Well, Young Ned is his nephew. And, unfortunately, Ned hopes to be half the drunk Jed is when he gets older. It runs in the family, I guess.
After visiting the
Barbarian Camp for the first time, you'll need to talk with Young Ned in order to hitch a ride on one of his boats to the
Burial Isle.


