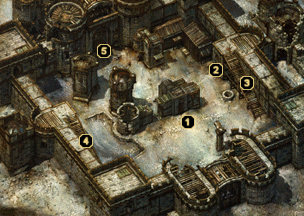
 Did we miss anything on this map? Is there something we didn't discover? Let us know!
1 - Arrival
When Hobart Stubbletoes triggers a Teleport Without Error spell in the Whistling Gallows Inn, your party will be transported to the courtyard of an old dilapitated stronghold called Castle Maluradek. When you confront Hobart about where he has brought you, he scoffs at your ignorance and even insults you with an "orc-wit" comment before disappearing into the door behind him.
After Hobart leaves, two Harpies, two Fiendish Harpies, four Wyverns, and three Boring Beetles surround your party and you'll be forced into battle. The Harpies are able to captivate your party members with their song, so they can prove to be fairly annoying. Get used to them, though. You'll be encountering plenty more during your visit to Castle Maluradek. When all of the beasts have been slain, follow Hobart inside the small building.
The sneaky halfling avoids answering any questions about his reasons for bringing you here ("I'm just one old halfling... what can I do against a ghost?"), but he will offer to sell you some of the goods he has collected over the years. Included in his list of trinkets for sale are some
Gauntlets of Ogre Power, a
Bag of Holding, a
Short Bow of Ebullience, the
Bracers of Icelandic Pearl, and the
SkullFlail. None of the items in his selection are all that great, but you might be able to outfit a secondary fighter or something if you have some extra gold. And an extra
Bag of Holding never hurts.
It's also worth noting that you can rest in Hobart's little guardhouse at any time. Considering the fact that the Harpies and other creatures continually respawn around Castle Maluradek, it's pretty convenient to have a safehaven to retreat to.
2 - Offering Room
This small offering room dedicated to the god Helm is infested with Phase Spiders and Sword Spiders. Once all of the vermin have been taken care of, grab the Manuscript of the High Watcher from the altar and read through it to learn of several happenings within the castle over its lifespan (and to discover the offering bowl's purpose).
During your first visit to this room, reading the journal is about all you can do. Once you have obtained the Holy Symbol of Helm from the
Northwest Tower, though, you can do as the journal states and place it in the offering bowl on the altar to open a secret entrance into the
Watchknight Crypt.
3 - Exit
Once this stairway magically repairs itself (by simply standing on it), you'll be able to ascend to the
Castle Walls.
4 - Exit
This stairway leads up to the
Castle Walls.
5 - The Luremaster
Oddly enough, the Luremaster introduces himself as "your adversary." His reasoning is that you will eventually want to leave the castle and he will resist, therefore pitting you both on opposite sides of a disagreement. It's not that the Luremaster necessarily wants to keep you here for eternity; he just wants you to prove that you are worthy of being called "heroes" before you can leave. Accept his challenge and he'll propose a riddle:
North, east, south, and west,
In towers four the purgatives rest.
Feed them where the spirits nest,
Or forever here remain, our guest.
Cryptic, as expected. Another one follows:
The sun rises, the earth warms,
Four men lie cold, yet no on mourns.
"Leave them be!" the mad lord warns,
and from my work their praise is shorn.
With that, the Luremaster tells you to leave and complete "the task at hand" before you will be allowed entrance into the castle. What the riddling apparition really wants is for your party to visit each of the castle's four towers in order to gain the Watchknights' tales (parchments describing each knight's deeds) so that you can put them to rest by placing each tale within that knight's respective tomb within the
Watchknight Crypt. Make sense?
When you've done as the Luremaster asked, return here and you'll be granted access to
Castle Maluradek.