 Did we miss anything on this map? Is there something we didn't discover? Let us know!
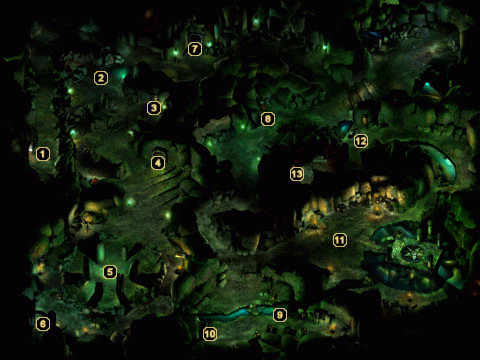
1 - Arrival
Did we miss anything on this map? Is there something we didn't discover? Let us know!
1 - Arrival
The secret hallway on
the third floor of the castle's dungeon will bring you to a network of caves below Castle Maluradek. To the north, you'll encounter a Jackal Shaman who will lead your party through a series of traps toward area #2.
2 - Jackalweres
When you reach this chamber, several Jackal Warriors and Greater Jackals will come to the Jackal Shaman's aid. Focus on the Shaman to put an end to his spellcasting, then clean up the other beasts in short order afterwards. Check the Shaman's corpse for some
Studded Leather Armor +2 and a
Quarter Staff +1, then plunder the chest along the west wall to find a suit of
Studded Leather +2: Missile Attractor, a
Spear +3, Backbiter, and a
Scimitar +3, Frostbrand.
3 - Loot!
Search the recessed door and chest in this vicinity to uncover 1800 gold pieces, a
Potion of Heroism, an
Elixir of Health, and a powerful broad sword called
Hell's Bane.
4 - Exit
This passageway is one of five that lead to and from
the fifth floor of the castle's dungeon.
5 - Summoning Circle
Two Summoners will have just conjured forth a Glabrezu demon and several Bats in the center of these standing stones. On top of that, two Jackal Shaman stand within casting distance in the two hallways to your right and left. Wipe out the Summoners as quickly as you can (to keep them from conjuring forth anymore Glabrezu demons), then focus on the Jackal Shaman. When no more casters remain, equip the
Hell's Bane sword you just found to witness its potential against the Glabrezu.
Once the area is clear, you'll find that each Shaman has dropped a suit of
Studded Leather Armor +2 and a
Quarter Staff +1, and that each Summoner has dropped a
Robe of the Evil Archmagi and a
Ring of Protection +2. A closer inspection of the chest and bedroll in the southwest area will uncover a
Potion of Absorption, a
Potion of Magic Shielding, an
Oil of Fiery Burning, and a scroll that reveals how to use five gems to activate a portal (at area #11) that leads out of this dungeon.
6 - Exit
This passageway is one of five that lead to and from
the fifth floor of the castle's dungeon.
7 - Exit
This passageway is one of five that lead to and from
the fifth floor of the castle's dungeon. It is guarded by three Phase Spiders.
8 - Rikasha
A Jackalwere named Rikasha patrols this hallway, though he isn't hostile like the rest. Speak with him to learn that Hobart actually works for the Luremaster, and that his sole purpose is to bring adventurers to this castle so that the Luremaster can put them through his tests. Rikasha will also mention that escape might be possible if you were able to activate an old portal that the Jackalweres used ages ago to reach the surface.
If you found the scroll at area #5, then you can pretty much piece together what needs to be done. Basically, you need to track down five gems scattered about these last two levels of the dungeon, convert them to a flawless condition, and then use them to activate the portal at area #11.
9 - Loot!
A handful of Jackalweres guard three containers in this area of the caverns. Search the crate for scrolls of Icelance, Ice Storm, Stoneskin, and Emotion: Hopelessness, and the two shelving units for a
Potion of Hill Giant Strength, a
Potion of Invulnerability, a
Violet Potion, a
Potion of Agility, an
Oil of Speed, a
Potion of Absorption, a
Potion of Genius, and an
Antidote.
10 - Exit
This passageway is one of five that lead to and from
the fifth floor of the castle's dungeon.
11 - Portal Room
A Summoner, four Jackal Shaman, a couple of Jackal Warriors, and several Greater Jackals guard the dismantled portal, so prepare your party for a tough battle before entering the room. After the whole lot of them have been decimated, grab the suits of
Studded Leather Armor +2 and
Quarter Staves +1 from the Shaman corpses and the
Robe of the Evil Archmagi and
Ring of Protection +2 from the dead Summoner. You'll also find scrolls of Summon Shadow, Demishadow Monsters, Tenser's Transformation, and Monster Summoning VI in a crate along the south wall.
When you're ready, take a closer look at the portal. To activate it, you're going to need all five flawless gems produced by the Chest of Seasons on
the fifth floor of the castle's dungeon. Once all of the gems are in your inventory, begin placing them in the following order: Heaven - Star Sapphire, Day - Sunstone, Earth - Diamond, Sea - Waterstar, and Night - Moonstone. When all five gems are properly placed, you'll be awarded 30,000 experience points and the portal will hum to life. Take a moment to make sure your party is well rested, then walk through the portal to be teleported to the throne room on
Castle Maluradek's ground floor.
12 - Loot!
After dealing with the Sword Spiders that inhabit this hallway, ransack the recessed door and chest for six
Tranquil Bolts, seventeen
Arrows of Fire, a
Ring of Animal Friendship, and a
Long Bow of Marksmanship.
13 - Exit
This passageway is one of five that lead to and from
the fifth floor of the castle's dungeon.


