 Did we miss anything on this map? Is there something we didn't discover? Let us know!
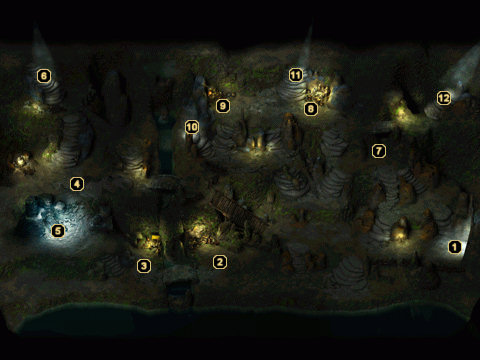
1 - Arrival
Did we miss anything on this map? Is there something we didn't discover? Let us know!
1 - Arrival
Unless you fully explored the top level of the island, this will most likely be your entrance point from the cave near Young Ned's boat. Five Barrow Wights and two Wailing Virgins will provide you with a not-so-warm welcome.
2 - Loot!
Slay the Wailing Virgin, Drowned Dead, and Barrow Wights infesting this section of the map and then search the two nearby containers for some gold, a Jade Ring, a couple of high quality weapons, and a
Small Shield +1.
3 - Loot!
You'll have to deal with two more Wailing Virgins, a few Drowned Dead, and a handful of Barrow Wights here. When you've taken out all the resistance, check the three nearby containers for some gold, two scrolls of Heal, a Yeti Pelt, twelve
Inferno Arrows +2, twenty
Fire Darts +2, a
Battle Axe +3: Fatigue, and a named axe called
Young Rage. Be careful, though, as two of the containers are trapped.
4 - Mebdinga
A Wailing Virgin named Mebdinga will confront your party here and proclaim that your presence is defiling Wylfdene's barrow. If you chat with her for a bit, you'll learn that she sacrificed herself to tend to Wylfdene in the afterlife. She also mentions that the barbarian leader has recently risen from the dead, but that it wasn't his spirit that inhabited the body.
Regardless of what you say to her, a battle is inevitable. Several Drowned Dead and a few more Wailing Virgins come to her aid, so expect a very difficult confrontation. When the battle has been won, check the two nearby containers for some gold, six gems, and scrolls of Holy Smite and Blade Barrier, then search Wylfdene's tomb at area #5 if you haven't already.
5 - Wylfdene's Tomb
If you've already dealt with Mebdinga at area #4, then you can plunder the gold and Wylfdene's Tribal Insignia from this tomb without a problem. However, if you haven't yet spoken to Mebdinga, then ransacking Wylfdene's tomb will cause Mebdinga and all surrounding undead to become hostile immediately. Once you have the insignia, you'll want to show it to Hjollder in the northwest corner of
Burial Isle 1.
6 - Exit
These stone steps lead to and from
Burial Isle 1. This exit has more significance than the others, though, since it leads you up to Hjollder's secluded island.
7 - Vexing Thoughts
This spectral suit of armor is actually a glabrezu known only as "Vexing Thoughts." He was summoned here as this suit of armor, but the one who conjured him forgot his true name so Vexing Thoughts slew him. If you feed him the "I shall command you, Vexing Thoughts!" line and then follow it up by telling the demon to submit to you so that you can wear him,
a cursed suit of Vexed Armor will appear in your inventory. If you put the armor on, a demon called Chalimandren will appear and kill the person wearing the armor. Slaying the creature with your remaining characters will earn you 12,000 experience points.
However, there's a better route to take here. If you have access to the 5th level mage spell Contact Other Plane, try casting it after you've initially spoken with Vexing Thoughts. A Planar Spirit will appear and you'll be given the option of asking what Vexing Thoughts' true name is. If you've already put the cursed version of the armor on, then the Planar Spirit's response of "Chalimandren" shouldn't be too surprising. Once you have acquired his true name, speak the name aloud to Vexing Thoughts and demand that the demon submit to your will. This will cause
the true Vexed Armor to appear in your inventory. And a fine suit of armor it is.
8 - Loot!
Once you've taken out the Barrow Wights guarding this area, you can search through the three nearby containers to grab yourself some gold, twelve Horn Coral Gems, a scroll of Protection From Cold, an
Elixir of Health, and
Svian's Club. Two of the containers are trapped, so utilize a thief if you have one in your party.
9 - Loot!
There are three more containers waiting to be plundered in this corner. Check their contents to uncover some gold, four Water Opals, some
Chainmail +1, a
Battle Axe +1, twenty-one
Arrows +2, a
Cloak of Displacement, and a named short sword called
Blood Iron. As usual, expect a trap or two.
10 - Exit
These stone steps lead to and from
Burial Isle 1.
11 - Exit
These stone steps lead to and from
Burial Isle 1.
12 - Exit
These stone steps lead to and from
Burial Isle 1.


