Did we miss anything in this location? Is there something we didn't discover?
Let us know!
Notes
Did we miss anything in this location? Is there something we didn't discover?
Let us know!
Notes
- The first time you rest in this level, you'll wake up to discover a fighter/thief named
Isharn Hammerfell trying to steal your food. Once caught, he'll offer to join your party in exchange for sausages. Unlike
Insal the Quick in EOB2, this encounter won't lead to anything later, so add
Isharn or not depending on how much you like him.
Isharn is a weak companion, but he might be the first one you meet, and so he might be useful for a while.
- Shadows can drain strength. This is a temporary effect. Resting will restore a strength-drained character to normal.
- Wights can drain levels. This is a permanent effect. The Rod of Restoration (#20) will return a level-drained character to their original level, but the character will still lose all of their xp from that level. So the best "remedy" for the effect is to load your game.
Enemies
Notable Loot
- Rod of Restoration (#20)
- Trident +3 "Reuko" (#6)
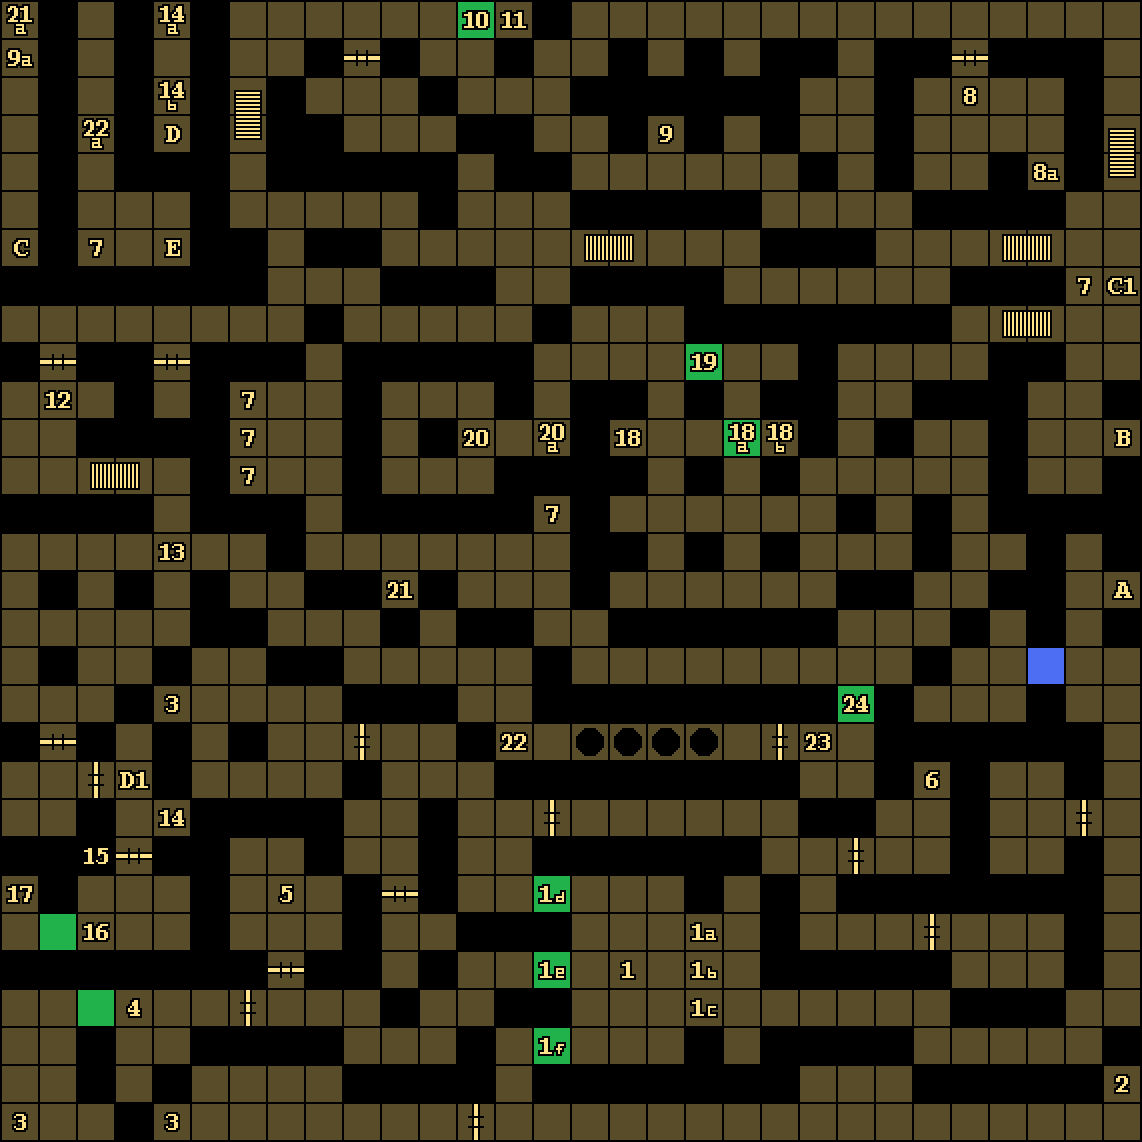
Annotations
1 - Pressure Plate
Stepping onto the pressure plate here (#1) will open one of the moveable walls to the west (and close the others):
- To open the wall at #1d, you must walk through #1a before stepping onto the pressure plate.
- To open the wall at #1e, you must walk through #1b before stepping onto the pressure plate.
- To open the wall at #1f, you must walk through #1c before stepping onto the pressure plate.
2 - Loot
On the ground here, you'll find a Mage Scroll of Fireball and two Rations.
3 - Rod Fragments
You'll find a Rod Fragment at each of these three places. You'll need the fragments for the Rod of Restoration (see #20).
4 - Button
If you press the button on the western wall here, then you'll remove the wall behind it.
5 - Loot
On the ground here, you'll find a Mage Scroll of Fireball, a Potion of Giant Strength, and Rations.
6 - Loot
On the ground here, you'll find a Cleric Scroll of Cure Serious Wounds, Rations, and the Trident +3 "Reuko."
7 - Closed Crypts
According to the Cluebook, opening up these crypts (by clicking on the bottom drawer) will cause enemies to spawn from them, but we've never seen anything actually appear.
8 - Poison Trap
When you enter this room (#8), the door will shut behind you, and you'll begin taking poison damage. You'll also get attacked by a few shadows and wights. To turn off the poison and re-open the door, you'll need to pull the lever in the back of the room (#8a).
9 - Trap
Pressing the button on the wall here (#9) will open the floor beneath you and drop you down into a sublevel (#9a).
10 - Moveable Wall
To remove the wall here, you'll just need to press the button on its western or southern face.
11 - Rod Orb
You'll find a Rod Orb on the ground here. You'll need the orb for the Rod of Restoration (see #20).
12 - Ambush
Every time you step here, you'll get attacked by two shadows (to the east) and two wights (to the west). This is an easy place to grind xp, if you feel so inclined.
13 - Muck
To the south and west of this position, you'll encounter a bunch of muck on the ground. This will slow your movement and probably annoy you greatly, but that's it.
14 - Trap / Holy Key
Pressing the button on the wall here (#14) will open the floor beneath you and drop you down into a sublevel (#14a). But while you're there, you'll find a Holy Key (#14b).
15 - Locked Door
You'll need a Holy Key (#14b) to open this door.
16 - Button
If you press the button on the western wall here, then you'll remove the wall behind it.
17 - Closed Crypt
If you open up this crypt, then Captain Fflar's Nameplate will drop to the floor. The nameplate is useful when you meet Fflar (#23), so be sure to pick it up.
18 - Lever / Crystal Wall
A plaque on the wall here (#18) will warn you not to touch the lever beneath it. If you do, then all metal equipment will be confiscated from your party and placed on the ground to the east (#18b), behind a crystal wall (#18a). If you pull the lever a second time, then the crystal wall will disappear, allowing you to collect your gear. At the same time, you'll get attacked by several shadows. If you have enough spells, then the shadow attacks shouldn't pose much of a problem. Otherwise, you'll have to grab some of the basic Clubs on the ground nearby and use them until you can get re-equipped. But really, there isn't any reason to pull the lever.
19 - Moveable Wall
To remove this wall, you'll need to press the button on its eastern or western face.
20 - Rod Monolith
If you insert the three rod fragments (#3) and the rod orb (#11) into the monolith here (#19), then a plaque will appear to the east (#19a). Clicking on the plaque will reveal that "faith restoreth the soul" -- and also cause the rod pieces to merge together to form the Rod of Restoration. The rod will then drop onto the floor in front of the monolith. You can use the rod to cast the Restoration spell, which will cure characters who have been energy drained by wights.
21 - Trap
Pressing the button on the wall here (#21) will open the floor beneath you and drop you down into a sublevel (#21a).
22 - Mysterious Ways Puzzle
If you read the plaque on the wall here (#22), then you'll see: "The spirit moves in mysterious ways." The pits involved in the puzzle, however, move in a very simple way. Just walk forward until there are two pits in front of you and then back up one space. The pits will disappear, allowing you to walk to the end of the hallway. If you manage to fall into a pit, then you'll land in a sublevel (#22a).
23 - Captain Fflar
You'll meet the ghost of Captain Fflar here. This is encounter can go in one of two ways:
- If you talk to Fflar, and if you have his nameplate (#17), then you'll convince him that he's dead, and he'll give you a Medallion of Friendship as a reward. Then he'll depart for the afterlife. This will earn each character in your party 50,000 xp. The medallion is useful but not required in the Forest Trail.
- Otherwise, you'll have to fight Fflar. This should be an easy battle, and your party will earn 3000 xp total for winning. But you won't get the medallion this way.
24 - Moveable Wall
To remove this wall, you'll need to press the button on its southern pace.
Exits
- Stairs up to
Level 1.
- Stairs up to
Level 1.
- One-way teleporter to C1.
- One-way teleporter to D1.
- One-way teleporter to #22.