Did we miss anything in this location? Is there something we didn't discover?
Let us know!
Notes
Did we miss anything in this location? Is there something we didn't discover?
Let us know!
Notes
- If you hit a living muck with a metallic weapon (which is almost all of them), then there's a good chance that it'll consume the weapon, and you'll lose it for good. So use spells against mucks. Ranged weapons are also safe to use, but it's not clear if they do any actual damage.
- Living mucks can also "hold" characters with their attacks, but this effect doesn't last very long.
Enemies
Notable Loot
- Long Sword +4 (#3)
- Mace +4 (#16)
Annotations
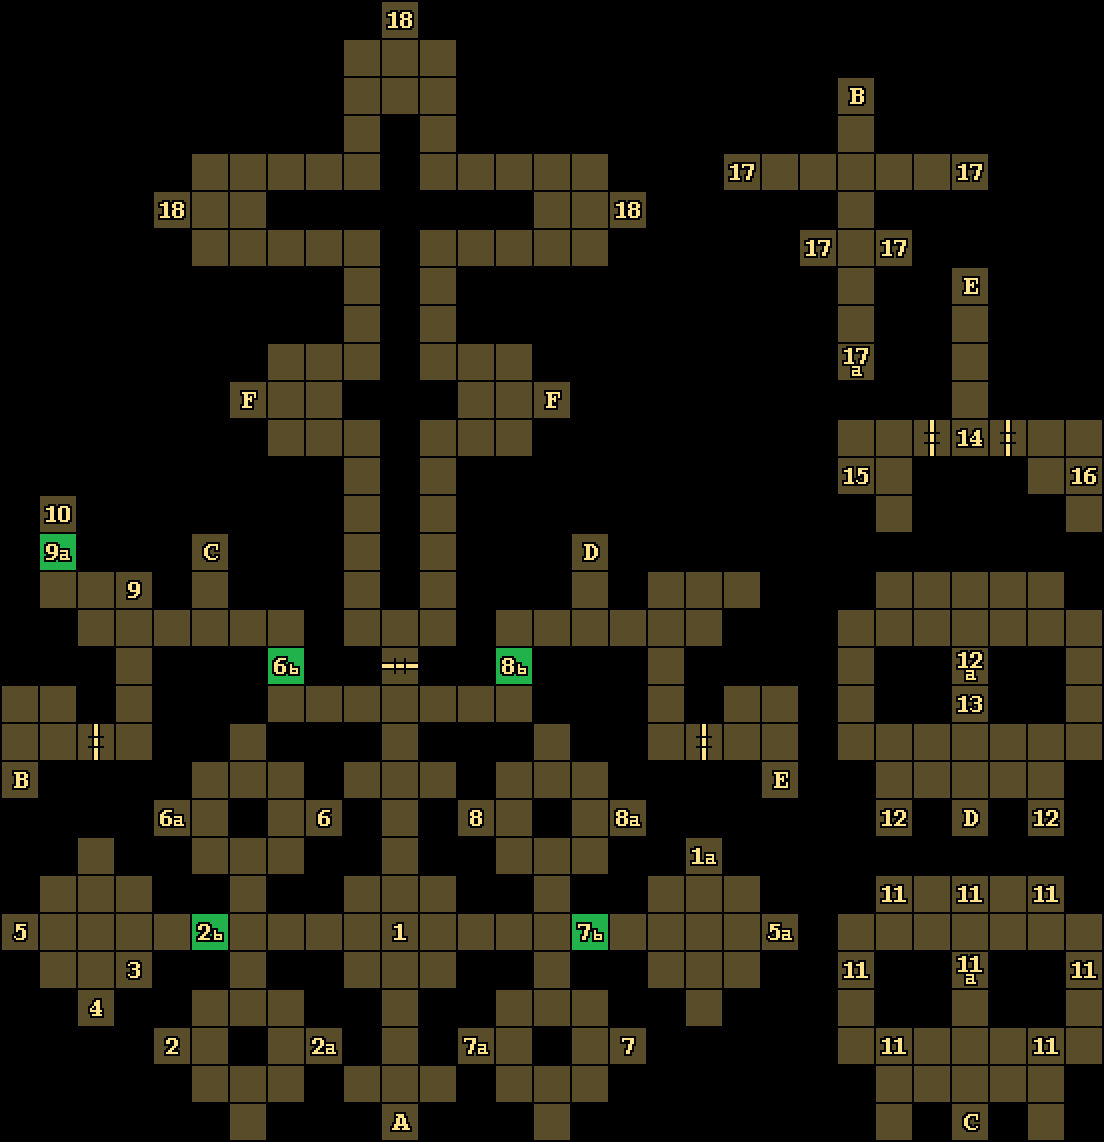
1 - Vandalized Fountain / Fountain Spout
You'll discover a vandalized fountain here (#1). To repair it, you'll need to pick up the nearby Fountain Spout (#1a) and use it on the fountain. Once repaired, clicking on the fountain will cast Prayer on the party.
2 - Altar / Plaque / Moveable Wall
The clue for the altar here (#2) can be found on the plaque to the east (#2a): "War is averted by forsaking the sword." When you place just about any weapon onto the altar (we only found maces not to work), a moveable wall to the north (#2b) will disappear. Afterwards, you'll be able to take back the weapon.
3 - Loot / Bags of Incense
On the ground here, you'll find four Bags of Incense and a Long Sword +4. You'll need incense for wall censers (#8, #12) on all four levels of the temple.
4 - Shelf / Golden Cup
You'll find a Golden Cup inside the shelf here. You'll need the cup for an altar (#6).
5 - Statues of Lathander
You'll find a statue of Lathander at these two places. The eastern statue (#5a) will start out broken, but conveniently you'll find its missing arm on the ground right next to it. When you repair the statue (by picking up the arm and using it on the statue), Lathander will make an appearance, and he'll thank you for what you've been doing in Myth Drannor. He'll then offer you his assistance: from this time forward, any time you click on one of his statues, he'll heal your party.
6 - Altar / Plaque / Moveable Wall
The clue for the altar here (#6) can be found on the plaque to the west (#6a): "Drought is dispelled with a drink of clear water." When you place the Golden Cup (#4) onto the altar, a moveable wall to the north (#6b) will disappear. Afterwards, you'll be able to take back the cup, but there isn't any reason to.
7 - Altar / Plaque / Moveable Wall
The clue for the altar here (#7) can be found on the plaque to the west (#7a): "Famine is driven away by the generous." When you place a food item (an Apple or Rations) onto the altar, a moveable wall to the north (#6b) will disappear. Afterwards, you'll be able to take back the item.
8 - Wall Censer / Plaque / Moveable Wall
The clue for the wall censer here (#8) can be found on the plaque to the east (#8a): "Pestilence is subdued with a waft of sweet air." When you place a Bag of Incense (#3) into the censer, the bag will be consumed and a moveable wall to the north (#8b) will disappear.
9 - Button / Moveable Wall
Pressing the button on the northern wall here (#9) will remove the moveable wall to the west (#9a).
10 - Shelf / Fire Key
You'll find a Fire Key inside the shelf here.
11 - Open Crypts
Closing all seven of these open crypts (#11) will cause a Holy Symbol to appear in the area (#11a). You'll need the Holy Symbol to reach Level 2 (see #18).
12 - Wall Censers
If you put a Bag of Incense (#3, #16) into these two wall censers (#12), then a Holy Symbol will appear on the ground to the north (#12a). You'll need the Holy Symbol to reach Level 2 (see #18).
13 - Tabitha
At this spot, you'll meet the paladin
Tabitha. She'll offer to join your party.
14 - Locked Doors
You'll need the Fire Key (#10) to open the doors to the east and west.
15 - Shields
You'll find four Shields on the ground here. You might need them elsewhere in the level (#17).
16 - Loot / Bags of Incense
On the ground here, you'll find an Arrow +2, two Bags of Incense, and a Mace +4.
17 - Pressure Plates
Weighting down these four pressure plates (#17) will cause a Holy Symbol to appear in the shelf to the south (#17a). But be careful. If you step onto the pressure plates or put anything onto them other than a shield, then you'll get hit by a fireball. If you use a shield, then nothing bad will happen to you. You can find four shields elsewhere in the level (#15). You'll need the Holy Symbol to reach Level 2 (see #18).
18 - Altars
These three altars will start out defiled by Black Holy Symbols. To cleanse the altars, you'll need to remove the Black Holy Symbols and replace them with regular Holy Symbols (#11, #12, #17). Once done, the exits from the level (Exits F) will start taking you up to
Level 2 rather than down to the Pit of Despair. If you end up in the Pit of Despair, then you'll have to load your game because there isn't any way to escape.
Note: To tell if an altar has been cleansed, look at Lathander's eyes. If they're open then the altar is clean.
Another Note: Don't use the Black Holy Symbols to cast spells. If you do, then the caster will die.
Exits
- Stairs down to the
Temple Quarter Ruins.
- Stairs.
- Stairs.
- Stairs.
- Stairs.
- Stairs down to the Pit of Despair or up to
Level 2 (see #18 for details).