 Did we miss anything in this location? Is there something we didn't discover?
Let us know!
Notes
Did we miss anything in this location? Is there something we didn't discover?
Let us know!
Notes
- Earth elementals can hit multiple characters with their punches, and they'll deal a lot of damage, so try not to go toe-to-toe with them. Instead, dance around them to avoid their attacks. You'll need +2 or better weapons to damage them.
- Water weirds resist slashing damage, but they're so wimpy you should be able to kill them easily, even with swords.
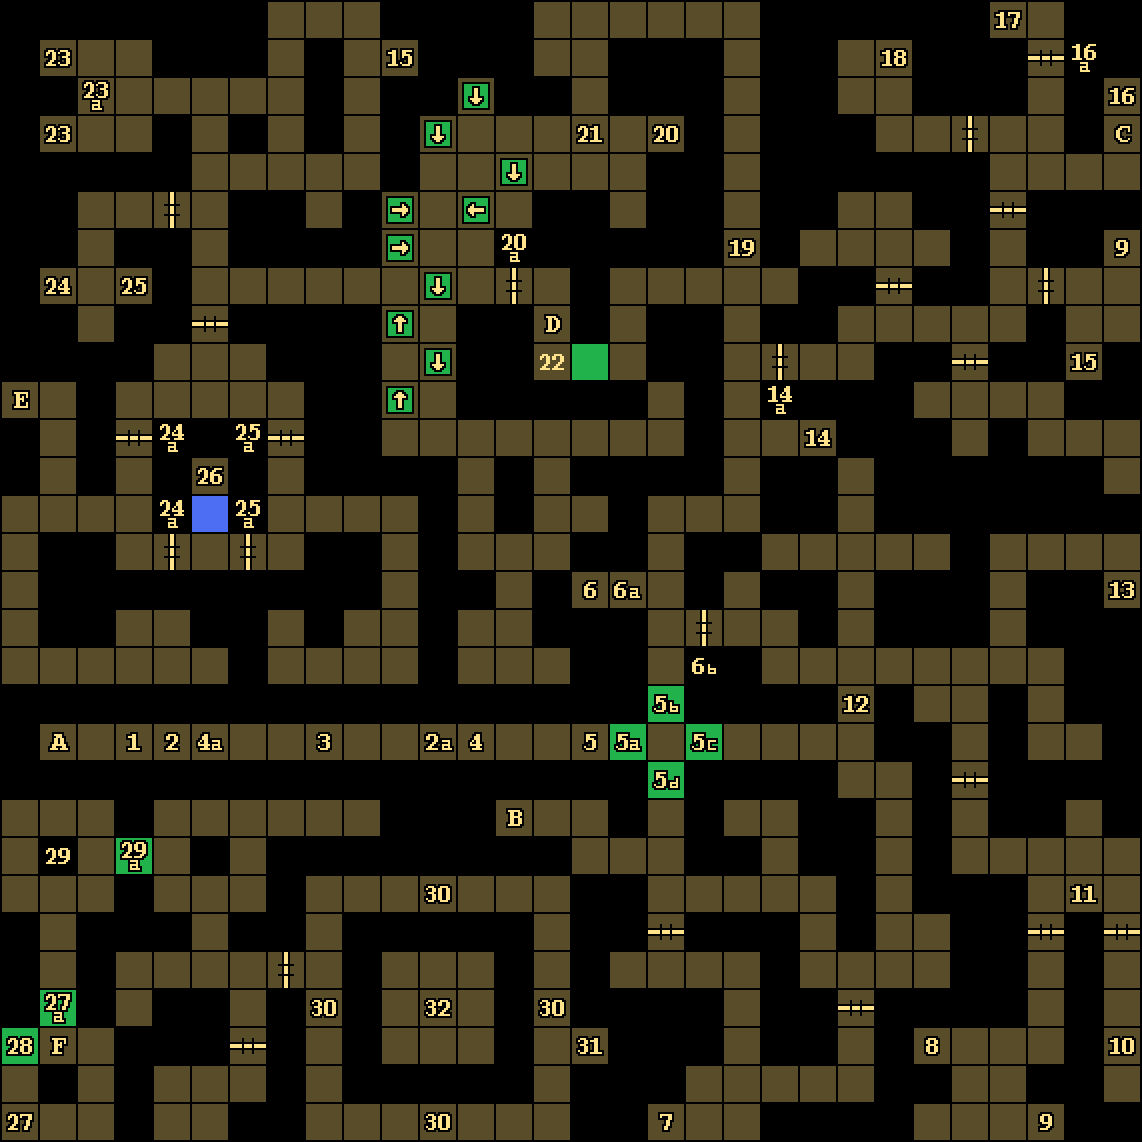
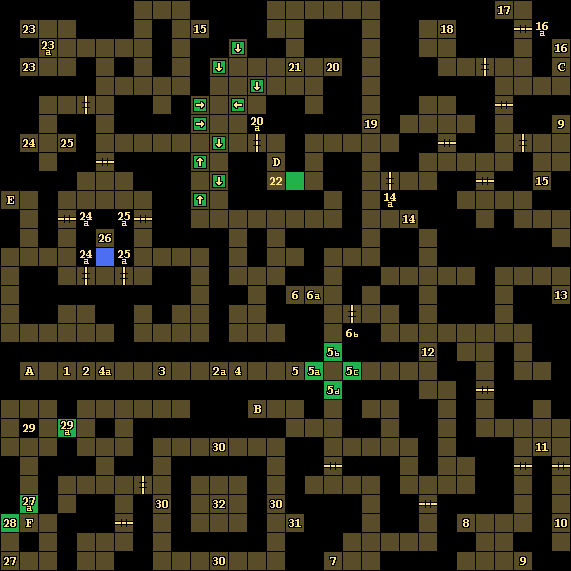
- There are four exits to
Level 4. The multi-key exit (Exit D) will take you to the main part of the level. The other exits (Exits B, C and E) will take you to isolated parts of the level where you'll find enemies and loot. All of Level 4 is submerged, so make sure you have some Water Breathing spells memorized.
- The southwestern part of this level is the final part of the guild, but you won't be able to reach it until you've explored Level 4.
Enemies
- Earth Elementals
- Water Weirds
Notable Loot
- Arrows +4 (#7)
- Elven Chain Mail +3 (#7)
- Leather Armor +4 (#8)
- Ring of Protection +3 (#8)
- Short Sword +3 (#8)
Annotations
1 - Grappling Hook
You'll find a Grappling Hook on the ground here. You'll need it for all of the grates leading to
Level 4 (Exits B-F)
2 - Teleporter Trap
If you step here (#2) while heading west, then you'll get teleported to the east (#2a).
3 - Shelves
You'll find a Blue Gem and a Red Gem in the shelves here (#3). If you read the nearby plaques (#3a), then you'll see that "the hand of the learned holds the key." If you have a mage hold the Blue Gem, then the eastern teleporter trap (#4) won't trigger. If you have a mage hold the Red Gem, then the western teleporter trap (#2) won't trigger.
4 - Teleporter Trap
If you step here (#4) while heading east, then you'll get teleported to the west (#4a).
5 - Button / Moveable Wall
If you press the button here (#5), then you'll rotate the nearby moveable wall (#5a-d) by 90 degrees, changing which hallway it's blocking.
6 - Button / Grate Trap / Locked Door
Pressing the button here (#6) will open the locked door to the east (#6b), but the grate trap next to the button (#6a) will prevent you from reaching it (since the trap will push you east). So to press the button, you'll need to throw something at it. Just be aware that you won't be able to retrieve the item later, so only throw something you don't need.
7 - Loot
On the ground here, you'll find two Arrows +4, Elven Chain Mail +3, and a cursed Robe -4.
8 - Loot
On the ground here, you'll find Leather Armor +4, a Ring of Protection +3, and a Short Sword +3.
9 - Scrolls
At these two places, you'll find Scrolls giving background information about Acwellan (#32) and Myth Drannor. To read a Scroll, just equip it and right-click on it.
10 - Mage Scrolls
On the ground here, you'll find several high-level mage scrolls: a Mage Scroll of Abi-Dalzim's Horrid Wilting, a Mage Scroll of Bigby's Clenched Fist, a Mage Scroll of Energy Drain, a Mage Scroll of Meteor Swarm, and a Mage Scroll of Power Word, Kill.
11 - Plaque
The plaque here will make it sound like you can only go through one of the two nearby doors, but that's not the case. You can go through both doors. Just be aware that opening either door will cause a fireball to shoot at you from the south. So open a door and then get out of the way.
12 - Magic Half Wall
You'll be able to walk through this square if you approach it from the north, but it'll be a solid wall if you approach it from the south.
13 - Shelf / Silver Key
You'll find a Silver Key inside the shelf here.
14 - Lever / Locked Door
Pulling the lever here (#14) will open the locked door to the north (#14a).
15 - Green Gems
You'll find a Green Gem at each of these two places.
16 - Button / Gate
Pressing the button on the western wall here (#16) will open the locked gate to the west (#16a).
17 - Shelf / Brass Key
Inside the shelf here, you'll find a Brass Key.
18 - More Mage Scrolls
You'll find several high-level mage scrolls here: two Mage Scrolls of Energy Drain, two Mage Scrolls of Meteor Swarm, a Mage Scroll of Power Word, Kill, and two Mage Scrolls of Time Stop. You'll also find a Potion of Speed.
19 - Lightning Bolt Trap
Each time you step here, a lightning bolt will shoot at you from the south. The lightning bolt isn't very fast, so you should be able to outrun it to the north and turn the corner before it can hit you.
20 - Cord
Pulling the cord here (#20) will open the locked door to the south (#20a).
21 - Grates and Grate Traps
To the west and south of this position, you'll encounter lots of grates, some trapped and some not. The trapped grates will damage your entire party and push you into a different square. These traps are represented on the map above as squares with an arrow inside (indicating the direction that they'll push you). The non-trapped grates are just shown as empty squares. There isn't any way to make it through the grate area unscathed -- especially since you'll encounter a few earth elementals wandering around -- so be sure to save before venturing into it.
22 - Lever / Moveable Wall
Pulling the lever on the western wall here will remove the wall to the east.
23 - Shelves / Crystal Key
Next to the shelves here (#23), you'll see a plaque reading, "An emerald for each shall yield the key." If you place a Green Gem (#15) into each shelf, then a Crystal Key will appear in the shelf to the east (#23a).
24 - Button / Locked Gates
Pressing the button here (#24) will open two locked gates to the south (#24a).
25 - Button / Locked Gates
Pressing the button here (#25) will open two locked gates to the south (#25a).
26 - Shelf / Copper Key
You'll find a Copper Key in the shelf here.
27 - Hidden Button
Pressing the hidden button on the southern wall here (#27) will remove the moveable wall to the north (#27a).
28 - Moveable Wall
This wall will follow you and only allow you to move in a clockwise direction.
29 - Pillar / Moveable Wall
On each side of this pillar (#29), you'll find a lock: crystal to the south, copper to the west, silver to the north, and brass to the east. You'll need to insert a Crystal Key (#23), Copper Key (#26), Silver Key (#13), and Brass Key (#17) into these locks -- all while dodging the arrows shooting along the sides of the pillar. Each time you insert a key, the arrow shooting on that side of the pillar will stop, and after inserting all four keys, the moveable wall to the east (#29a) will disappear, releasing a bunch of earth elementals to attack you.
For best results against the elementals, you should lead them back the way you came, attacking and retreating as you go. The moveable wall by the entrance grate (#28) will prevent elementals from attacking you on two sides while you lead them around in circles. The wall will also give you a chance to heal in between battles.
Note: The elementals will keep spawning in the room past the moveable wall (#29a), so if they're easy for you to kill, then this is a place when you can grind some xp.
30 - Shelves
At these four locations, you'll discover eight shelves containing a Ring of Protection -1, two Rings of Protection -2, a Ring of Protection -3, a Ring of Protection +1, two Rings of Protection +2, and a Ring of Protection +3 (already identified). You'll need these rings at the Balance Puzzle to the east (#31), so don't equip them.
31 - Balance Puzzle
In this puzzle, you'll need to "weigh" the Rings of Protection from the nearby shelves (#30) so each wall niche has the same number of rings and a total bonus of zero. There are various ways to do this, including:
- -1, -2, +1, +2 in one niche
- -2, -3, +2, +3 in the other niche
When you've successfully balanced the rings, you'll get teleported to Acwellan's lair (#32).
32 - Acwellan's Lair
This is where you'll meet Acwellan, an ancient lich. No matter what you say to him -- if you say anything at all -- the encounter will lead to a fight. Acwellan will immediately cast Mirror Image, but you'll only have to hit the images once to make them disappear. That means you should quickly be able to work out which image is the real Acwellan, and focus your attacks on him.
Acwellan is a spellcaster with all of the mage spells available to him, but he doesn't have a lot of hit points, and so you should be able to defeat him quickly. When Acwellan goes down, you'll discover that he was protecting the Codex from the Dark God, and with him out of the way, a minion of the Dark God will steal the Codex away. But before dying, Acwellan will direct you to stop the Dark God in his lair in the
Temple of Lathander, and he'll teleport you to the
Temple Quarter Ruins to help you out.
Exits
- Stairs up to
Level 2.
- Locked grate to an isolated part of
Level 4 where you'll find Plate Mail +2 and a Shield +3. To open this grate, you'll need to use a Silver Key (#13) on the grate's padlock and then use the Grappling Hook (#1) on the grate itself. You won't lose the key or the Grappling Hook.
- Locked grate to an isolated part of
Level 4 where you'll encounter several water elementals. To open this grate, you'll need to use a Brass Key (#17) on the grate's padlock and then use the Grappling Hook (#1) on the grate itself. You won't lose the key or the Grappling Hook.
- Locked grate to the main part of
Level 4. To open this grate, you'll need to use a Crystal Key (#23), a Brass Key (#17), and then a Silver Key (#13) on the grate's padlock, and then use a Grappling Hook (#1) on the grate itself. You won't lose the keys or the Grappling Hook.
- Locked grate to an isolated part of
Level 4 where you'll find a Long Sword +4. To open this grate, you'll need to use a Crystal Key (#23) on the grate's padlock and then use the Grappling Hook (#1) on the grate itself. You won't lose the key or the Grappling Hook.
- Grate from
Level 4. You'll only be able to reach this part of the level from
Level 4.