 Did we miss anything in this location? Is there something we didn't discover?
Let us know!
Enemies
Did we miss anything in this location? Is there something we didn't discover?
Let us know!
Enemies
- Bone Nagas
- Shambling Mounds
Notable Loot
- Arrows +3 (#21)
- Cloak of Protection +4 (#9)
- Gauntlets of Hill Giant Strength (#21)
- Shield +4 (#7)
- Short Sword +4 (#20)
- Two-Handed Sword +5 "Dhauzimmer" (#25)
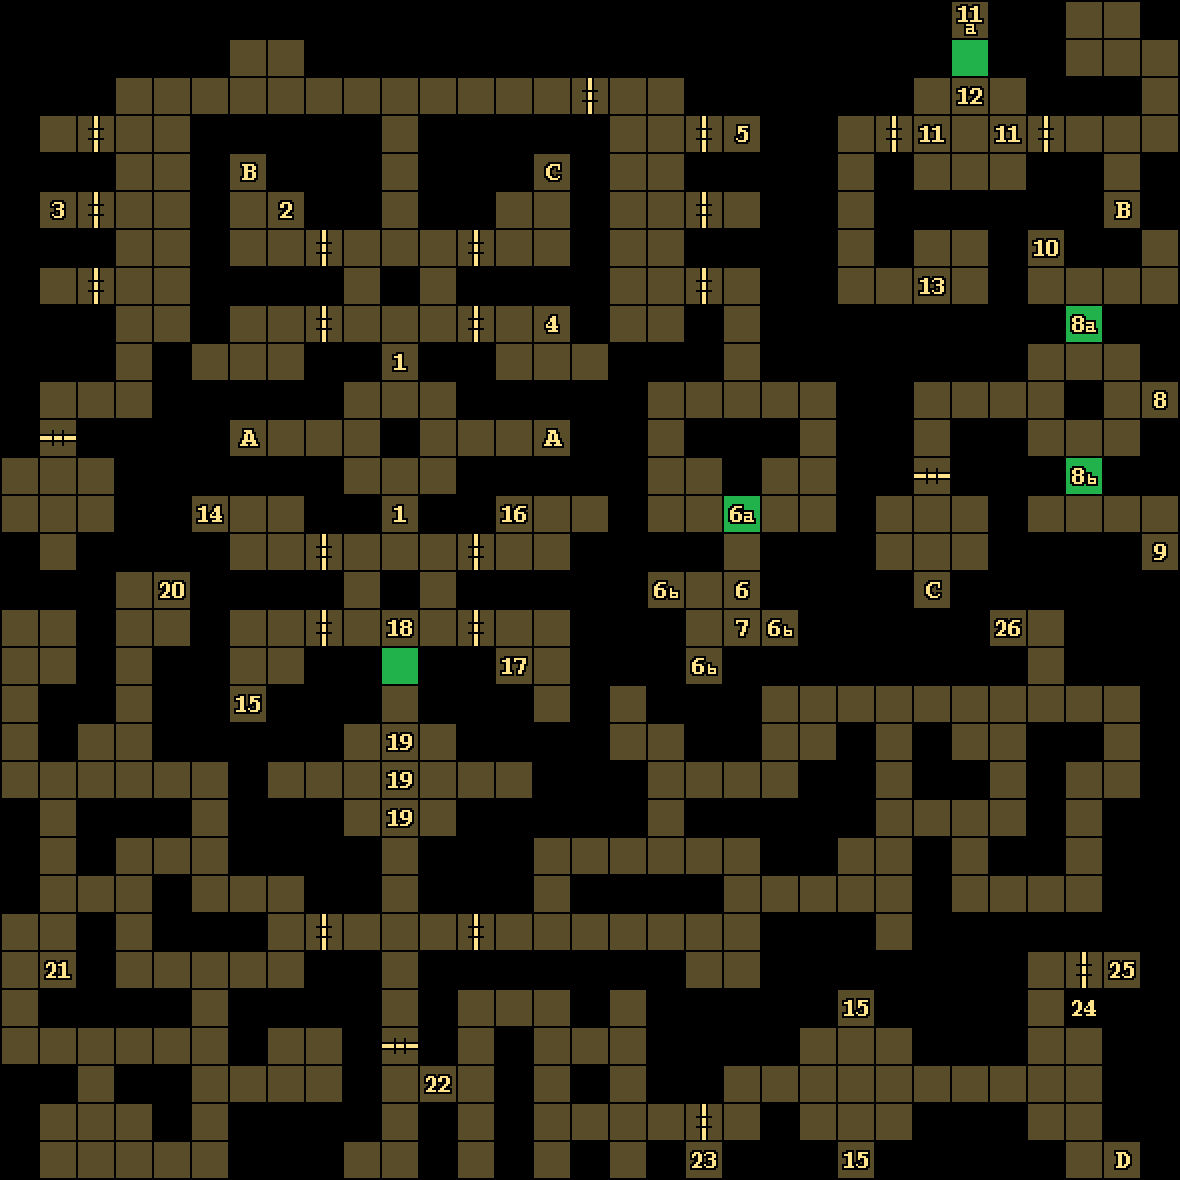
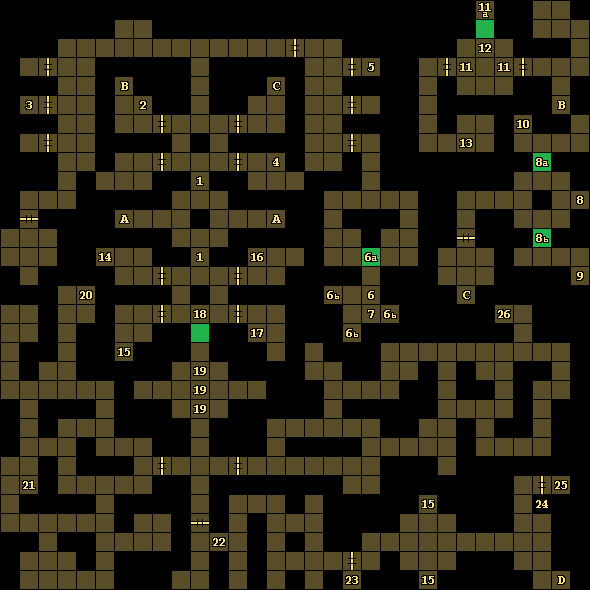
Annotations
1 - Spinners
You'll get rotated by 180 degrees when you step here.
2 - Cleric Scroll
You'll find a Cleric Scroll of Cure Serious Wounds on the ground here.
3 - Scroll
On the ground here, you'll find a Scroll containing a poem about Morning's Light, which you'll find later in the level (#26).
4 - Potion
You'll find a Potion of Healing on the ground here.
5 - Short Sword
You'll find a cursed Short Sword -4 on the ground here.
6 - Moveable Wall Puzzle
When you step here (#6), a moveable wall will spring up behind you (#6a), blocking the exit. To remove the wall, you'll need to place objects on the three nearby pressure plates (#6b). Of course, each time you do, a fireball will shoot at you. To avoid the damage, stand a square away from the pressure plates, throw an item at them, and then strafe to the left before the fireball gets to you.
7 - Loot
On the ground here, you'll find a Cleric Scroll of Raise Dead, a Mage Scroll of Disintegrate, a Potion of Speed, and a Shield +4.
8 - Hidden Buttons
Pressing the hidden button on the northern wall here (#8) will remove the moveable wall to the north (#8a). Pressing the hidden button on the southern wall here will remove the moveable wall to the south (#8b).
9 - Cloak
You'll find a Cloak of Protection +4 on the ground here.
10 - Plate Mail
You'll find cursed Plate Mail -4 on the ground here.
11 - Pressure Plates / Lever
Stepping onto either of these pressure plates (#11) will close the door right next to it. To reverse the pressure plates -- so they open the doors instead of closing them -- you'll need to pull the lever to the north (#11a).
12 - Hidden Button
Pressing the button on the northern wall here will remove the wall.
13 - Shambling Mounds / Gold Key
Right around here, you'll encounter three shambling mounds. One of them will drop a Gold Key when it dies.
14 - Wall Censer
Using a Bag of Incense (#16) on the wall censer here will Bless the party.
15 - Statues of Lathander
Touching any of these statues will grant the party a small amount of healing.
16 - Loot / Bags of Incense
On the ground here, you'll find two Bags of Incense and a Mage Scroll of Stone to Flesh.
17 - Sling
You'll find a regular Sling on the ground here.
18 - Hidden Button
Pressing the button on the northern wall here will remove the wall to the south.
19 - High Voltage Pressure Plates
Stepping onto any of these three pressure plates will cause Lightning Bolts to shoot at you from the east and west. The easiest way to survive these traps is to just run through them. The traps will only trigger once.
20 - Shelf / Frost Key
You'll find a Frost Key inside the shelf here. You'll also find a Short Sword +4 on the ground next to the shelf.
21 - Loot
On the ground here, you'll find two Arrows +3, Gauntlets of Hill Giant Strength (which will raise a character's strength to 19), and a Rock.
22 - Blessed Puzzle
If you read the plaque on the wall here, then you'll see: "Blessed are the pure of heart for they shall find the way." To the east of this position, you'll enter a 5x5 section of the level filled with spinners that will rotate you randomly each time you step on them. If you carefully watch your compass (or ASE if you're using that), then you should be able to make it to the end of the puzzle fairly easily. But the easiest solution is to cast Bless on your party. While Bless is active, the spinners won't do anything.
23 - Locked Door
You'll need a Frost Key (#20) to open this door.
24 - Locked Door
You'll need a Gold Key (#13) to open this door.
25 - Shelf
Inside the shelf here, you'll find Morning's Light, an object that doesn't appear to do anything. But when you pick it up, Lathander will visit you, and he'll give you the Two-Handed Sword +5 "Dhauzimmer," a weapon that can destroy undead creatures with a single hit. It's also the family sword of Delmair Rallyhorn (not that he'll say anything if he's in your party).
26 - Cleric Scroll
You'll find a Cleric Scroll of Cure Critical Wounds on the ground here.
Exits
- Stairs down to
Level 1.
- Stairs.
- Stairs.
- Stairs up to
Level 3.