 Did we miss anything in this location? Is there something we didn't discover?
Let us know!
Notes
Did we miss anything in this location? Is there something we didn't discover?
Let us know!
Notes
- Undead beasts hit hard, they resist slashing damage, and they're immune to fire damage. So keep some Lightning Bolts and Cones of Cold on hand for when you face them.
- Swordwraiths can drain strength. This is a temporary effect. Resting will restore a strength-drained character to normal.
- The game won't allow you to rest if there are monsters "nearby." At worst, you might need to retreat to the
Burial Glen to find a safe place for a nap.
Enemies
- Swordwraiths
- Undead Beasts
Notable Loot
- Dagger +3 (#27)
- Short Sword +2 (#7)
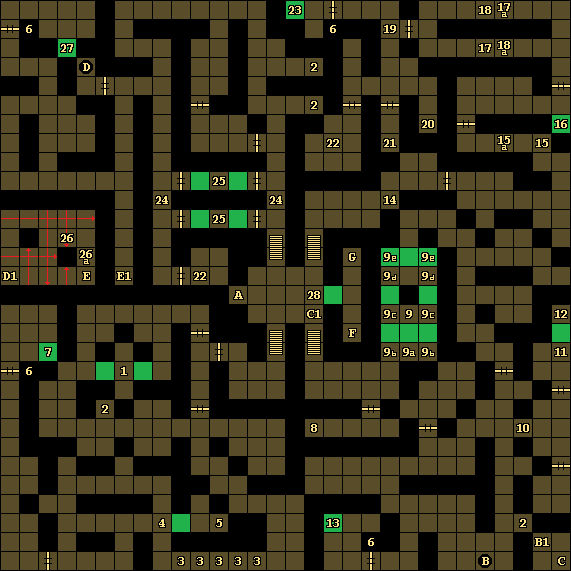
Annotations
1 - Undead Beast Ambush
When you arrive here, the space in front of you will turn into a wall, and undead beasts will appear on the other three sides. Since undead beasts hit hard and are hard to kill, this is a place where you might have trouble keeping your spellcasters alive. Luckily, you can just walk around the ambush and skip it entirely. But if you're feeling stubborn, then the best strategy is to immediately turn around and fight the undead beast behind you, and then move in that direction so you only have to fight the remaining two beasts one at a time.
2 - Open Crypts
Swordwraiths will regularly spawn at these crypts while they remain open. To close the crypts, just click on them.
3 - Pressure Plate Puzzle
You'll discover five pressure plates in a row in this hallway. If you read the plaque in front of them, then you'll see that "not all need weight." If you just try to walk across the pressure plates, then you'll get hit by fireballs, and you'll get teleported back to the start. To avoid this, you'll need to drop items onto the second, third, and fifth pressure plates. This will allow you to walk through the hallway unscathed.
4 - Button
If you press the button on the eastern wall here, then you'll remove the wall behind it.
5 - Cursed Sword / Holy Key
On the ground here, you'll find a Holy Key and the cursed Short Sword -2 "Maggot."
6 - Locked Doors
You'll need Holy Keys (#5, #12, #19, #26) to open these doors.
7 - Moveable Wall / Bone Lever / Short Sword
To remove the wall here, you'll need to press the button on its northern or western face. Removing the wall will reveal a bone lever. You'll need to pull this lever down to open up the way to
Level 2 (see #28).
In the square to the north of this position, you'll find a Short Sword +2.
8 - Mage Scroll
You'll find a Mage Scroll of Protection from Paralysis on the ground here.
9 - Lever Puzzle
You'll discover a series of levers (#9a-i) and moveable walls in this part of the level. You'll need to pull the levers in the correct order to remove the moveable walls to create a path to the north. A plaque in the middle of the puzzle (#9) for some reason contains a bit of poetry (from the play Cymbeline by William Shakespeare) -- "The scepter, learned, physic must all follow this and come to dust." -- but these words don't have anything to do with the puzzle.
To solve the puzzle, you should begin with all of the levers in the "up" position, and then pull them in the following order: #9a, both at #9c, both at #9b, both at #9c (up), both at #9d, both at #9e, both at #9d (up). There aren't any hints for this sequence. This is just a trial-and-error puzzle (and a way to encourage players to buy the Cluebook, back in the days before the Internet).
10 - Ambush
Every time you step here, four swordwraiths and an undead beast will spawn nearby and attack you.
11 - Button
Pressing the button on the northern wall here will remove the wall behind it.
12 - Holy Key
You'll find a Holy Key on the ground here.
13 - Moveable Wall / Bone Lever
To remove the wall here, you'll need to press the button on its southern or eastern face. Removing the wall will reveal a bone lever. You'll need to pull this lever down to open up the way to
Level 2 (see #28).
14 - Potion
You'll find a Potion of Giant Strength on the ground here.
15 - Pressure Plate / Lever
When you step onto the pressure plate here (#15), a spiked wall will (slowly) advance on you from the west. If the wall hits you, then it'll deal some minor damage. To prevent the wall from moving, you'll need to pull the lever to the west (#15a).
16 - Moveable Wall / Stuck Lever
To remove the wall here, you'll need to press the button on its northern face. You'll then find a stuck lever where the wall was. To pull the lever, you'll either need to drink a Potion of Giant Strength (#14) to force it, or you'll need to use Thieves' Tools to "pick" it. Pulling the lever will disable two nearby traps (#17, #18).
17 - Teleporter Trap
Stepping here (#17) will send you to the north (#17a) and rotate you by 180 degrees. You can turn off this trap by pulling a lever to the south (#16).
18 - Teleporter Trap
Stepping here (#18) will send you to the south (#18a) and rotate you by 180 degrees. You can turn off this trap by pulling a lever to the south (#16).
19 - Undead Beast / Holy Key
Somewhere around here, you'll encounter an undead beast that will drop a Holy Key when it dies.
20 - Trapped Scroll
You'll find a Cleric Scroll of Resist Fire on the ground here, but if you try to pick it up, then it will explode, damaging your entire party. There isn't any way to disarm the trap.
21 - Wand
You'll find a Wand of Wall of Force on the ground here.
22 - Loot (x2)
On the ground at these two places, you'll find a Cleric Scroll of Raise Dead, a Potion of Healing, and two Rations.
23 - Moveable Wall / Bone Lever
To remove the wall here, you'll need to press the button on its eastern face. Removing the wall will reveal a bone lever. You'll need to pull this lever down to open up the way to
Level 2 (see #28).
24 - Scroll / Plaques
At these two places, you'll discover a plaque on the wall advising you to "pray for the dead." On the ground next to the eastern plaque, you'll also find a Cleric Scroll of Prayer. The plaques are a clue for the nearby Prayer Traps (#25).
25 - Prayer Traps
When you step onto one of these two squares, moveable walls will spring up on either side of you, locking you in place. If you have a cleric in your party, then they'll suggest that you "atone" for angering the undead. You'll also get a clue for the traps from two nearby plaques (#24). To escape, you'll just need to cast Prayer, including from a scroll. This will remove the two moveable walls and allow you to continue on. Triggering one of the traps will deactivate the other one, so you'll only need to cast Prayer once.
26 - Safety Lever / Holy Key
Pulling the lever here (#26) will turn off the nearby fireball traps (shown as red lines on the map above), cause a Holy Key to appear to the east (#26a), and activate the exit teleporter (Exit E).
27 - Moveable Wall / Bone Lever
To remove the wall here, you'll need to press the button on its northern face. Removing the wall will reveal a bone lever. You'll need to pull this lever down to open up the way to
Level 2 (see #28).
On the ground just to the north of the wall, you'll find a Dagger +3.
28 - Plaque
The plaque on the wall here will give you a clue: "Four bones down will show the way." If you pull down the four bone levers in the level (#7, #13, #23, #27), then the moveable wall behind the plaque will disappear, revealing two exits to
Level 2 (Exits F, G).
Exits
- Stairs up to the
Burial Glen.
- Hidden pit. Dropping down here will take you to B1.
- One-way teleporter to C1.
- Pit. Dropping down here will take you to D1.
- One-way teleporter to E1. You'll need to pull a lever (#26) for this teleporter to appear.
- Stairs down to the southern part of
Level 2. This is the exit you should use first.
- Stairs down to the northern part of
Level 2.


