 Did we miss anything in this location? Is there something we didn't discover?
Let us know!
Enemies
Did we miss anything in this location? Is there something we didn't discover?
Let us know!
Enemies
- Death Knights
- Shadow Hounds
Notable Loot
- Hammer of Throwing +3 (#6)
- Magic Staff +4 (#1)
- Spear +4 (#6)
Annotations
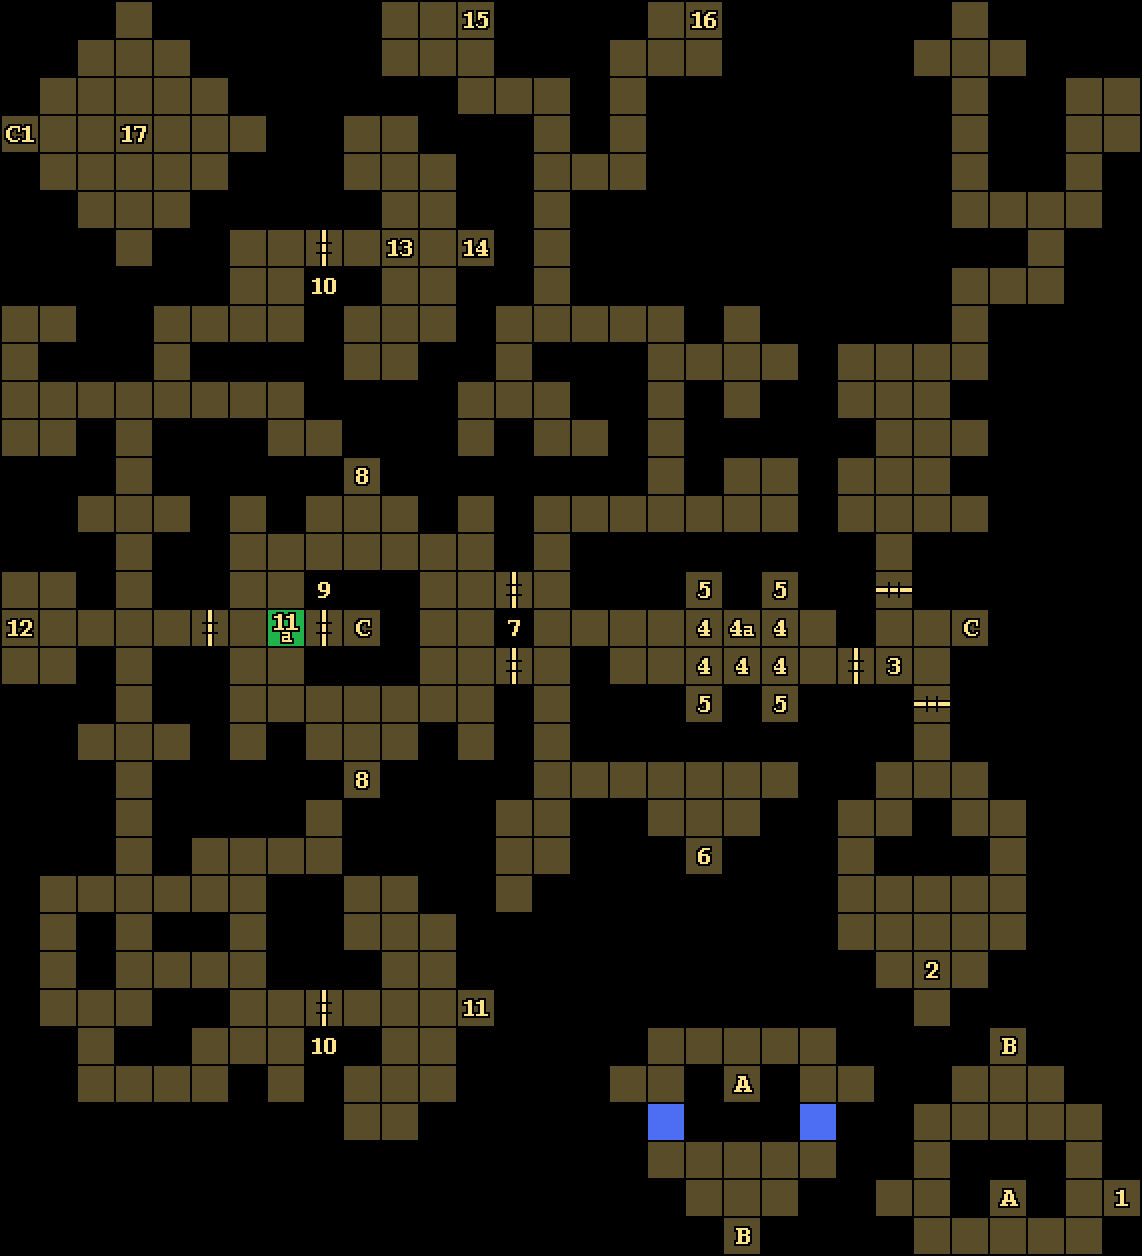
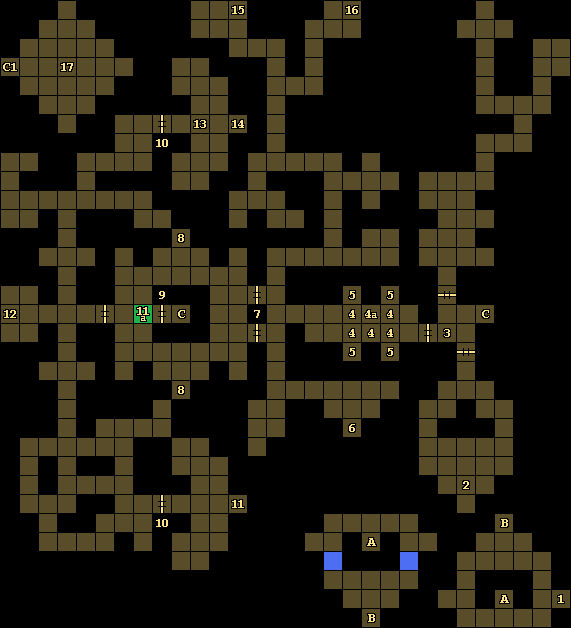
1 - Loot
On the ground here, you'll find a Cleric Scroll of Resurrection and a Magic Staff +4.
2 - Fountain / Crystal Key
Clicking on this fountain will give you the Prayer spell. If you toss a Coin (#15) into the fountain, then a Crystal Key will appear in the shelf right next to it, but two shadow hounds will also spawn nearby and attack you.
3 - Plaque / Door Puzzle
The plaque here will tell you, "Against these gates neither stealth nor sword nor prayer shall prevail." High strength and keys won't work, either. To get the doors open, you'll just need to cast Dispel Magic somewhere in the room with the plaque. But be aware: when the doors open, groups of shadow hounds will probably rush into the room (from the north) and attack you.
4 - Pressure Plates / Crystal Key
Stepping onto any of these squares will cause nearby lightning bolt traps (#5) to fire. If you move quickly enough, then you should be able to dodge the bolts and avoid taking damage. In one of the squares (#4a) you'll find a Crystal Key.
5 - Lightning Bolt Traps
These traps are triggered by nearby pressure plates (#4).
6 - Loot
On the ground here, you'll find a Hammer of Throwing +3 (which returns to the user) and a Spear +4.
7 - Locked Doors
You'll need a single Crystal Key (#2, #4a, #16) to open the two doors adjacent to this square.
8 - Basins of Holy Water
Each time you click on either of these basins, you'll receive "the blessing of Lathander's spirit," which will only last until you take damage. You'll need the blessing to pass through Lathander's Ward (#13).
9 - Locked Door
To open this door, you'll need to use the Sun Mask (#12) on it.
10 - Locked Doors
You'll need a Crystal Key (#2, #4a, #16) to open these two doors.
11 - Shadow of Death / Moveable Wall
You'll find a dark statue here called the Shadow of Death. If you click on it, then your entire party will take damage. To destroy the statue, you'll need to touch it with the Staff of Life (#14). When you do, a moveable wall to the north (#11a) will disappear.
12 - Sun Mask
Hanging on the wall here, you'll find a Shield +3 "Sun Mask." But it's not something for you to equip (or at least not for long). You'll need it to open a door to the east (#9).
13 - Lathander's Ward
You'll only be allowed to pass through this square if you have Lathander's Blessing (from #8).
14 - Staff of Life
On the ground here, you'll find the Staff of Life. You'll need it to destroy the Shadow of Death (#11). When you pick up the staff, a group of shadow hounds will appear nearby and attack you.
15 - Loot / Coin
On the ground here, you'll find a Coin and a Mage Scroll of Disintegrate. You'll need the Coin for the fountain near the entrance to the level (#2).
16 - Shelf / Crystal Key
Inside the shelf here, you'll find a Crystal Key and a Mage Scroll of Fireball.
17 - Dark God's Lair
You'll encounter the Dark God when you enter this chamber. He'll have two death knights and two shadow hounds with him. You should take out those creatures right away and then focus on the god. The Dark God will cast a variety of mage spells on you, but they'll mostly be from levels 1-3: Fireball, Hold Person, Melf's Acid Arrow, and the like. So dance around the god to avoid taking damage, and then whack him when you get a chance. Or just go toe-to-toe with him. The battle should not be too difficult to win.
Afterwards, you'll be summoned out of the lair, and you'll be named Knights of Myth Drannor! Congratulations for completing Eye of the Beholder III!
Exits
- Stairs down to
Level 3.
- Teleporter to
Level 3.
- One-way teleporter to C1.